Quantcast
Channel: rtrouton – Der Flounder
Viewing all 764 articles
Browse latest View live

Installer package identifiers and the mystery of the missing Java 11 files

$
0
0

As part of developing new AutoPkg recipes to support SapMachine‘s new Long Term Support (LTS) distribution for Java 17, I ran into a curious problem when testing. When I ran the SapMachine Java 17 LTS installer that was being generated by AutoPkg, I was seeing the following behavior:

  • SapMachine Java 17 LTS is installed by itself – no problem
  • SapMachine Java 17 LTS installed, then SapMachine Java 11 LTS is installed – no problem
  • SapMachine Java 11 LTS installed, then SapMachine Java 17 LTS is installed – SapMachine Java 11 LTS is removed, only SapMachine Java 17 LTS is installed now.

I double-checked the preinstall script for the SapMachine Java 17 LTS installer. It is supposed to remove an existing SapMachine Java 17 LTS installation with the same version info, but it should not have also been removing SapMachine Java 11 LTS. After a re-review of the script and additional testing, I was able to rule out the script as the problem. But what was causing this behavior? Also, why was it happening in this order?

  • SapMachine Java 11 LTS installed, then SapMachine Java 17 LTS is installed

But not this order?

  • SapMachine Java 17 LTS installed, then SapMachine Java 11 LTS is installed

The answer was in how the package’s package identifier was set up. For more details, please see below the jump.

When I was writing the AutoPkg .pkg recipes for SapMachine Java 17 LTS, I used the existing SapMachine Java 11 LTS .pkg recipe as a template. Included with that recipe was the following:

<key>id</key>
<string>net.java.openjdk.sapmachine</string>
view raw
gistfile1.txt
hosted with ❤ by GitHub

For AutoPkg’s PkgCreator processor, this defines the package identifier.

I didn’t change that. That was a mistake, because that meant that Apple’s Installer was going to see SapMachine Java 17 LTS as an upgrade install for an existing SapMachine Java 11 LTS installation. Why is this important?

When macOS’s Installer does an upgrade install, it does the following:

  1. Consults its store of existing installer package receipts.
  2. Identifies if it has a receipt by a previous installer with a matching package identifier. If multiple receipts are found, the latest installed is used.
  3. Uses the Bill of Materials (BOM) stored with the receipt to generate a list of files which are in the receipt’s BOM and are not part of the new installer’s BOM.
  4. Removes the files in question.
  5. Adds the files from the current installer.

Note: Files added, removed or changed outside of the main installation process will not be included in the BOM. Since these files are not included in the BOM’s listing, the installer process will not move, change or delete these files. Examples of files not included or tracked by the BOM would be files added or moved by an installer package’s preinstall or postinstall scripts.

From Installer‘s point of view, the two packages were identified this way:

SapMachine Java 11 LTS

  • Identifier: net.java.openjdk.sapmachine
  • Version: 11.xx.xx

SapMachine Java 17 LTS

  • Identifier: net.java.openjdk.sapmachine
  • Version: 17.xx.xx

That meant that, on a Mac where SapMachine Java 11 LTS had been installed previously using an installer package with the net.java.openjdk.sapmachine package identifier, Installer interpreted the SapMachine Java 17 LTS install as being an upgrade for SapMachine Java 11 LTS.

In those conditions, Installer performs the following actions:

  1. Consults the existing installer package receipts.
  2. Identifies the latest version of the SapMachine Java 11 LTS receipt with a matching net.java.openjdk.sapmachine package identifier.
  3. Generates a list of the files installed by the SapMachine Java 11 LTS installer package, using the SapMachine Java 11 LTS receipt’s BOM, and identified those files which were not included in the SapMachine Java 17 LTS installer package’s BOM.
  4. Removes those files.
  5. Adds the files from the SapMachine Java 17 LTS installer.

The effect is that SapMachine Java 11 LTS’s files were automatically removed when SapMachine Java 11 LTS is installed first and then SapMachine Java 17 LTS is subsequently installed.

The fix? Make sure the SapMachine Java 17 LTS installer package has a different package identifier.

As I was using AutoPkg to build the installer package in question, I could include variables as part of the package identifier to help ensure the package identifier would be unique for each version of the SapMachine Java 17 LTS installer package.

<key>id</key>
<string>net.java.openjdk.sapmachine.universal.%version%.%BUILD_NUMBER%</string>
view raw
gistfile1.txt
hosted with ❤ by GitHub

For example, for SapMachine Java 17.35 LTS, the package identifier looks like this in the AutoPkg-created installer package:

<key>id</key>
<string>net.java.openjdk.sapmachine.universal.17.35</string>
view raw
gistfile1.txt
hosted with ❤ by GitHub

Using AutoPkg to create an installer package for SAP GUI

$
0
0

I’ve previously posted guides on how to manually package SAP GUI:

However it’s also possible to automate creating a SAP GUI installer package using AutoPkg. To do this, you’ll need the following:

  1. AutoPkg
  2. The SAP GUI recipes from the rtrouton-recipes repo
  3. The latest SAP GUI installer application’s disk image
  4. A SAP GUI templates.jar file (optional)

For more details, please see below the jump.

The AutoPkg recipes I’ve written will need the following information provided:

  • SAP GUI’s numeric information
  • SAP GUI’s alphanumeric information
  • SAP GUI’s application bundle identifier information

None of this information is available from the installer application, so you’ll need to provide it to AutoPkg using a com.sapgui.identifier.plist file which will be included along with the latest SAP GUI installer application’s disk image. Please see below for how to gather this information.

Preparing SAP GUI for AutoPkg

1. Copy the latest SAP GUI installer application’s disk image to a test Mac or virtual machine.

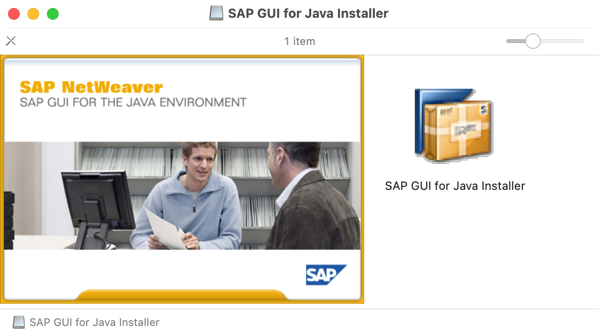
2. Mount the disk image and launch the SAP GUI for Java Installer installer application on the test Mac or virtual machine.

Screen Shot 2021 07 22 at 2 16 27 PM

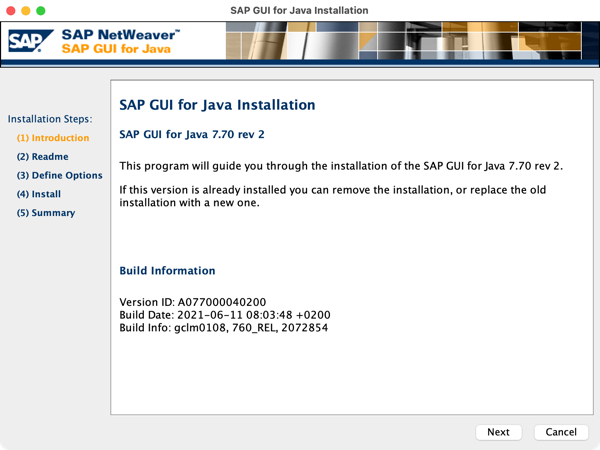
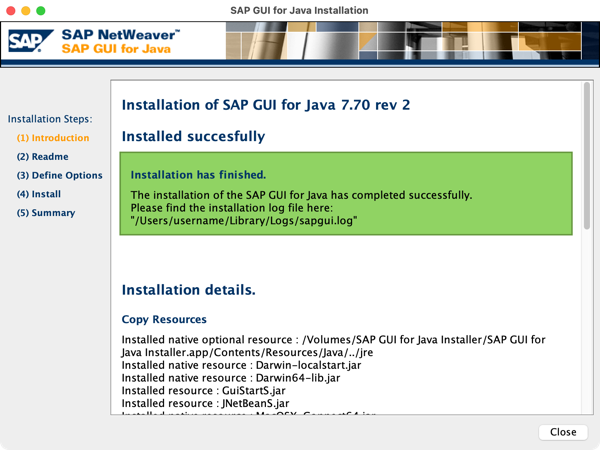
3. Follow the prompts to install.

Screen Shot 2021 07 22 at 2 16 55 PM

Screen Shot 2021 07 22 at 2 17 20 PM

Screen Shot 2021 07 22 at 2 17 32 PM

Screen Shot 2021 07 22 at 2 17 56 PM

4. Once installed, run the following command to get SAP GUI’s alphanumeric version.

defaults read "/Applications/SAP Clients/SAPGUI $version/SAPGUI $version.app/Contents/Info.plist" NSHumanReadableCopyright | awk '{print $2$3$4}'

For example, if this is SAPGUI 7.70rev2, use the following command:

defaults read "/Applications/SAP Clients/SAPGUI 7.70rev2/SAPGUI 7.70rev2.app/Contents/Info.plist" NSHumanReadableCopyright| awk '{print $2$3$4}'

Screen Shot 2021 07 22 at 2 34 18 PM

5. Once you have the alphanumeric version, run the following command to get SAP GUI’s numeric version.

defaults read "/Applications/SAP Clients/SAPGUI $version/SAPGUI $version.app/Contents/Info.plist" CFBundleShortVersionString

For example, if this is SAPGUI 7.70rev2, use the following command:

defaults read "/Applications/SAP Clients/SAPGUI 7.70rev2/SAPGUI 7.70rev2.app/Contents/Info.plist" CFBundleShortVersionString

Screen Shot 2021 07 22 at 2 35 47 PM

6. Once you have both versions, run the following command to get SAP GUI’s bundle identifier:

defaults read "/Applications/SAP Clients/SAPGUI $version/SAPGUI $version.app/Contents/Info.plist" CFBundleIdentifier

For example, if this is SAPGUI 7.70rev2, use the following command:

defaults read "/Applications/SAP Clients/SAPGUI 7.70rev2/SAPGUI 7.70rev2.app/Contents/Info.plist" CFBundleIdentifier

Screen Shot 2021 07 22 at 2 45 12 PM

7. Open Terminal and run the following command to create a com.sapgui.identifier.plist file with the alphanumeric version information for SAP GUI:

defaults write /path/to/com.sapgui.identifier AlphanumericVersionString version_info_goes_here

For example, if the SAP GUI alphanumeric version is 7.70rev2, run the following command to create a com.sapgui.identifier.plist file on the Desktop:

defaults write $HOME/Desktop/com.sapgui.identifier AlphanumericVersionString 7.70rev2

Screen Shot 2021 07 22 at 2 49 14 PM

8. Run the following command to add the numeric version information for SAP GUI to the com.sapgui.identifier.plist file:

defaults write /path/to/com.sapgui.identifier CFBundleShortVersionString version_info_goes_here

For example, if the SAP GUI numeric version is 770.4.200, run the following command

defaults write $HOME/Desktop/com.sapgui.identifier CFBundleShortVersionString 770.4.200

Screen Shot 2021 07 22 at 2 59 28 PM

9. Run the following command to add the bundle identifier information for SAP GUI to the com.sapgui.identifier.plist file:

defaults write /path/to/com.sapgui.identifier CFBundleIdentifier bundle_identifier_info_goes_here

For example, if the SAP GUI bundle identifier is com.sap.platin, run the following command

defaults write $HOME/Desktop/com.sapgui.identifier CFBundleIdentifier com.sap.platin

Screen Shot 2021 07 22 at 2 58 32 PM

10. Once the com.sapgui.identifier.plist file is created and populated with the version and bundle identifier information, copy it to a convenient location along with the latest SAP GUI installer application’s disk image.

11. If you’re planning to include a templates.jar file with the SAP GUI installer, copy the templates.jar file to the same location.

Screen Shot 2021 06 18 at 12 12 51 PM

12. Create a .zip file of the following files:

  • corp.sap.sapgui.identifier.plist
  • Latest SAP GUI installer application’s disk image
  • templates.jar (if applicable)

For this example, I’m going to use the following filename for the .zip file:

latestsapgui.zip

This .zip file will be what’s used by AutoPkg to create the SAP GUI installer package.

Screen Shot 2019 10 09 at 11 30 35 AM


Using the AutoPkg recipes

To accomodate the fact that some folks will have a templates.jar file which they want to include and some folks won’t, I’ve written two sets of .pkg recipes:

  • SAPGUIWithTemplate.pkg – Use when you’re using a templates.jar file
  • SAPGUIWithoutTemplate.pkg – Use when you’re not using a templates.jar file

Both sets of recipes share a common SAPGUI.download recipe.

SAP GUI does not have a publicly accessible download link, so there are two options available for adding the .zip file you created earlier to your AutoPkg workflow:

1. Posting the .zip file to a web server for download.

You can upload the .zip file to a web server or other online storage location which AutoPkg can download files from. This is my preferred method because you can set the download URL in an AutoPkg override. Once that’s done, you just need to replace the .zip file on the web server when a new version of SAP GUI comes out. The next time it’s run, AutoPkg will download the new .zip file and handle the rest automatically.

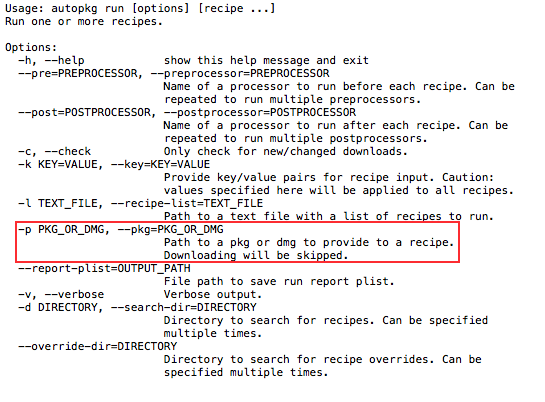
2. Using AutoPkg’s -p option.

AutoPkg includes an -p option for specifying a file for input, in place of downloading from a URL.

Screen shot 2015 01 26 at 7 36 26 am

For example, if you wanted to run the SAPGUIWithTemplate.pkg recipe and use a .zip file stored locally on your Mac, you would use the following command to run an AutoPkg override of the SAPGUIWithTemplate.pkg recipe and specify a .zip file named latestsapgui.zip:

autopkg run local.pkg.SAPGUIWithTemplate -p /path/to/latestsapgui.zip

Once you’ve sorted out how you’re adding the .zip file you created to your AutoPkg workflow, you should be able to use these recipes to create SAP GUI installer packages for use in your own environment.

For those who want to use code signing to sign the SAP GUI installers created by AutoPkg, I’ve also created the following .sign recipes:

SAPGUIWithTemplate.sign – Use when you’re using a templates.jar file
SAPGUIWithoutTemplate.sign – Use when you’re not using a templates.jar file

Each .sign recipe uses the appropriate .pkg recipe as a parent recipe.

Slides from the “AutoPkg in the Cloud” session at Jamf Nation User Conference 2021

Disabling the Erase All Contents and Settings function on macOS Monterey

$
0
0

As part of macOS Monterey, Apple has introduced the Erase All Contents and Settings function to macOS for Apple Silicon Macs. In my Monterey testing, this setting was very useful because it enabled me to reset my Mac to a factory default condition without having to spend extra time wiping the drive and installing a fresh copy of macOS.

Screen Shot 2021 10 14 at 9 46 35 AM

However, having this functionality available may not desired in all environments. For Mac admins supporting these environments, Apple has provided a new profile management option, as part of the Restrictions payload, which disables the Erase All Contents and Settings functionality on Apple Silicon Macs.

Screen Shot 2021 10 14 at 10 14 39 AM

For more details, please see below the jump.

I’ve written a profile to disable Erase All Contents and Settings functionality which does the following:

1. Removes the Erase All Contents and Settings… menu option from the System Preferences option.

Screen Shot 2021 10 14 at 9 47 17 AM

2. Blocks the Erase Assistant app from running.

Note: When the profile is installed, the Erase Assistant app will show the following message:

Erase Assistant is not supported on this Mac.

Screen Shot 2021 10 14 at 9 56 16 AM

In order to apply this profile, there are some pre-requisites:

  • User Approved Mobile Device Management (UAMDM) must be enabled on the target Mac.
  • Profile must be installed by an MDM server.

Those pre-requisites also apply to deploying this profile, which is available via the link below:

https://github.com/rtrouton/profiles/tree/main/DisableEraseAllContentsAndSettings

When deployed, the profile should appear similar to this in System Preference’s Profiles preference pane.

Screen Shot 2021 10 14 at 9 49 29 AM

Silently uninstalling system extensions on macOS Monterey and earlier

$
0
0

As part of the move from using kernel extensions to system extensions, there is an issue which can be a problem for Mac admins: Uninstalling a system extension from the command line usually involves a GUI window popping up and requesting admin authorization.

Screen Shot 2021 10 26 at 8 25 37 AM

This can be a problem for admins because it requires the logged-in user to:

  • Have admin rights.
  • Understand what the dialog is telling them.
  • Be willing to enter admin credentials when prompted.

For macOS Monterey, this issue has been addressed by the addition of the RemovableSystemExtensions property to the com.apple.system-extension-policy profile payload. This is used to identify system extensions which can be deactivated without requiring admin authorization.

Screen Shot 2021 10 26 at 11 41 26 AM

However, the RemovableSystemExtensions property is new in macOS Monterey and does not apply to macOS Big Sur and earlier. In the past, Mac admins have dealt with this issue through user education, providing warnings like the one shown below, or (in macOS 11.3 and later) removing the profile which authorized the system extension. In the latter case, removing authorization will also unload the system extension.

Screen Shot 2021 10 26 at 8 24 59 AM

However, there is a way to bypass the admin authorization. For more details, please see below the jump.

There are two parts to being able to silently uninstall a system extension. The first is that the app developer must have written into their code signed app a way to trigger Apple’s uninstall API for system extensions. An example of this can be found in the code of the open source Santa tool created by Google:

https://github.com/google/santa/blob/d2b6c2b6c2de33ba2267c54f9affcbf592046050/Source/santa/main.m#L64-L78

For Santa, this functionality can be triggered from the command line by running the following command:

/Applications/Santa.app/Contents/MacOS/santa --unload-system-extension

This call to Apple’s uninstall API must be from the same code-signed app which is using the system extension. Other applications or functions trying to call the uninstall function from outside the app will not be authorized to uninstall the system extension.

Assuming that the code is included in the app to trigger Apple’s uninstall API for system extensions, the next step is found in the authorization database as the setting which controls whether or not the logged-in user is prompted for admin credentials is located there. Running the following command should show the setting:

security authorizationdb read com.apple.system-extensions.admin

That should display output similar to what’s shown below:

<?xml version="1.0" encoding="UTF-8"?>
<!DOCTYPE plist PUBLIC "-//Apple//DTD PLIST 1.0//EN" "http://www.apple.com/DTDs/PropertyList-1.0.dtd"&gt;
<plist version="1.0">
<dict>
<key>class</key>
<string>rule</string>
<key>created</key>
<real>600880872.76305306</real>
<key>modified</key>
<real>656531090.20857704</real>
<key>rule</key>
<array>
<string>authenticate-admin-nonshared</string>
</array>
<key>version</key>
<integer>0</integer>
</dict>
</plist>

The rule key’s value is what determines whether the logged-in user is asked for admin authorization:

<key>rule</key>
<array>
<string>authenticate-admin-nonshared</string>
</array>
view raw

gistfile1.txt

hosted with ❤ by GitHub

By default, this value is set to the following:

authenticate-admin-nonshared

https://gist.github.com/rtrouton/bb4e4136af5ee1b8160f1638b68f1a86

However, this value can be changed. Setting it to the value shown below will stop the request for admin authorization:

allow

https://gist.github.com/rtrouton/dd26f434ff28edaac455b6b396b26e44

To change com.apple.system-extensions.admin‘s rule key value to allow, you can use the commands shown below:

security authorizationdb read com.apple.system-extensions.admin > /tmp/com.apple.system-extensions.admin.plist
/usr/libexec/PlistBuddy -c "Set rule:0 allow" /tmp/com.apple.system-extensions.admin.plist
security authorizationdb write com.apple.system-extensions.admin < /tmp/com.apple.system-extensions.admin.plist
view raw

gistfile1.txt

hosted with ❤ by GitHub

To revert back to the default value of authenticate-admin-nonshared, you can use the commands shown below:

security authorizationdb read com.apple.system-extensions.admin > /tmp/com.apple.system-extensions.admin.plist
/usr/libexec/PlistBuddy -c "Set rule:0 authenticate-admin-nonshared" /tmp/com.apple.system-extensions.admin.plist
security authorizationdb write com.apple.system-extensions.admin < /tmp/com.apple.system-extensions.admin.plist
view raw

gistfile1.txt

hosted with ❤ by GitHub

An example of how this can be used is with Microsoft Defender, which may deploy multiple system extensions. The example script below will uninstall Microsoft Defender and includes deactivating the system extensions without prompting the logged-in user for admin credentials:

#!/bin/bash
# Uninstall Microsoft Defender
# unload the launchd plist for the current user
currentUser=$(/bin/ls -l /dev/console | /usr/bin/awk '{ print $3 }')
# Temp plist files used for import and export from authorization database.
management_db_original_setting="$(mktemp).plist"
management_db_edited_setting="$(mktemp).plist"
management_db_check_setting="$(mktemp).plist"
# Expected settings from management database for com.apple.system-extensions.admin
original_setting="authenticate-admin-nonshared"
updated_setting="allow"
ManagementDatabaseUpdatePreparation() {
# Create temp plist files
touch "$management_db_original_setting"
touch "$management_db_edited_setting"
touch "$management_db_check_setting"
# Create backup of the original com.apple.system-extensions.admin settings from the management database
/usr/bin/security authorizationdb read com.apple.system-extensions.admin > "$management_db_original_setting"
# Create copy of the original com.apple.system-extensions.admin settings from the management database for editing.
/usr/bin/security authorizationdb read com.apple.system-extensions.admin > "$management_db_edited_setting"
}
UpdateManagementDatabase() {
if [[ -r "$management_db_edited_setting" ]] && [[ $(/usr/libexec/PlistBuddy -c "Print rule:0" "$management_db_edited_setting") = "$original_setting" ]]; then
/usr/libexec/PlistBuddy -c "Set rule:0 $updated_setting" "$management_db_edited_setting"
if [[ $(/usr/libexec/PlistBuddy -c "Print rule:0" "$management_db_edited_setting" ) = "$updated_setting" ]]; then
echo "Edited $management_db_edited_setting is set to allow system extensions to be uninstalled without password prompt."
echo "Now importing setting into authorization database."
/usr/bin/security authorizationdb write com.apple.system-extensions.admin < "$management_db_edited_setting"
if [[ $? -eq 0 ]]; then
echo "Updated setting successfully imported."
UpdatedAuthorizationSettingInstalled=1
fi
else
echo "Failed to update $management_db_edited_setting file with the correct setting to allow system extension uninstallation without prompting for admin credentials."
fi
fi
}
RestoreManagementDatabase() {
/usr/bin/security authorizationdb read com.apple.system-extensions.admin > "$management_db_check_setting"
if [[ ! $(/usr/libexec/PlistBuddy -c "Print rule:0" "$management_db_check_setting") = "$original_setting" ]]; then
if [[ -r "$management_db_original_setting" ]] && [[ $(/usr/libexec/PlistBuddy -c "Print rule:0" "$management_db_original_setting") = "$original_setting" ]]; then
echo "Restoring original settings to allow system extension uninstallation only after prompting for admin credentials."
echo "Now importing setting into authorization database."
/usr/bin/security authorizationdb write com.apple.system-extensions.admin < "$management_db_original_setting"
if [[ $? -eq 0 ]]; then
echo "Original setting successfully imported."
OriginalAuthorizationSettingInstalled=1
fi
else
echo "Failed to update the authorization database with the correct setting to allow system extension uninstallation only after prompting for admin credentials."
fi
fi
}
if [[ -n "$currentUser" && "$currentUser" != "root" ]]; then
/bin/launchctl bootout gui/$(/usr/bin/id -u "$currentUser") /Library/LaunchAgents/com.microsoft.wdav.tray.plist
fi
# Unload the launchd plist for the daemon
/bin/launchctl bootout system /Library/LaunchDaemons/com.microsoft.fresno.plist
/bin/launchctl bootout system /Library/LaunchDaemons/com.microsoft.fresno.uninstall.plist
# unload the kernel extension
/sbin/kextunload -v 6 -b com.microsoft.wdavkext
# Check for loaded system extensions.
wdavExtensions=$(/usr/bin/systemextensionsctl list | /usr/bin/grep -Eo "com.microsoft.wdav.[^[:space:]]+" | /usr/bin/uniq)
if [[ -n "$wdavExtensions" ]]; then
# Prepare to update authorization database to allow system extensions to be uninstalled without password prompt.
ManagementDatabaseUpdatePreparation
# Update authorization database with new settings.
UpdateManagementDatabase
# Uninstall the system extensions
#
# Note: If the updated settings to allow system extensions to be uninstalled without password prompt were not
# added successfully, this will prompt the user to enter their admin credentials, so a message will be displayed
# to let the user know.
if [[ -z UpdatedAuthorizationSettingInstalled ]]; then
/usr/bin/osascript -e 'display dialog "As part of the uninstall process for Microsoft" & "\nDefender, please enter your admin password when prompted." & "\n" & "\nYou may be prompted up to three times."buttons {"Understood"} default button 1 with icon Caution'
fi
# The system extensions will now be uninstalled. If needed, a message will be displayed to warn the user
# to enter their admin credentials.
#
# After the message is displayed, the user will be prompted for the password to authorize removal of Defender's system extensions.
for anExtension in ${wdavExtensions}; do
"/Applications/Microsoft Defender ATP.app/Contents/MacOS/wdavdaemon" uninstall-system-extension "$anExtension"
done
# Once the system extensions are uninstalled, the relevant settings for the authorization database will be restored from backup to their prior state.
if [[ -n UpdatedAuthorizationSettingInstalled ]]; then
RestoreManagementDatabase
if [[ -n "$OriginalAuthorizationSettingInstalled" ]]; then
echo "com.apple.system-extensions.admin settings in the authorization database successfully restored to $original_setting."
rm -rf "$management_db_original_setting"
rm -rf "$management_db_edited_setting"
rm -rf "$management_db_check_setting"
fi
fi
fi
# kill Microsoft Defender
/usr/bin/killall -SIGKILL "Microsoft Defender" "Microsoft Defender ATP"
# remove the global stuff
/bin/rm -rf "/Applications/Microsoft Defender ATP.app" \
/Library/Logs/Microsoft/mdatp \
"/Library/Application Support/Microsoft/Defender" \
"/Library/Application Support/Microsoft Defender ATP" \
/var/log/fresno*.log \
/Library/Extensions/com.microsoft.wdavkext \
/Library/Extensions/wdavkext.kext \
/Library/LaunchDaemons/com.microsoft.fresno.* \
/Library/LaunchAgents/com.microsoft.wdav.tray.plist
# remove stuff in users folders
localUsers=$(/usr/bin/dscl . -list /Users | /usr/bin/grep -v "^_")
for userName in ${localUsers}; do
# get path to user's home directory
userHome=$(/usr/bin/dscl . -read "/Users/$userName" NFSHomeDirectory 2>/dev/null | /usr/bin/sed 's/^[^\/]*//g')
if [[ -d "$userHome" && "$userHome" != "/var/empty" ]]; then
/bin/rm -rf "$userHome/Library/Saved Application State/com.microsoft.wdav.savedState" \
"$userHome/Library/Preferences/com.microsoft.wdav.plist" \
"$userHome/Library/Preferences/com.microsoft.wdavtray.plist" \
"$userHome/Library/Caches/Microsoft/uls/com.microsoft.wdav"
fi
done
# remove the mdatp user and group
/usr/bin/dscl /Local/Default -delete /Users/_mdatp
/usr/bin/dscl /Local/Default -delete /Groups/_mdatp
# forget the packages
allPKGS=$(/usr/sbin/pkgutil –pkgs="com.microsoft.wdav")
for aPKG in ${allPKGS}; do
/usr/sbin/pkgutil –forget "$aPKG"
done
exit 0

Before Microsoft Defender uninstallation:

username@computername ~ % systemextensionsctl list
2 extension(s)
— com.apple.system_extension.network_extension
enabled active teamID bundleID (version) name [state]
* * UBF8T346G9 com.microsoft.wdav.netext (101.47.27/101.47.27) Microsoft Defender ATP Network Extension [activated enabled]
— com.apple.system_extension.endpoint_security
enabled active teamID bundleID (version) name [state]
* * UBF8T346G9 com.microsoft.wdav.epsext (101.47.27/101.47.27) Microsoft Defender ATP Endpoint Security Extension [activated enabled]
username@computername ~ %
view raw

gistfile1.txt

hosted with ❤ by GitHub

After Microsoft Defender uninstallation:

username@computername ~ % systemextensionsctl list
2 extension(s)
— com.apple.system_extension.network_extension
enabled active teamID bundleID (version) name [state]
UBF8T346G9 com.microsoft.wdav.netext (101.47.27/101.47.27) Microsoft Defender ATP Network Extension [terminated waiting to uninstall on reboot]
— com.apple.system_extension.endpoint_security
enabled active teamID bundleID (version) name [state]
UBF8T346G9 com.microsoft.wdav.epsext (101.47.27/101.47.27) Microsoft Defender ATP Endpoint Security Extension [terminated waiting to uninstall on reboot]
username@computername ~ %
view raw

gistfile1.txt

hosted with ❤ by GitHub

Use of FileVault Institutional Recovery Keys no longer recommended by Apple

$
0
0

When legacy FileVault was first introduced as part of Mac OS X 10.3 Panther in 2005, it supported a recovery key method which used a special keychain named FileVaultMaster.keychain which by default had a private key and public key inside. This recovery key was used to provide certificate-based authentication to unlock the encrypted disk images which were used by legacy FileVault.

When FileVault 2 was announced as part of Mac OS X Lion in 2011, Apple announced that there would be two kinds of recovery keys available:

  1. Personal recovery keys (PRK) – These are recovery keys that are automatically generated at the time of encryption. These keys are generated as an alphanumeric string and are unique to the machine being encrypted. In the event that an encrypted Mac is decrypted and then re-encrypted, the existing personal recovery key would be invalidated and a new personal recovery key would be created as part of the encryption process.
  2. Institutional recovery keys (IRK) – These are pre-made recovery keys that can be installed on a system prior to encryption and most often used by a company, school or institution to have one common recovery key that can unlock their managed encrypted systems.

IRKs were the sole part of Apple’s FileVault 1 (also known as legacy FileVault) that was carried over into FileVault 2. IRKs were legacy FileVault’s recovery keys and they were used in almost exactly the same way. The main difference was that they were now used to unlock an encrypted disk as opposed to legacy FileVault’s disk images.

In FileVault 1 deployments, you were asked to set a Master Password when turning on FileVault 1’s encryption. When you set the Master Password, the FileVault 1 encryption process set the password that was entered as the password on the /Library/Keychains/FileVaultMaster.keychain file. In turn, the FileVaultMaster.keychain file contained two keys used for PKI certificate-based authentication (one public key and one private key). When the public and private keys are both stored in one keychain, the keychain can be used to unlock your FileVault 1-encrypted home folder in the event that the password to open it was lost or forgotten. The Master Password only unlocked the keychain and allowed the system to access those two PKI keys. This is the reason why you needed to set the Master Password before encrypting and why it was also important to use the same FileVaultMaster.keychain file across the machines where you wanted to make sure that the same recovery key was being used.

If you were deploying the same recovery key for your FileVault-encrypted Macs, Apple consistently recommended that you go into the FileVaultMaster.keychain file, remove the PKI private key, put the private key somewhere secure and deploy the FileVaultMaster.keychain file with only the public key inside. The reason was that, in the event that the password to the FileVaultMaster.keychain file was compromised, all the compromiser got was one half of the keypair (the public key half.) The private key would not be on the machine and thus not available to compromise the FileVault 1-encrypted homes on the machine. However, FileVault 1 would work with both the public and private keys stored in /Library/Keychains/FileVaultMaster.keychain.

In FileVault 2, Apple changed removing the private key from being a suggested best practice to being a technical requirement. If you want to use an institutional recovery key, your FileVaultMaster.keychain file needs to have just the public key in it. If both public and private keys are stored in the /Library/Keychains/FileVaultMaster.keychain file on a Mac, FileVault 2 will ignore the keychain and not use it as an institutional recovery key. In this case, enabling FileVault 2 encryption will automatically generate a personal recovery key.

That was then, this is now

Over the years, the PRK gained functionality while the IRK largely did not. With the advent of PRK escrow systems (found in most present-day MDM solutions), the IRK’s main advantage of being a recovery key which could be mass-deployed came to seen instead as a weakness. After all, better to have recovery keys where each encrypted drive has its own unique key in place of the danger of a compromised recovery key being able to unlock all the machines in your Mac environment.

You can also only use an IRK to unlock or decrypt if you were booted to macOS Recovery. Recovery’s limited functionality meant that users of an IRK would have to do some preparation work, including making sure that the IRK’s keychain file was available somewhere which could be reached from Recovery.

Meanwhile, Apple has made changes to the environments where you could use an IRK. Beginning with macOS Catalina, macOS Recovery now prompted you to log in with either a password associated with an admin user or with a PRK.

Screen Shot 2020 04 06 at 4 48 45 PM

Screen Shot 2020 04 06 at 1 53 51 PM

You could not use an IRK at this login screen. So now Mac admins found themselves in the situation where they had an IRK, but couldn’t use it to authenticate in Recovery and get to the point where they could use the IRK.

With the introduction of Apple Silicon Macs, Apple has also discontinued Target Disk Mode functionality. This also affected the use of IRKs because it removes the ability to unlock using an IRK while the locked drive is connected to another Mac via Target Disk Mode.

The combination of all of these factors has led to Apple making a written recommendation to not use IRKs for institutional deployments of FileVault on Macs.

Screen Shot 2021 10 29 at 3 24 29 PM

It’s been a long run for IRKs and they still do work as recovery keys (for now), but in my opinion it’s time to follow Apple’s stated recommendation and stop the deployment and use of IRKs as FileVault recovery keys.

Running Jamf Pro actions from outside Jamf Pro

$
0
0

Every so often, I need to have Jamf Pro perform actions where it’s difficult to arrange the timing and task order I want using the options available from the Jamf Pro server’s end. An example of this would be following an OS upgrade. I want the following:

  • Update the computer inventory record in Jamf Pro as soon as possible that the OS upgrade has occurred.
  • Don’t interfere with any other processes that Jamf Pro may be running at that time.

To address this, I want to use the following workflow:

  1. Make sure the Jamf Pro agent hasn’t run anything for at least the last five minutes.
  2. Enforce the Jamf Pro agent’s management framework
  3. Send the Jamf Pro server an updated inventory.

To run these tasks, I’m using a self-destructing LaunchDaemon and script. For more details, please see below the jump.

I’ve written an example script, which does the following:

  • Creates a LaunchDaemon
  • Creates a script in /var/root which is triggered to run by the LaunchDaemon

Once triggered to run, the script stored in /var/root verifies that the Mac can communicate with the Jamf Pro server. Once communication is verified, it takes the following actions:

  • Checks to see if the /var/log/jamf.log file has been modified in the previous five minutes.
  • Once it has been verified that the /var/log/jamf.log file has not been modified for at least the last five minutes, the script runs the following functions:
  1. Runs jamf manage to enforce the management framework using the latest available data from the Jamf Pro server
  2. Runs jamf recon to send an updated inventory to the Jamf Pro server
  3. Deletes LaunchDaemon file
  4. Deletes script file
  5. Unloads LaunchDaemon

Note: The order for deletion and unloading is important. If the LaunchDaemon is unloaded before the script deletes the LaunchDaemon’s and script’s file, LaunchD will stop the script’s run at the point where the LaunchDaemon unload command occurred. Both the script and LaunchDaemon are in the computer’s memory, so it’s possible to delete the files before the script unloads the LaunchDaemon from LaunchD.

This script is available below and also from GitHub at the following location:

https://github.com/rtrouton/rtrouton_scripts/tree/main/rtrouton_scripts/Casper_Scripts/jamf_pro_manage_inventory_update_and_check_in

#!/bin/bash
# Script for use with Jamf Pro when you want to trigger an update of the management framework, followed by an inventory update.
#
# The LaunchDaemon and accompanying script created by running this script verifies that the Mac can communicate with the Jamf Pro server.
# Once communication is verified, it takes the following actions:
#
# Checks to see if the /var/log/jamf.log file has been modified in the previous five minutes.
#
# Once it has been verified that the /var/log/jamf.log file has not been modified for at least the last five minutes,
# the script runs the following functions:
#
# Runs jamf manage to enforce the management framework using the latest available data from the Jamf Pro server
# Runs jamf recon to send an updated inventory to the Jamf Pro server
# Deletes LaunchDaemon file
# Deletes script file
# Unloads LaunchDaemon
#
#
# Note: The "runjamfproinventoryupdate.sh" script which is part of this script has the following variable set:
#
# jamfpro_server_port="443"
#
# This port is correct for all Jamf Cloud-hosted installations of Jamf Pro.
#
# If your Jamf Pro server is not using port 443, please change this port to the correct number.
# For on-premise Jamf Pro installations, this port is most commonly port 8443. If your Jamf Pro
# server is using port 8443, the variable should look like this:
#
# jamfpro_server_port="8443"
#
# If any previous instances of the runjamfproinventoryupdate LaunchDaemon and script exist,
# unload the LaunchDaemon and remove the LaunchDaemon and script files
if [[ -n $(/bin/launchctl list | grep "com.github.runjamfproinventoryupdate") ]]; then
/bin/launchctl bootout system/com.github.runjamfproinventoryupdate
fi
# Delete LaunchDaemon and script files files if they exist
/bin/rm -f \
"/Library/LaunchDaemons/com.github.runjamfproinventoryupdate.plist" \
"/var/root/runjamfproinventoryupdate.sh"
# Create the runjamfproinventoryupdate LaunchDaemon by using cat input redirection
# to write the XML contained below to a new file.
#
# The LaunchDaemon will run at load and every minute thereafter.
temp_directory=$(mktemp -d)
/bin/cat > "$temp_directory/com.github.runjamfproinventoryupdate.plist" << 'JAMF_PRO_INVENTORY_UPDATE_LAUNCHDAEMON'
<?xml version="1.0" encoding="UTF-8"?>
<!DOCTYPE plist PUBLIC "-//Apple//DTD PLIST 1.0//EN" "http://www.apple.com/DTDs/PropertyList-1.0.dtd"&gt;
<plist version="1.0">
<dict>
<key>Label</key>
<string>com.github.runjamfproinventoryupdate</string>
<key>ProgramArguments</key>
<array>
<string>sh</string>
<string>/var/root/runjamfproinventoryupdate.sh</string>
</array>
<key>RunAtLoad</key>
<true/>
<key>StartInterval</key>
<integer>60</integer>
</dict>
</plist>
JAMF_PRO_INVENTORY_UPDATE_LAUNCHDAEMON
# Create the runjamfproinventoryupdate script by using cat input redirection
# to write the shell script contained below to a new file.
/bin/cat > "$temp_directory/runjamfproinventoryupdate.sh" << 'JAMF_PRO_INVENTORY_UPDATE_SCRIPT'
#!/bin/bash
jamfpro_server_address=$(/usr/bin/defaults read /Library/Preferences/com.jamfsoftware.jamf.plist jss_url)
jamfpro_server_address="${jamfpro_server_address#*//}"
jamfpro_server_address="${jamfpro_server_address%%/}"
jamfpro_server_port="443"
jamf_binary="/usr/local/jamf/bin/jamf"
CheckSiteNetwork (){
# CheckSiteNetwork function adapted from Facebook's check_corp function script.
# check_corp script available on Facebook's IT-CPE Github repo:
#
# check_corp:
# This script verifies a system is on the corporate network.
# Input: CORP_URL= set this to a hostname on your corp network
# Optional ($1) contains a parameter that is used for testing.
# Output: Returns a check_corp variable that will return "True" if on
# corp network, "False" otherwise.
# If a parameter is passed ($1), the check_corp variable will return it
# This is useful for testing scripts where you want to force check_corp
# to be either "True" or "False"
# USAGE:
# check_corp # No parameter passed
# check_corp "True" # Parameter of "True" is passed and returned
site_network="False"
ping=$(host -W .5 $jamfpro_server_address)
# If the ping fails – site_network="False"
[[ $? -eq 0 ]] && site_network="True"
# Check if we are using a test
[[ -n "$1" ]] && site_network="$1"
}
CheckTomcat (){
# Verifies that the JSS's Tomcat service is responding.
tomcat_chk=$(nc -z -w 5 $jamfpro_server_address $jamfpro_server_port > /dev/null; echo $?)
if [ "$tomcat_chk" -eq 0 ]; then
/usr/bin/logger "Machine can connect to $jamfpro_server_address. Proceeding."
else
/usr/bin/logger "Machine cannot connect to $jamfpro_server_address. Exiting."
exit 0
fi
}
CheckLogAge (){
# Verifies that the /var/log/jamf.log hasn't been written to for at least five minutes.
# This should help ensure that both an inventory update and check-in can run and not
# have to wait for a policy to finish running.
jamf_log="/var/log/jamf.log"
current_time=$(date +%s)
last_modified=$(stat -f %m "$jamf_log")
if [[ $(($current_time-$last_modified)) -gt 300 ]]; then
/usr/bin/logger "Log has not been modified in the past five minutes. Proceeding."
else
/usr/bin/logger "Log has been modified in the past five minutes. Exiting."
exit 0
fi
}
UpdateManagementAndInventory (){
# Verifies that the Mac can communicate with the Jamf Pro server.
# Once communication is verified, it takes the following actions:
#
# 1. Runs jamf manage to enforce the Jamf Pro management framework
# 2. Runs jamf recon to send an updated inventory to the Jamf Pro server
#
jss_comm_chk=$($jamf_binary checkJSSConnection > /dev/null; echo $?)
if [[ "$jss_comm_chk" -gt 0 ]]; then
/usr/bin/logger "Machine cannot connect to the JSS. Exiting."
exit 0
elif [[ "$jss_comm_chk" -eq 0 ]]; then
/usr/bin/logger "Machine can connect to the JSS. Updating management framework and updating inventory."
$jamf_binary manage
$jamf_binary recon
fi
}
SelfDestruct (){
# Removes script and associated LaunchDaemon
if [[ -f "/Library/LaunchDaemons/com.github.runjamfproinventoryupdate.plist" ]]; then
/bin/rm "/Library/LaunchDaemons/com.github.runjamfproinventoryupdate.plist"
fi
rm -rf $0
if [[ -n $(/bin/launchctl list | grep "com.github.runjamfproinventoryupdate") ]]; then
/bin/launchctl bootout system/com.github.runjamfproinventoryupdate
fi
}
CheckSiteNetwork
if [[ "$site_network" == "False" ]]; then
/usr/bin/logger "Unable to verify access to site network. Exiting."
fi
if [[ "$site_network" == "True" ]]; then
/usr/bin/logger "Access to site network verified"
CheckTomcat
CheckLogAge
UpdateManagementAndInventory
SelfDestruct
fi
exit 0
JAMF_PRO_INVENTORY_UPDATE_SCRIPT
# Once the LaunchDaemon file has been created, fix the permissions
# so that the file is owned by root:wheel and set to not be executable
# After the permissions have been updated, move the LaunchDaemon into
# place in /Library/LaunchDaemons.
/usr/sbin/chown root:wheel "${temp_directory}/com.github.runjamfproinventoryupdate.plist"
/bin/chmod 644 "${temp_directory}/com.github.runjamfproinventoryupdate.plist"
/bin/chmod a-x "${temp_directory}/com.github.runjamfproinventoryupdate.plist"
/bin/mv "${temp_directory}/com.github.runjamfproinventoryupdate.plist" "/Library/LaunchDaemons/com.github.runjamfproinventoryupdate.plist"
# Once the script file has been created, fix the permissions
# so that the file is owned by root:wheel and set to be executable
# After the permissions have been updated, move the script into the
# place that it will be executed from.
/usr/sbin/chown root:wheel "$temp_directory/runjamfproinventoryupdate.sh"
/bin/chmod 755 "$temp_directory/runjamfproinventoryupdate.sh"
/bin/chmod a+x "$temp_directory/runjamfproinventoryupdate.sh"
/bin/mv "$temp_directory/runjamfproinventoryupdate.sh" "/var/root/runjamfproinventoryupdate.sh"
# After the LaunchDaemon and script are in place with proper permissions,
# load the LaunchDaemon to begin the script's execution.
if [[ -f "/Library/LaunchDaemons/com.github.runjamfproinventoryupdate.plist" ]] && [[ -x "/var/root/runjamfproinventoryupdate.sh" ]]; then
/bin/launchctl bootstrap system "/Library/LaunchDaemons/com.github.runjamfproinventoryupdate.plist"
fi
# Remove temp directory
/bin/rm -rf "$temp_directory"
exit 0


This technique is pretty flexible and can be used to trigger other tasks with Jamf Pro. One example would be triggering installation of a particular software package faster than usual. In this scenario, you may have a particular software installation which is a module for X software, but only members of a specific LDAP are supposed to get that module. So the module is set for installation on check-in and scoped as follows:

  • Target: Macs with X software installed.
  • Limitation: LDAP group
  • Exclusion: Macs with Module Installed.

Your check-in is scheduled to happen every fifteen minutes, but you get feedback from management that this process can’t wait fifteen minutes. It needs to happen within five minutes or sooner. No problem; this technique can be adapted to do the following:

  1. Runs jamf recon to send an updated inventory to the Jamf Pro server (to make sure that the module installation policy has the Mac in scope.)
  2. Runs jamf policy to trigger installation of the module.
  3. Deletes LaunchDaemon file
  4. Deletes script file
  5. Unloads LaunchDaemon

After that, add the script to your X Software install policy and set it to run as an After script. The module should now install within five minutes if installing X software was the last action taken by Jamf Pro.

An example script is available below:

#!/bin/bash
# Script for use with Jamf Pro when you want to trigger an inventory update followed by a policy check-in.
#
# The LaunchDaemon and accompanying script created by running this script verifies that the Mac can communicate with the Jamf Pro server.
# Once communication is verified, it takes the following actions:
#
# Checks to see if the /var/log/jamf.log file has been modified in the previous five minutes.
#
# Once it has been verified that the /var/log/jamf.log file has not been modified for at least the last five minutes,
# the script runs the following functions:
#
# Runs jamf recon to to send an updated inventory to the Jamf Pro server
# Runs jamf policy to force a check-in and run whatever policies are available to run on check-in.
# Deletes LaunchDaemon file
# Deletes script file
# Unloads LaunchDaemon
#
# Note: The "runjamfprocheckin.sh" script which is part of this script has the following variable set:
#
# jamfpro_server_port="443"
#
# This port is correct for all Jamf Cloud-hosted installations of Jamf Pro.
#
# If your Jamf Pro server is not using port 443, please change this port to the correct number.
# For on-premise Jamf Pro installations, this port is most commonly port 8443. If your Jamf Pro
# server is using port 8443, the variable should look like this:
#
# jamfpro_server_port="8443"
#
# If any previous instances of the runjamfprocheckin LaunchDaemon and script exist,
# unload the LaunchDaemon and remove the LaunchDaemon and script files
if [[ -n $(/bin/launchctl list | grep "com.github.runjamfprocheckin") ]]; then
/bin/launchctl bootout system/com.github.runjamfprocheckin
fi
# Delete LaunchDaemon and script files files if they exist
/bin/rm -f \
"/Library/LaunchDaemons/com.github.runjamfprocheckin.plist" \
"/var/root/runjamfprocheckin.sh"
# Create the runjamfprocheckin LaunchDaemon by using cat input redirection
# to write the XML contained below to a new file.
#
# The LaunchDaemon will run at load and every minute thereafter.
temp_directory=$(mktemp -d)
/bin/cat > "$temp_directory/com.github.runjamfprocheckin.plist" << 'JAMF_PRO_CHECKIN_LAUNCHDAEMON'
<?xml version="1.0" encoding="UTF-8"?>
<!DOCTYPE plist PUBLIC "-//Apple//DTD PLIST 1.0//EN" "http://www.apple.com/DTDs/PropertyList-1.0.dtd"&gt;
<plist version="1.0">
<dict>
<key>Label</key>
<string>com.github.runjamfprocheckin</string>
<key>ProgramArguments</key>
<array>
<string>sh</string>
<string>/var/root/runjamfprocheckin.sh</string>
</array>
<key>RunAtLoad</key>
<true/>
<key>StartInterval</key>
<integer>60</integer>
</dict>
</plist>
JAMF_PRO_CHECKIN_LAUNCHDAEMON
# Create the runjamfprocheckin script by using cat input redirection
# to write the shell script contained below to a new file.
/bin/cat > "$temp_directory/runjamfprocheckin.sh" << 'JAMF_PRO_CHECKIN_SCRIPT'
#!/bin/bash
jamfpro_server_address=$(/usr/bin/defaults read /Library/Preferences/com.jamfsoftware.jamf.plist jss_url)
jamfpro_server_address="${jamfpro_server_address#*//}"
jamfpro_server_address="${jamfpro_server_address%%/}"
jamfpro_server_port="443"
jamf_binary="/usr/local/jamf/bin/jamf"
CheckSiteNetwork (){
# CheckSiteNetwork function adapted from Facebook's check_corp function script.
# check_corp script available on Facebook's IT-CPE Github repo:
#
# check_corp:
# This script verifies a system is on the corporate network.
# Input: CORP_URL= set this to a hostname on your corp network
# Optional ($1) contains a parameter that is used for testing.
# Output: Returns a check_corp variable that will return "True" if on
# corp network, "False" otherwise.
# If a parameter is passed ($1), the check_corp variable will return it
# This is useful for testing scripts where you want to force check_corp
# to be either "True" or "False"
# USAGE:
# check_corp # No parameter passed
# check_corp "True" # Parameter of "True" is passed and returned
site_network="False"
ping=$(host -W .5 $jamfpro_server_address)
# If the ping fails – site_network="False"
[[ $? -eq 0 ]] && site_network="True"
# Check if we are using a test
[[ -n "$1" ]] && site_network="$1"
}
CheckTomcat (){
# Verifies that the JSS's Tomcat service is responding.
tomcat_chk=$(nc -z -w 5 $jamfpro_server_address $jamfpro_server_port > /dev/null; echo $?)
if [ "$tomcat_chk" -eq 0 ]; then
/usr/bin/logger "Machine can connect to $jamfpro_server_address. Proceeding."
else
/usr/bin/logger "Machine cannot connect to $jamfpro_server_address. Exiting."
exit 0
fi
}
CheckLogAge (){
# Verifies that the /var/log/jamf.log hasn't been written to for at least five minutes.
# This should help ensure that both an inventory update and check-in can run and not
# have to wait for a policy to finish running.
jamf_log="/var/log/jamf.log"
current_time=$(date +%s)
last_modified=$(stat -f %m "$jamf_log")
if [[ $(($current_time-$last_modified)) -gt 300 ]]; then
/usr/bin/logger "Log has not been modified in the past five minutes. Proceeding."
else
/usr/bin/logger "Log has been modified in the past five minutes. Exiting."
exit 0
fi
}
UpdateInventoryAndRunCheckin (){
# Verifies that the Mac can communicate with the Jamf Pro server.
# Once communication is verified, it takes the following actions:
#
# 1. Runs jamf recon to send an updated inventory to the Jamf Pro server
# 2. Runs jamf policy to run any policies which run on check-in
#
jss_comm_chk=$($jamf_binary checkJSSConnection > /dev/null; echo $?)
if [[ "$jss_comm_chk" -gt 0 ]]; then
/usr/bin/logger "Machine cannot connect to the JSS. Exiting."
exit 0
elif [[ "$jss_comm_chk" -eq 0 ]]; then
/usr/bin/logger "Machine can connect to the JSS. Updating inventory and doing policy check-in."
$jamf_binary recon
$jamf_binary policy
fi
}
SelfDestruct (){
# Removes script and associated LaunchDaemon
if [[ -f "/Library/LaunchDaemons/com.github.runjamfprocheckin.plist" ]]; then
/bin/rm "/Library/LaunchDaemons/com.github.runjamfprocheckin.plist"
fi
rm -rf $0
if [[ -n $(/bin/launchctl list | grep "com.github.runjamfprocheckin") ]]; then
/bin/launchctl bootout system/com.github.runjamfprocheckin
fi
}
CheckSiteNetwork
if [[ "$site_network" == "False" ]]; then
/usr/bin/logger "Unable to verify access to site network. Exiting."
fi
if [[ "$site_network" == "True" ]]; then
/usr/bin/logger "Access to site network verified"
CheckTomcat
CheckLogAge
UpdateInventoryAndRunCheckin
SelfDestruct
fi
exit 0
JAMF_PRO_CHECKIN_SCRIPT
# Once the LaunchDaemon file has been created, fix the permissions
# so that the file is owned by root:wheel and set to not be executable
# After the permissions have been updated, move the LaunchDaemon into
# place in /Library/LaunchDaemons.
/usr/sbin/chown root:wheel "${temp_directory}/com.github.runjamfprocheckin.plist"
/bin/chmod 644 "${temp_directory}/com.github.runjamfprocheckin.plist"
/bin/chmod a-x "${temp_directory}/com.github.runjamfprocheckin.plist"
/bin/mv "${temp_directory}/com.github.runjamfprocheckin.plist" "/Library/LaunchDaemons/com.github.runjamfprocheckin.plist"
# Once the script file has been created, fix the permissions
# so that the file is owned by root:wheel and set to be executable
# After the permissions have been updated, move the script into the
# place that it will be executed from.
/usr/sbin/chown root:wheel "$temp_directory/runjamfprocheckin.sh"
/bin/chmod 755 "$temp_directory/runjamfprocheckin.sh"
/bin/chmod a+x "$temp_directory/runjamfprocheckin.sh"
/bin/mv "$temp_directory/runjamfprocheckin.sh" "/var/root/runjamfprocheckin.sh"
# After the LaunchDaemon and script are in place with proper permissions,
# load the LaunchDaemon to begin the script's execution.
if [[ -f "/Library/LaunchDaemons/com.github.runjamfprocheckin.plist" ]] && [[ -x "/var/root/runjamfprocheckin.sh" ]]; then
/bin/launchctl bootstrap system "/Library/LaunchDaemons/com.github.runjamfprocheckin.plist"
fi
# Remove temp directory
/bin/rm -rf "$temp_directory"
exit 0

Session videos from Jamf Nation User Conference 2021 now available


Disabling Recent Tags in the Finder window sidebar

$
0
0

Every so often, something gets added to macOS and enabled by default where I wish it was off by default. The Tags section of the Finder’s sidebar is one of those additions.

Screen Shot 2021 11 29 at 10 04 13 AM

Fortunately for my preferences, I recently figured out (thanks to Bob Gendler’s method for discovering settings via the unified logs) that display of the Tags section was controlled via the following setting:

Domain: com.apple.finder
Key: ShowRecentTags
Value: Boolean

To show Recent Tags in the Finder’s sidebar, run the following command as the logged-in user:

defaults write com.apple.Finder ShowRecentTags -bool true

Screen Shot 2021 11 29 at 10 41 26 AM

Here’s how the Recent Tags setting should now appear in the Finder preferences:

Screen Shot 2021 11 29 at 10 03 48 AM


To remove Recent Tags from the Finder’s sidebar, run the following command as the logged-in user:

defaults write com.apple.Finder ShowRecentTags -bool false

Screen Shot 2021 11 29 at 10 40 53 AM


Here’s how the Recent Tags setting should now appear in the Finder preferences:

Screen Shot 2021 11 29 at 10 06 54 AM


The new setting will not apply until the Finder is restarted, which can be accomplished via either logging out and logging back in or running the following command as the logged-in user:

killlall Finder

Screen Shot 2021 11 29 at 10 06 16 AM


After the Finder restart, the Tags section should no longer appear in the Finder window sidebar:

Screen Shot 2021 11 29 at 10 06 24 AM


In my case, I wanted them off permanently so I’ve also written a profile which can enforce this. It’s available via the link below:

https://github.com/rtrouton/profiles/blob/main/DisableRecentTagsinFinderSidebar

Obtaining, checking and renewing Bearer Tokens for the Jamf Pro API

$
0
0

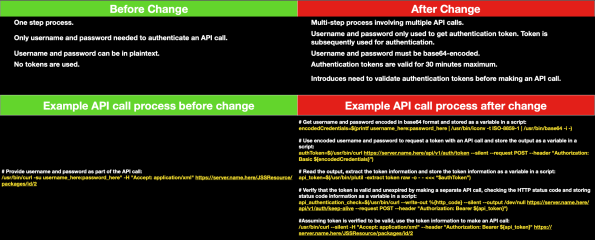
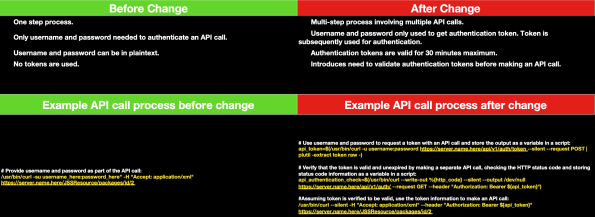
I’ve recently begun looking into uses for the Jamf Pro API, the API which Jamf makes available for Jamf Pro in addition to the Classic API. The two APIs handle authentication differently and for folks coming over to using the Jamf Pro API from the Classic API, the extra steps involved may be a surprise.

For the Classic API, here’s what’s required for authentication:

  • One step process.
  • Only username and password needed to authenticate an API call.
  • Username and password can be in plaintext.
  • No tokens are used.

Example Classic API call process:


# Provide username and password as part of the API call:
/usr/bin/curl -su username_here:password_here" -H "Accept: application/xml" https://server.name.here/JSSResource/packages/id/2
view raw

gistfile1.txt

hosted with ❤ by GitHub

For the Jamf Pro API, here’s what’s required for authentication:

  • Multi-step process involving multiple API calls.
  • Username and password only used to get authentication token, known as a Bearer Token. The Bearer Token is subsequently used for authentication.
  • Username and password must be base64-encoded.
  • Bearer Tokens are valid for 30 minutes maximum.
  • Introduces need to validate authentication Bearer Tokens before making an API call.

Example Jamf Pro API call process:


# Get username and password encoded in base64 format and stored as a variable in a script:
encodedCredentials=$(printf username_here:password_here | /usr/bin/iconv -t ISO-8859-1 | /usr/bin/base64 -i -)
# Use encoded username and password to request a token with an API call and store the output as a variable in a script:
authToken=$(/usr/bin/curl https://server.name.here/api/v1/auth/token –silent –request POST –header "Authorization: Basic ${encodedCredentials}”)
# Read the output, extract the token information and store the token information as a variable in a script:
api_token=$(/usr/bin/plutil -extract token raw -o – – <<< “$authToken”)
# Verify that the token is valid and unexpired by making a separate API call, checking the HTTP status code and storing status code information as a variable in a script:
api_authentication_check=$(/usr/bin/curl –write-out %{http_code} –silent –output /dev/null https://server.name.here/api/v1/auth/keep-alive –request POST –header "Authorization: Bearer ${api_token}")
#Assuming token is verified to be valid, use the token information to make an API call:
/usr/bin/curl –silent -H "Accept: application/xml" –header "Authorization: Bearer ${api_token}" https://server.name.here/JSSResource/packages/id/2
view raw

gistfile1.txt

hosted with ❤ by GitHub

Screen Shot 2021-12-10 at 9.39.57 AM

The differences in authentication are significant enough that I decided to write functions for shell scripting to handle the following tasks for the Jamf Pro API:

  • Obtaining Bearer Token.
  • Verifying that current Bearer Token is valid and unexpired.
  • Renewing Bearer Tokens by using current Bearer Token to authenticate the issuing of a new Bearer Token. (This renewal process creates a new Bearer Token and invalidates the old Bearer Token.)
  • Invalidating current Bearer Token.

For more details, please see below the jump.

I’ve written a script which includes the four functions listed below:

  • GetJamfProAPIToken: Obtains the Bearer Token using the username and password of a Jamf Pro account.
  • APITokenValidCheck: Runs an API call using the current Bearer Token which displays the authorization details associated with the current API user. The API call will only return the HTTP status code.
  • CheckAndRenewAPIToken: Uses APITokenValidCheck to verify if the current Bearer Token is valid by checking the HTTP status code. If it is, the current Bearer Token will be used to get a new Bearer Token. If not, GetJamfProAPIToken is run to get a new Bearer Token using the username and password of a Jamf Pro account.
  • InvalidateToken: Uses APITokenValidCheck to verify if the current Bearer Token is valid by checking the HTTP status code. If it is, the current Bearer Token will be used to invalidate itself.

The script is available below:


#!/bin/bash
# This script uses the Jamf Pro API to get an authentication token
# Set default exit code
exitCode=0
# Explicitly set initial value for the api_token variable to null:
api_token=""
# Explicitly set initial value for the token_expiration variable to null:
token_expiration=""
# If you choose to hardcode API information into the script, set one or more of the following values:
#
# The username for an account on the Jamf Pro server with sufficient API privileges
# The password for the account
# The Jamf Pro URL
# Set the Jamf Pro URL here if you want it hardcoded.
jamfpro_url=""
# Set the username here if you want it hardcoded.
jamfpro_user=""
# Set the password here if you want it hardcoded.
jamfpro_password=""
# Read the appropriate values from ~/Library/Preferences/com.github.jamfpro-info.plist
# if the file is available. To create the file, run the following commands:
#
# defaults write $HOME/Library/Preferences/com.github.jamfpro-info jamfpro_url https://jamf.pro.server.here
# defaults write $HOME/Library/Preferences/com.github.jamfpro-info jamfpro_user API_account_username_goes_here
# defaults write $HOME/Library/Preferences/com.github.jamfpro-info jamfpro_password API_account_password_goes_here
#
if [[ -f "$HOME/Library/Preferences/com.github.jamfpro-info.plist" ]]; then
if [[ -z "$jamfpro_url" ]]; then
jamfpro_url=$(defaults read $HOME/Library/Preferences/com.github.jamfpro-info jamfpro_url)
fi
if [[ -z "$jamfpro_user" ]]; then
jamfpro_user=$(defaults read $HOME/Library/Preferences/com.github.jamfpro-info jamfpro_user)
fi
if [[ -z "$jamfpro_password" ]]; then
jamfpro_password=$(defaults read $HOME/Library/Preferences/com.github.jamfpro-info jamfpro_password)
fi
fi
# If the Jamf Pro URL, the account username or the account password aren't available
# otherwise, you will be prompted to enter the requested URL or account credentials.
if [[ -z "$jamfpro_url" ]]; then
read -p "Please enter your Jamf Pro server URL : " jamfpro_url
fi
if [[ -z "$jamfpro_user" ]]; then
read -p "Please enter your Jamf Pro user account : " jamfpro_user
fi
if [[ -z "$jamfpro_password" ]]; then
read -p "Please enter the password for the $jamfpro_user account: " -s jamfpro_password
fi
echo
# Remove the trailing slash from the Jamf Pro URL if needed.
jamfpro_url=${jamfpro_url%%/}
GetJamfProAPIToken() {
# This function uses Basic Authentication to get a new bearer token for API authentication.
# Create base64-encoded credentials from user account's username and password.
encodedCredentials=$(printf "${jamfpro_user}:${jamfpro_password}" | /usr/bin/iconv -t ISO-8859-1 | /usr/bin/base64 -i –)
# Use the encoded credentials with Basic Authorization to request a bearer token
authToken=$(/usr/bin/curl "$jamfpro_url/api/v1/auth/token" –silent –request POST –header "Authorization: Basic ${encodedCredentials}")
# Parse the returned output for the bearer token and store the bearer token as a variable.
if [[ $(/usr/bin/sw_vers -productVersion | awk -F . '{print $1}') -lt 12 ]]; then
api_token=$(/usr/bin/awk -F \" 'NR==2{print $4}' <<< "$authToken" | /usr/bin/xargs)
else
api_token=$(/usr/bin/plutil -extract token raw -o – – <<< "$authToken")
fi
}
APITokenValidCheck() {
# Verify that API authentication is using a valid token by running an API command
# which displays the authorization details associated with the current API user.
# The API call will only return the HTTP status code.
api_authentication_check=$(/usr/bin/curl –write-out %{http_code} –silent –output /dev/null "$jamfpro_url/api/v1/auth/keep-alive" –request POST –header "Authorization: Bearer ${api_token}")
}
CheckAndRenewAPIToken() {
# Verify that API authentication is using a valid token by running an API command
# which displays the authorization details associated with the current API user.
# The API call will only return the HTTP status code.
APITokenValidCheck
# If the api_authentication_check has a value of 200, that means that the current
# bearer token is valid and can be used to authenticate an API call.
if [[ ${api_authentication_check} == 200 ]]; then
# If the current bearer token is valid, it is used to connect to the keep-alive endpoint. This will
# trigger the issuing of a new bearer token and the invalidation of the previous one.
#
# The output is parsed for the bearer token and the bearer token is stored as a variable.
authToken=$(/usr/bin/curl "$jamfpro_url/api/v1/auth/keep-alive" –silent –request POST –header "Authorization: Bearer ${api_token}")
if [[ $(/usr/bin/sw_vers -productVersion | awk -F . '{print $1}') -lt 12 ]]; then
api_token=$(/usr/bin/awk -F \" 'NR==2{print $4}' <<< "$authToken" | /usr/bin/xargs)
else
api_token=$(/usr/bin/plutil -extract token raw -o – – <<< "$authToken")
fi
else
# If the current bearer token is not valid, this will trigger the issuing of a new bearer token
# using Basic Authentication.
GetJamfProAPIToken
fi
}
InvalidateToken() {
# Verify that API authentication is using a valid token by running an API command
# which displays the authorization details associated with the current API user.
# The API call will only return the HTTP status code.
APITokenValidCheck
# If the api_authentication_check has a value of 200, that means that the current
# bearer token is valid and can be used to authenticate an API call.
if [[ ${api_authentication_check} == 200 ]]; then
# If the current bearer token is valid, an API call is sent to invalidate the token.
authToken=$(/usr/bin/curl "$jamfpro_url/api/v1/auth/invalidate-token" –silent –header "Authorization: Bearer ${api_token}" -X POST)
# Explicitly set value for the api_token variable to null.
api_token=""
fi
}
GetJamfProAPIToken
APITokenValidCheck
echo "$api_authentication_check"
echo "$api_token"
CheckAndRenewAPIToken
APITokenValidCheck
echo "$api_authentication_check"
echo "$api_token"
InvalidateToken
APITokenValidCheck
echo "$api_authentication_check"
echo "$api_token"

Remediating Log4Shell on Jamf Pro

$
0
0

On Thursday, December 9th 2021, a vulnerability was discovered in the popular Java logging library (log4j) which allowed for Remote Code Execution (RCE) by logging a certain string. This vulnerability has been dubbed Log4shell:

How bad is this? I’ll let the below video of a Minecraft server being changed into a DOOM server via this vulnerability speak to how a remote attacker could use Log4shell to give you a bad day:

It’s bad. It’s hard to overstate how bad. My colleague Ben Toms has a good write up on this issue here:

https://macmule.com/2021/12/11/jamf-pro-and-log4shell-cve-2021-44228

To address this vulnerability, the log4j folks have released an updated version of the logging tool which is not vulnerable. It’s log4j 2.1.5 and is available for download via the link below:

https://logging.apache.org/log4j/2.x/download.html

The files to download are one of the following two:

  • Apache log4j 2 binary (tar.gz)
  • Apache log4j 2 binary (zip)

Both have the same contents, the main difference is how they are compressed. Once downloaded and uncompressed, you should have the following files:


LICENSE.txt
NOTICE.txt
RELEASE-NOTES.md
log4j-1.2-api-2.15.0-javadoc.jar
log4j-1.2-api-2.15.0-sources.jar
log4j-1.2-api-2.15.0.jar
log4j-api-2.15.0-javadoc.jar
log4j-api-2.15.0-sources.jar
log4j-api-2.15.0.jar
log4j-appserver-2.15.0-javadoc.jar
log4j-appserver-2.15.0-sources.jar
log4j-appserver-2.15.0.jar
log4j-cassandra-2.15.0-javadoc.jar
log4j-cassandra-2.15.0-sources.jar
log4j-cassandra-2.15.0.jar
log4j-core-2.15.0-javadoc.jar
log4j-core-2.15.0-sources.jar
log4j-core-2.15.0-tests.jar
log4j-core-2.15.0.jar
log4j-couchdb-2.15.0-javadoc.jar
log4j-couchdb-2.15.0-sources.jar
log4j-couchdb-2.15.0.jar
log4j-docker-2.15.0-javadoc.jar
log4j-docker-2.15.0-sources.jar
log4j-docker-2.15.0.jar
log4j-flume-ng-2.15.0-javadoc.jar
log4j-flume-ng-2.15.0-sources.jar
log4j-flume-ng-2.15.0.jar
log4j-iostreams-2.15.0-javadoc.jar
log4j-iostreams-2.15.0-sources.jar
log4j-iostreams-2.15.0.jar
log4j-jcl-2.15.0-javadoc.jar
log4j-jcl-2.15.0-sources.jar
log4j-jcl-2.15.0.jar
log4j-jdbc-dbcp2-2.15.0-javadoc.jar
log4j-jdbc-dbcp2-2.15.0-sources.jar
log4j-jdbc-dbcp2-2.15.0.jar
log4j-jmx-gui-2.15.0-javadoc.jar
log4j-jmx-gui-2.15.0-sources.jar
log4j-jmx-gui-2.15.0.jar
log4j-jpa-2.15.0-javadoc.jar
log4j-jpa-2.15.0-sources.jar
log4j-jpa-2.15.0.jar
log4j-jul-2.15.0-javadoc.jar
log4j-jul-2.15.0-sources.jar
log4j-jul-2.15.0.jar
log4j-liquibase-2.15.0-javadoc.jar
log4j-liquibase-2.15.0-sources.jar
log4j-liquibase-2.15.0.jar
log4j-mongodb3-2.15.0-javadoc.jar
log4j-mongodb3-2.15.0-sources.jar
log4j-mongodb3-2.15.0.jar
log4j-mongodb4-2.15.0-javadoc.jar
log4j-mongodb4-2.15.0-sources.jar
log4j-mongodb4-2.15.0.jar
log4j-slf4j-impl-2.15.0-javadoc.jar
log4j-slf4j-impl-2.15.0-sources.jar
log4j-slf4j-impl-2.15.0.jar
log4j-slf4j18-impl-2.15.0-javadoc.jar
log4j-slf4j18-impl-2.15.0-sources.jar
log4j-slf4j18-impl-2.15.0.jar
log4j-spring-boot-2.15.0-javadoc.jar
log4j-spring-boot-2.15.0-sources.jar
log4j-spring-boot-2.15.0.jar
log4j-spring-cloud-config-client-2.15.0-javadoc.jar
log4j-spring-cloud-config-client-2.15.0-sources.jar
log4j-spring-cloud-config-client-2.15.0.jar
log4j-taglib-2.15.0-javadoc.jar
log4j-taglib-2.15.0-sources.jar
log4j-taglib-2.15.0.jar
log4j-to-slf4j-2.15.0-javadoc.jar
log4j-to-slf4j-2.15.0-sources.jar
log4j-to-slf4j-2.15.0.jar
log4j-web-2.15.0-javadoc.jar
log4j-web-2.15.0-sources.jar
log4j-web-2.15.0.jar
view raw

output.txt

hosted with ❤ by GitHub

The ones relevant to Jamf Pro are the following:

  • log4j-1.2-api-2.15.0.jar
  • log4j-api-2.15.0.jar
  • log4j-core-2.15.0.jar
  • log4j-slf4j-impl-2.15.0.jar

For more details, please see below the jump.

The folks at Jamf jumped on this issue and they’ve put together a list of how this affects their products which use the log4j logging tool:


What Jamf products are impacted by the vulnerability?
Jamf Pro (hosted on-premises): Patched
Jamf Pro versions older than 10.14 are vulnerable to this issue. Versions 10.14 through 10.34 include Java 11, which partially mitigates the issue. The Jamf Pro 10.34.1 release was made available to address the issue completely. Please update to this version as soon as possible.
Jamf Pro (Jamf Cloud and Jamf Cloud Premium) Mitigated
Customers utilizing our cloud-based products have had the vulnerability mitigated through appropriate security controls. No further actions are necessary.
Jamf Connect: Not affected
Jamf Connect does not use the affected libraries.
Jamf Now: Not affected
Jamf Now does not use the affected libraries.
Jamf Protect: Not affected
Jamf Protect does not use the affected libraries.
Jamf School: Not affected
Jamf School does not use the affected libraries.
Jamf Threat Defense: Not affected
Jamf Threat Defense does not use the affected libraries.
Jamf Data Policy: Not affected
Jamf Data Policy does not use the affected libraries.
Jamf Private Access: Not affected
Jamf Private Access does not use the affected libraries.
Health Care Listener: Not vulnerable
While Health Care Listener does utilize the library that includes the vulnerability, it cannot be exploited by an attacker.
Jamf Infrastructure Manager: Not vulnerable
While Jamf Infrastructure Manager does utilize the library that includes the vulnerability, it cannot be exploited by an attacker.
view raw

gistfile1.txt

hosted with ❤ by GitHub

To summarize, Jamf found that the main product which was vulnerable was Jamf Pro. To protect Jamf Cloud-hosted instances, Jamf was able to implement security controls on their end to mitigate the vulnerability. These controls allowed Jamf to block remote attempts to use the vulnerability without needing to upgrade everyone to a new version of Jamf Pro.

For folks hosting their own Jamf Pro instances, Jamf has released Jamf Pro 10.34.1. For folks in a position to upgrade, upgrading to Jamf Pro 10.34.1 is the best answer. This version of Jamf Pro includes the fixed 2.15.0 version of log4j and installs the following files:

  • log4j-1.2-api-2.15.0.jar
  • log4j-api-2.15.0.jar
  • log4j-core-2.15.0.jar
  • log4j-slf4j-impl-2.15.0.jar

These files are located in the following directories on platforms which support running Jamf Pro Server:

  • Linux:
    • /usr/local/jss/tomcat/webapps/ROOT/WEB-INF/lib/
  • Windows:
    • C:\Program Files\JSS\Tomcat\webapps\ROOT\WEB-INF\lib\
  • macOS:
    • /Library/JSS/Tomcat/webapps/ROOT/WEB-INF/lib/

If for some reason it is not possible to upgrade to Jamf Pro 10.34.1 at this time and your Jamf Pro Server is not hosted in Jamf Cloud, it is also possible to mitigate the vulnerability by manually copying the updated version of the log4j tools into place. Jamf has a technical article posted which describes this process. If you are not able to upgrade to 10.34.1 and you’re hosting Jamf Pro outside of Jamf Cloud, I strongly recommend following this article to get the updated log4j.jar files in place as soon as possible.

Note: Something very important to know is that these logging tools are replaced as part of a normal Jamf Pro upgrade, so if you’re not upgrading to Jamf Pro 10.34.1 or later, this fix would need to be re-applied for each upgrade.

If you’re upgrading from an older version of Jamf Pro and need to upgrade to certain vulnerable versions along the way to getting to the latest version, you will need to repeat manually re-adding the non-vulnerable log4j.jar files as part of each upgrade.

Preventing user and location inventory information from being changed by the jamf binary’s recon verb

$
0
0

You can allow or prevent local administrators on the computer from changing User and Location inventory information in Jamf Pro with the jamf binary by using the Allow local administrators to use the jamf binary recon verb to change User and Location inventory information in Jamf Pro checkbox. This is a feature which first appeared in Jamf Pro 10.20.x, but may not be well known.

Screen Shot 2020 03 17 at 10 54 47 AM

This setting is enabled by default and can be configured by navigating to Settings > Computer Management > Inventory Collection in Jamf Pro.

Screen Shot 2021 12 27 at 11 42 08 AM

Screen Shot 2021 12 27 at 11 43 13 AM

What this setting affects are the following options associated with the jamf binary’s recon verb:


-endUsername
-realname
-email
-position
-building
-department
-phone
-room
view raw

gistfile1.txt

hosted with ❤ by GitHub

Screen Shot 2021 12 27 at 12 10 53 PM

Why disable this setting? If you have workflows which leverage the user and location information stored in Jamf Pro, being able to change this setting from a managed Mac using the jamf binary’s recon verb may have security implications. In particular, PKI certificate authorities set up in Jamf Pro may use the user and location information stored in Jamf Pro to issue certificates to managed Macs.

Screen Shot 2021 12 27 at 11 39 03 AM

In the context of certificates used for authentication, being able to change the user and location stored in Jamf Pro from the managed Mac’s end may mean that an enduser with the ability to run the jamf binary’s recon verb may be able to get authentication certificates for someone other than themselves assigned to their Mac.

Screen Shot 2021 12 27 at 12 12 47 PM

If you do not have any workflows that use the recon verb’s options specified above, my advice is that you disable this setting and remove the ability of managed Macs to change the user and location information stored in Jamf Pro using the jamf binary’s recon verb.

Screen Shot 2021 12 27 at 12 02 48 PM

2021 Holiday Vacation Project

$
0
0

Like a lot of folks, I took some time off around the holidays. Before then, I decided I wanted to accomplish a couple of things while I was off.

  • Goal 1: Set up a personal status board for my office, where at a glance I could find useful information.
  • Goal 2: Figure out how to be able to play the Star Wars arcade game whenever I wanted to.

I’m happy to say that I was able to accomplish my goal by December 31st, 2021. For more details, please see below the jump.

When I was planning out this project, I knew I would need certain components:

  1. A computer
  2. A display
  3. A keyboard and mouse
  4. An arcade fightstick controller.

For the computer part, I knew I could accomplish my goals using software available for the Raspberry Pi:

However, using a Raspberry Pi meant that I would have to source the Raspberry Pi and display separately. Instead, I decided to look into an older iMac running Ubuntu. When I did my research, I found that the folks at Free Geek in Portland, OR were selling a nearly pristine 2013 21.5 inch iMac with a 250 GB SSD and 16 GBs of RAM for $168.75 on eBay. Even with $60 for shipping, that was cheaper than purchasing a Raspberry Pi 4 and a comparable display.

As an aside, this is the second iMac I’ve bought from the good folks at Free Geek (the first was a 2015 iMac I bought in 2020 for a family member) and what I’ve received has consistently been exactly what I thought I was buying 

So now I had the following:

  • Apple iMac 14,1 (21.5″, 2013)
  • Processor: 2.7 GHz Quad-Core i5 (I5-4570R)
  • Memory: 16 GB RAM
  • Storage: 256 GB SSD

However, I wanted to make it simple to switch between the status board and the arcade. Rather than try to manage it all on the same boot drive, I decided to attach two external SSDs, set up a dual-boot configuration and then just start up from the appropriate drive when needed. To accomplish this, I bought two of the following drives:

I only needed enough space for Ubuntu and either the status board or arcade software, so 240 GBS of space was more than enough. Both connected via USB 3 connections, which the iMac supports.

My next component to support the actual computer was a keyboard and mouse. For that, I chose the following:

This gave me a compact wireless keyboard with an integrated trackpad which didn’t require drivers. This allowed me to use the keyboard and mouse even when the computer needed to boot to EFI or other conditions where the OS hadn’t fully loaded yet.

The last component I needed was the arcade fightstick controller, which I would use when playing games. The research I did specifically for the Star Wars arcade game indicated that I should get one with a trackball for best results, so after doing more research on fightsticks with integrated trackballs, I chose the following:

After that, I installed the latest version of Ubuntu Desktop LTS, which as of December 2021 meant Ubuntu 20.04.3 LTS, onto both external drives.

Once that was done, I configured GRUB with the following configuration:

  • Always boot to boot menu
  • Remember the last drive booted from and automatically have it selected in the boot menu
  • Wait fifteen seconds, then boot to selected drive

# If you change this file, run 'update-grub' afterwards to update
# /boot/grub/grub.cfg.
# For full documentation of the options in this file, see:
# info -f grub -n 'Simple configuration'
GRUB_DEFAULT="saved"
GRUB_TIMEOUT_STYLE=menu
GRUB_TIMEOUT=15
GRUB_DISTRIBUTOR=`lsb_release -i -s 2> /dev/null || echo Debian`
GRUB_CMDLINE_LINUX_DEFAULT="quiet splash"
GRUB_CMDLINE_LINUX=""
# Uncomment to enable BadRAM filtering, modify to suit your needs
# This works with Linux (no patch required) and with any kernel that obtains
# the memory map information from GRUB (GNU Mach, kernel of FreeBSD …)
#GRUB_BADRAM="0x01234567,0xfefefefe,0x89abcdef,0xefefefef"
# Uncomment to disable graphical terminal (grub-pc only)
GRUB_TERMINAL=console
# The resolution used on graphical terminal
# note that you can use only modes which your graphic card supports via VBE
# you can see them in real GRUB with the command `vbeinfo'
#GRUB_GFXMODE=640×480
# Uncomment if you don't want GRUB to pass "root=UUID=xxx" parameter to Linux
#GRUB_DISABLE_LINUX_UUID=true
# Uncomment to disable generation of recovery mode menu entries
#GRUB_DISABLE_RECOVERY="true"
# Uncomment to get a beep at grub start
#GRUB_INIT_TUNE="480 440 1"
view raw

gistfile1.txt

hosted with ❤ by GitHub

The reason I chose this was that I was planning to set up automated system software updates and pre-authorizing reboots if needed by a software update. By configuring GRUB to remember the last drive booted from and booting from it after 15 seconds, that would allow the software update process to happen normally even if a reboot was needed. Meanwhile, fifteen seconds should be more than enough time to me to choose another drive if I’m sitting in front of the Mac.

Now I had Ubuntu installed on two separate boot drives and could set them up as desired. Now I needed to configure each separately according to their function:

Status Board

For the status board Ubuntu boot drive, I installed MagicMirror to drive the status board. The instructions I followed to install and configure MagicMirror are available via the links below:

More information about installing and configuring MagicMirror on Ubuntu is available via the link below:

Arcade

For the arcade Ubuntu boot drive, I installed RetroPie. The instructions I followed to install and configure RetroPie are available via the links below:

I wanted to set RetroPie (otherwise known as EmulationStation) to start up at boot, so I followed the directions available via the link below to configure the Start EmulationStation at Boot setting:

The last part was configuring my Atari Arcade Fightstick to correctly work with Ubuntu. By default, the RetroPie software will only see the fightstick’s one set of controls and not both. To fix this, you need to set the following setting for the Atari Arcade Fightstick:

usbhid.quirks=0x16c0:0x05e1:0x040

To improve the trackball performance, you also need to set the following setting:

usbhid.mousepoll=1

However, where you set this setting is going to be different between Ubuntu (which I’m using) and RetroPie on a Raspberry Pi (which most other folks are using.) For a Raspberry Pi, you should set these settings in the following file:

/boot/cmdline.txt

For Ubuntu, these need to be added to the GRUB_CMDLINE_LINUX_DEFAULT line of your GRUB configuration, as shown below:

GRUB_CMDLINE_LINUX_DEFAULT="usbhid.quirks=0x16c0:0x05e1:0x040 usbhid.mousepoll=1 quiet splash"

In the context of the overall GRUB configuration, it looks like this:


# If you change this file, run 'update-grub' afterwards to update
# /boot/grub/grub.cfg.
# For full documentation of the options in this file, see:
# info -f grub -n 'Simple configuration'
GRUB_DEFAULT="saved"
GRUB_TIMEOUT_STYLE="menu"
GRUB_TIMEOUT="15"
GRUB_DISTRIBUTOR="`lsb_release -i -s 2> /dev/null || echo Debian`"
GRUB_CMDLINE_LINUX_DEFAULT="usbhid.quirks=0x16c0:0x05e1:0x040 usbhid.mousepoll=1 quiet splash"
GRUB_CMDLINE_LINUX=""
# Uncomment to enable BadRAM filtering, modify to suit your needs
# This works with Linux (no patch required) and with any kernel that obtains
# the memory map information from GRUB (GNU Mach, kernel of FreeBSD …)
#GRUB_BADRAM="0x01234567,0xfefefefe,0x89abcdef,0xefefefef"
# Uncomment to disable graphical terminal (grub-pc only)
GRUB_TERMINAL="console"
# The resolution used on graphical terminal
# note that you can use only modes which your graphic card supports via VBE
# you can see them in real GRUB with the command `vbeinfo'
#GRUB_GFXMODE="640×480"
# Uncomment if you don't want GRUB to pass "root=UUID=xxx" parameter to Linux
#GRUB_DISABLE_LINUX_UUID="true"
# Uncomment to disable generation of recovery mode menu entries
#GRUB_DISABLE_RECOVERY="true"
# Uncomment to get a beep at grub start
#GRUB_INIT_TUNE="480 440 1"
GRUB_SAVEDEFAULT="true"
view raw

gistfile1.txt

hosted with ❤ by GitHub

In the end, I’m pretty happy with the end result. Here’s a look at the status board running MagicMirror and the MagicMirror modules which I configured:

IMG 2212

Here’s a look at RetroPie up and running:

IMG 2204

Last but not least, playing the Star Wars arcade game:

IMG 2205

Basic Authentication deprecated for the Jamf Pro Classic API

$
0
0

As part of the release of Jamf Pro 10.35, the following note was added to the Deprecations and Removals section of the Jamf Pro 10.35.0 Release Notes:

Basic authentication — Jamf will discontinue support for Basic authentication in the Classic API in a future release of Jamf Pro (estimated removal date: August-December 2022) for enhanced security. Jamf will provide additional information at a later date. To disable Basic authentication before support is removed, contact Jamf Support via Jamf Account.

Screen Shot 2022 01 04 at 11 54 23 AM

To help folks prepare for this change, as of Jamf Pro 10.35.0, both Basic Authentication and using Bearer Tokens generated by the Jamf Pro API can be used for Jamf Pro Classic API authentication. This is noted in the New Features and Enhancements section of the Jamf Pro 10.35.0 release notes:

You can now use the Classic API to authenticate using Basic authentication or a Bearer Token retrieved through the /v1/auth/token Jamf Pro API endpoint for enhanced security. For information on Bearer Token authentication, see the Jamf developer resources: https://developer.jamf.com/jamf-pro/docs/classic-api-authentication-changes

Screen Shot 2022 01 04 at 11 54 52 AM

For more details, please see below the jump.

For the Classic API, here’s what’s required for authentication using Basic Authentication:

  • One step process.
  • Only username and password needed to authenticate an API call.
  • Username and password can be in plaintext.
  • No tokens are used.

Example Classic API call process using Basic Authentication:


# Provide username and password as part of the API call:
/usr/bin/curl -su username_here:password_here" -H "Accept: application/xml" https://server.name.here/JSSResource/packages/id/2
view raw

gistfile1.txt

hosted with ❤ by GitHub

For the Classic API using Bearer Token authentication, here’s what’s required for authentication:

  • Multi-step process involving multiple API calls.
  • Username and password only used to get authentication token, known as a Bearer Token. The Bearer Token is subsequently used for authentication.
  • Username and password must be base64-encoded.
  • Bearer Tokens are valid for 30 minutes maximum.
  • Introduces need to validate authentication Bearer Tokens before making an API call.

Example Classic API call process using Bearer Token authentication:


# Get username and password encoded in base64 format and stored as a variable in a script:
encodedCredentials=$(printf username_here:password_here | /usr/bin/iconv -t ISO-8859-1 | /usr/bin/base64 -i -)
# Use encoded username and password to request a token with an API call and store the output as a variable in a script:
authToken=$(/usr/bin/curl https://server.name.here/api/v1/auth/token –silent –request POST –header "Authorization: Basic ${encodedCredentials}”)
# Read the output, extract the token information and store the token information as a variable in a script:
api_token=$(/usr/bin/plutil -extract token raw -o – – <<< “$authToken”)
# Verify that the token is valid and unexpired by making a separate API call, checking the HTTP status code and storing status code information as a variable in a script:
api_authentication_check=$(/usr/bin/curl –write-out %{http_code} –silent –output /dev/null https://server.name.here/api/v1/auth/keep-alive –request POST –header "Authorization: Bearer ${api_token}")
#Assuming token is verified to be valid, use the token information to make an API call:
/usr/bin/curl –silent -H "Accept: application/xml" –header "Authorization: Bearer ${api_token}" https://server.name.here/JSSResource/packages/id/2
view raw

gistfile1.txt

hosted with ❤ by GitHub

Screen Shot 2022-01-04 at 5.09.20 PM

The differences in authentication are significant enough that I’ve written shell scripting functions to handle the following tasks for Bearer Token authentication:

  • Obtaining Bearer Token.
  • Verifying that current Bearer Token is valid and unexpired.
  • Renewing Bearer Tokens by using current Bearer Token to authenticate the issuing of a new Bearer Token. (This renewal process creates a new Bearer Token and invalidates the old Bearer Token.)
  • Invalidating current Bearer Token.

Please see the link below for more information on this topic:

https://derflounder.wordpress.com/2021/12/10/obtaining-checking-and-renewing-bearer-tokens-for-the-jamf-pro-api/

Updated script for obtaining, checking and renewing Bearer Tokens for the Classic and Jamf Pro APIs

$
0
0

Following my earlier posts on obtaining, checking and renewing Bearer Tokens for the Jamf Pro API and the deprecation of Basic Authentication for the Jamf Pro Classic API, @bryson3gps reached out to let me know there was a simpler way to get the Bearer Token which didn’t require the prior encoding of the username and password credentials in base64 format.

The command shown below will handle obtaining the token using Basic Authentication on macOS Monterey and later:


curl -X POST -u username:password -s https://server.name.here/api/v1/auth/token | plutil -extract token raw –
view raw

gistfile1.txt

hosted with ❤ by GitHub

The command shown below will handle obtaining the token using Basic Authentication on macOS Big Sur and earlier:


curl -X POST -u username:password -s https://server.name.here/api/v1/auth/token | python -c 'import sys, json; print json.load(sys.stdin)["token"]'
view raw

gistfile1.txt

hosted with ❤ by GitHub

This allows the following functions to be collapsed into one command:

  • Encoding the username and password in base64 format
  • Obtaining a Bearer Token using Basic Authentication
  • Storing the Bearer Token (if command is used in a variable.)

He also pointed out that I was using an incorrect API call for the validation check which uses HTTP status codes. What I had:


/usr/bin/curl –write-out %{http_code} –silent –output /dev/null "$jamfpro_url/api/v1/auth/keep-alive" –request POST –header "Authorization: Bearer ${api_token}"
view raw

gistfile1.txt

hosted with ❤ by GitHub

While this worked, it was using the keepalive endpoint with a POST request, which is used to invalidate tokens and issue new ones. I’ve updated to use this instead:


/usr/bin/curl –write-out %{http_code} –silent –output /dev/null "$jamfpro_url/api/v1/auth" –request GET –header "Authorization: Bearer ${api_token}"
view raw

gistfile1.txt

hosted with ❤ by GitHub

This API call sends a GET request to the auth endpoint, which returns all the authorization details associated with the current Bearer Token. This will work for the validation check and won’t trigger accidental invalidation of the existing Bearer Token.

With this in mind, the process of obtaining Bearer Tokens is now simplified. This affects the deprecation of the Classic API for Jamf Pro 10.35.0 and later by changing the workflow from this:

Screen shot 2022 01 04 at 5 09 20 pm

To this:

Screen Shot 2022 01 05 at 9 43 06 AM

I’ve incorporated these changes into an updated script with functions for obtaining, checking and renewing Bearer Tokens for the Classic (for Jamf Pro 10.35.0 and later) and Jamf Pro APIs. For more details, please see below the jump.

Please see below for the updated script:


#!/bin/bash
# This script uses the Jamf Pro API to get an authentication token
# Set default exit code
exitCode=0
# Explicitly set initial value for the api_token variable to null:
api_token=""
# Explicitly set initial value for the token_expiration variable to null:
token_expiration=""
# If you choose to hardcode API information into the script, set one or more of the following values:
#
# The username for an account on the Jamf Pro server with sufficient API privileges
# The password for the account
# The Jamf Pro URL
# Set the Jamf Pro URL here if you want it hardcoded.
jamfpro_url=""
# Set the username here if you want it hardcoded.
jamfpro_user=""
# Set the password here if you want it hardcoded.
jamfpro_password=""
# Read the appropriate values from ~/Library/Preferences/com.github.jamfpro-info.plist
# if the file is available. To create the file, run the following commands:
#
# defaults write $HOME/Library/Preferences/com.github.jamfpro-info jamfpro_url https://jamf.pro.server.here
# defaults write $HOME/Library/Preferences/com.github.jamfpro-info jamfpro_user API_account_username_goes_here
# defaults write $HOME/Library/Preferences/com.github.jamfpro-info jamfpro_password API_account_password_goes_here
#
if [[ -f "$HOME/Library/Preferences/com.github.jamfpro-info.plist" ]]; then
if [[ -z "$jamfpro_url" ]]; then
jamfpro_url=$(defaults read $HOME/Library/Preferences/com.github.jamfpro-info jamfpro_url)
fi
if [[ -z "$jamfpro_user" ]]; then
jamfpro_user=$(defaults read $HOME/Library/Preferences/com.github.jamfpro-info jamfpro_user)
fi
if [[ -z "$jamfpro_password" ]]; then
jamfpro_password=$(defaults read $HOME/Library/Preferences/com.github.jamfpro-info jamfpro_password)
fi
fi
# If the Jamf Pro URL, the account username or the account password aren't available
# otherwise, you will be prompted to enter the requested URL or account credentials.
if [[ -z "$jamfpro_url" ]]; then
read -p "Please enter your Jamf Pro server URL : " jamfpro_url
fi
if [[ -z "$jamfpro_user" ]]; then
read -p "Please enter your Jamf Pro user account : " jamfpro_user
fi
if [[ -z "$jamfpro_password" ]]; then
read -p "Please enter the password for the $jamfpro_user account: " -s jamfpro_password
fi
echo
# Remove the trailing slash from the Jamf Pro URL if needed.
jamfpro_url=${jamfpro_url%%/}
GetJamfProAPIToken() {
# This function uses Basic Authentication to get a new bearer token for API authentication.
# Use user account's username and password credentials with Basic Authorization to request a bearer token.
if [[ $(/usr/bin/sw_vers -productVersion | awk -F . '{print $1}') -lt 12 ]]; then
api_token=$(/usr/bin/curl -X POST –silent -u "${jamfpro_user}:${jamfpro_password}" "$jamfpro_url/api/v1/auth/token" | python -c 'import sys, json; print json.load(sys.stdin)["token"]')
else
api_token=$(/usr/bin/curl -X POST –silent -u "${jamfpro_user}:${jamfpro_password}" "$jamfpro_url/api/v1/auth/token" | plutil -extract token raw –)
fi
}
APITokenValidCheck() {
# Verify that API authentication is using a valid token by running an API command
# which displays the authorization details associated with the current API user.
# The API call will only return the HTTP status code.
api_authentication_check=$(/usr/bin/curl –write-out %{http_code} –silent –output /dev/null "$jamfpro_url/api/v1/auth" –request GET –header "Authorization: Bearer ${api_token}")
}
CheckAndRenewAPIToken() {
# Verify that API authentication is using a valid token by running an API command
# which displays the authorization details associated with the current API user.
# The API call will only return the HTTP status code.
APITokenValidCheck
# If the api_authentication_check has a value of 200, that means that the current
# bearer token is valid and can be used to authenticate an API call.
if [[ ${api_authentication_check} == 200 ]]; then
# If the current bearer token is valid, it is used to connect to the keep-alive endpoint. This will
# trigger the issuing of a new bearer token and the invalidation of the previous one.
if [[ $(/usr/bin/sw_vers -productVersion | awk -F . '{print $1}') -lt 12 ]]; then
api_token=$(/usr/bin/curl "$jamfpro_url/api/v1/auth/keep-alive" –silent –request POST –header "Authorization: Bearer ${api_token}" | python -c 'import sys, json; print json.load(sys.stdin)["token"]')
else
api_token=$(/usr/bin/curl "$jamfpro_url/api/v1/auth/keep-alive" –silent –request POST –header "Authorization: Bearer ${api_token}" | plutil -extract token raw –)
fi
else
# If the current bearer token is not valid, this will trigger the issuing of a new bearer token
# using Basic Authentication.
GetJamfProAPIToken
fi
}
InvalidateToken() {
# Verify that API authentication is using a valid token by running an API command
# which displays the authorization details associated with the current API user.
# The API call will only return the HTTP status code.
APITokenValidCheck
# If the api_authentication_check has a value of 200, that means that the current
# bearer token is valid and can be used to authenticate an API call.
if [[ ${api_authentication_check} == 200 ]]; then
# If the current bearer token is valid, an API call is sent to invalidate the token.
authToken=$(/usr/bin/curl "$jamfpro_url/api/v1/auth/invalidate-token" –silent –header "Authorization: Bearer ${api_token}" -X POST)
# Explicitly set value for the api_token variable to null.
api_token=""
fi
}
GetJamfProAPIToken
APITokenValidCheck
echo "$api_authentication_check"
echo "$api_token"
CheckAndRenewAPIToken
APITokenValidCheck
echo "$api_authentication_check"
echo "$api_token"
InvalidateToken
APITokenValidCheck
echo "$api_authentication_check"
echo "$api_token"

I’ve updated the original script with the corrected API validation check, but otherwise left it unaltered. That script is available below:


#!/bin/bash
# This script uses the Jamf Pro API to get an authentication token
# Set default exit code
exitCode=0
# Explicitly set initial value for the api_token variable to null:
api_token=""
# Explicitly set initial value for the token_expiration variable to null:
token_expiration=""
# If you choose to hardcode API information into the script, set one or more of the following values:
#
# The username for an account on the Jamf Pro server with sufficient API privileges
# The password for the account
# The Jamf Pro URL
# Set the Jamf Pro URL here if you want it hardcoded.
jamfpro_url=""
# Set the username here if you want it hardcoded.
jamfpro_user=""
# Set the password here if you want it hardcoded.
jamfpro_password=""
# Read the appropriate values from ~/Library/Preferences/com.github.jamfpro-info.plist
# if the file is available. To create the file, run the following commands:
#
# defaults write $HOME/Library/Preferences/com.github.jamfpro-info jamfpro_url https://jamf.pro.server.here
# defaults write $HOME/Library/Preferences/com.github.jamfpro-info jamfpro_user API_account_username_goes_here
# defaults write $HOME/Library/Preferences/com.github.jamfpro-info jamfpro_password API_account_password_goes_here
#
if [[ -f "$HOME/Library/Preferences/com.github.jamfpro-info.plist" ]]; then
if [[ -z "$jamfpro_url" ]]; then
jamfpro_url=$(defaults read $HOME/Library/Preferences/com.github.jamfpro-info jamfpro_url)
fi
if [[ -z "$jamfpro_user" ]]; then
jamfpro_user=$(defaults read $HOME/Library/Preferences/com.github.jamfpro-info jamfpro_user)
fi
if [[ -z "$jamfpro_password" ]]; then
jamfpro_password=$(defaults read $HOME/Library/Preferences/com.github.jamfpro-info jamfpro_password)
fi
fi
# If the Jamf Pro URL, the account username or the account password aren't available
# otherwise, you will be prompted to enter the requested URL or account credentials.
if [[ -z "$jamfpro_url" ]]; then
read -p "Please enter your Jamf Pro server URL : " jamfpro_url
fi
if [[ -z "$jamfpro_user" ]]; then
read -p "Please enter your Jamf Pro user account : " jamfpro_user
fi
if [[ -z "$jamfpro_password" ]]; then
read -p "Please enter the password for the $jamfpro_user account: " -s jamfpro_password
fi
echo
# Remove the trailing slash from the Jamf Pro URL if needed.
jamfpro_url=${jamfpro_url%%/}
GetJamfProAPIToken() {
# This function uses Basic Authentication to get a new bearer token for API authentication.
# Create base64-encoded credentials from user account's username and password.
encodedCredentials=$(printf "${jamfpro_user}:${jamfpro_password}" | /usr/bin/iconv -t ISO-8859-1 | /usr/bin/base64 -i –)
# Use the encoded credentials with Basic Authorization to request a bearer token
authToken=$(/usr/bin/curl "$jamfpro_url/api/v1/auth/token" –silent –request POST –header "Authorization: Basic ${encodedCredentials}")
# Parse the returned output for the bearer token and store the bearer token as a variable.
if [[ $(/usr/bin/sw_vers -productVersion | awk -F . '{print $1}') -lt 12 ]]; then
api_token=$(/usr/bin/awk -F \" 'NR==2{print $4}' <<< "$authToken" | /usr/bin/xargs)
else
api_token=$(/usr/bin/plutil -extract token raw -o – – <<< "$authToken")
fi
}
APITokenValidCheck() {
# Verify that API authentication is using a valid token by running an API command
# which displays the authorization details associated with the current API user.
# The API call will only return the HTTP status code.
api_authentication_check=$(/usr/bin/curl –write-out %{http_code} –silent –output /dev/null "$jamfpro_url/api/v1/auth" –request GET –header "Authorization: Bearer ${api_token}")
}
CheckAndRenewAPIToken() {
# Verify that API authentication is using a valid token by running an API command
# which displays the authorization details associated with the current API user.
# The API call will only return the HTTP status code.
APITokenValidCheck
# If the api_authentication_check has a value of 200, that means that the current
# bearer token is valid and can be used to authenticate an API call.
if [[ ${api_authentication_check} == 200 ]]; then
# If the current bearer token is valid, it is used to connect to the keep-alive endpoint. This will
# trigger the issuing of a new bearer token and the invalidation of the previous one.
#
# The output is parsed for the bearer token and the bearer token is stored as a variable.
authToken=$(/usr/bin/curl "$jamfpro_url/api/v1/auth/keep-alive" –silent –request POST –header "Authorization: Bearer ${api_token}")
if [[ $(/usr/bin/sw_vers -productVersion | awk -F . '{print $1}') -lt 12 ]]; then
api_token=$(/usr/bin/awk -F \" 'NR==2{print $4}' <<< "$authToken" | /usr/bin/xargs)
else
api_token=$(/usr/bin/plutil -extract token raw -o – – <<< "$authToken")
fi
else
# If the current bearer token is not valid, this will trigger the issuing of a new bearer token
# using Basic Authentication.
GetJamfProAPIToken
fi
}
InvalidateToken() {
# Verify that API authentication is using a valid token by running an API command
# which displays the authorization details associated with the current API user.
# The API call will only return the HTTP status code.
APITokenValidCheck
# If the api_authentication_check has a value of 200, that means that the current
# bearer token is valid and can be used to authenticate an API call.
if [[ ${api_authentication_check} == 200 ]]; then
# If the current bearer token is valid, an API call is sent to invalidate the token.
authToken=$(/usr/bin/curl "$jamfpro_url/api/v1/auth/invalidate-token" –silent –header "Authorization: Bearer ${api_token}" -X POST)
# Explicitly set value for the api_token variable to null.
api_token=""
fi
}
GetJamfProAPIToken
APITokenValidCheck
echo "$api_authentication_check"
echo "$api_token"
CheckAndRenewAPIToken
APITokenValidCheck
echo "$api_authentication_check"
echo "$api_token"
InvalidateToken
APITokenValidCheck
echo "$api_authentication_check"
echo "$api_token"

Identifying Intel Macs with Secure Enclave using Jamf Pro

$
0
0

Identifying Intel Macs with Secure Enclave using Jamf Pro

As part of a recent task, I needed to identify using Jamf Pro which Macs in our environment have Secure Enclave and which Macs do not. For Intel Macs, having Secure Enclave means that you have one of the following Macs:

Macs with the Apple T1 Security Chip

  • MacBook Pro (13-inch with Touch Bar, Late 2016)
  • MacBook Pro (15-inch with Touch Bar, Late 2016)
  • MacBook Pro (13-inch with Touch Bar, Mid-2017)
  • MacBook Pro (15-inch with Touch Bar, Mid-2017)

Macs with the Apple T2 Security Chip

  • iMac (Retina 5K, 27-inch, 2020)
  • iMac Pro
  • Mac Pro (2019)
  • Mac Pro (Rack, 2019)
  • Mac mini (2018)
  • MacBook Air (Retina, 13-inch, 2020)
  • MacBook Air (Retina, 13-inch, 2019)
  • MacBook Air (Retina, 13-inch, 2018)
  • MacBook Pro (13-inch, 2020, Two Thunderbolt 3 ports)
  • MacBook Pro (13-inch, 2020, Four Thunderbolt 3 ports)
  • MacBook Pro (16-inch, 2019)
  • MacBook Pro (13-inch, 2019, Two Thunderbolt 3 ports)
  • MacBook Pro (15-inch, 2019)
  • MacBook Pro (13-inch, 2019, Four Thunderbolt 3 ports)
  • MacBook Pro (15-inch, 2018)
  • MacBook Pro (13-inch, 2018, Four Thunderbolt 3 ports)

Jamf Pro doesn’t have a specific “this Mac has Secure Enclave” inventory identifier, so I decided to use Apple’s documentation on which Intel Mac models have Secure Enclave to build Jamf Pro smart groups with model identifiers. With Apple’s move to Apple Silicon processors, this list of models should not be added to in the future.

For Intel Macs equipped with T1 chips, here are the relevant model identifiers:


This file contains bidirectional Unicode text that may be interpreted or compiled differently than what appears below. To review, open the file in an editor that reveals hidden Unicode characters.
Learn more about bidirectional Unicode characters


MacBookPro13,2
MacBookPro13,3
MacBookPro14,2
MacBookPro14,3
view raw

gistfile1.txt

hosted with ❤ by GitHub

For Intel Macs equipped with T2 chips, here are the relevant model identifiers:


This file contains bidirectional Unicode text that may be interpreted or compiled differently than what appears below. To review, open the file in an editor that reveals hidden Unicode characters.
Learn more about bidirectional Unicode characters


iMac20,1
iMacPro1,1
MacPro7,1
Macmini8,1
MacBookAir8,1
MacBookAir8,2
MacBookAir9,1
MacBookPro15,1
MacBookPro15,2
MacBookPro15,3
MacBookPro15,4
MacBookPro16,1
MacBookPro16,2
MacBookPro16,3
MacBookPro16,4
view raw

gistfile1.txt

hosted with ❤ by GitHub

For more details, please see below the jump.

To create a smart group that contains the list of all Intel Macs equipped with Secure Enclave, I’ve created the following smart group XML file:

Jamf Pro smart group containing model identifiers for Intel Macs with Secure Enclave:


This file contains bidirectional Unicode text that may be interpreted or compiled differently than what appears below. To review, open the file in an editor that reveals hidden Unicode characters.
Learn more about bidirectional Unicode characters


<?xml version="1.0" encoding="UTF-8"?>
<computer_group>
<name>Intel Macs with Secure Enclave</name>
<is_smart>true</is_smart>
<criteria>
<criterion>
<name>Model Identifier</name>
<priority>0</priority>
<and_or>or</and_or>
<search_type>is</search_type>
<value>MacBookPro13,2</value>
</criterion>
<criterion>
<name>Model Identifier</name>
<priority>1</priority>
<and_or>or</and_or>
<search_type>is</search_type>
<value>MacBookPro13,3</value>
</criterion>
<criterion>
<name>Model Identifier</name>
<priority>2</priority>
<and_or>or</and_or>
<search_type>is</search_type>
<value>MacBookPro14,2</value>
</criterion>
<criterion>
<name>Model Identifier</name>
<priority>3</priority>
<and_or>or</and_or>
<search_type>is</search_type>
<value>MacBookPro14,3</value>
</criterion>
<criterion>
<name>Model Identifier</name>
<priority>4</priority>
<and_or>or</and_or>
<search_type>is</search_type>
<value>iMac20,1</value>
</criterion>
<criterion>
<name>Model Identifier</name>
<priority>5</priority>
<and_or>or</and_or>
<search_type>is</search_type>
<value>iMacPro1,1</value>
</criterion>
<criterion>
<name>Model Identifier</name>
<priority>6</priority>
<and_or>or</and_or>
<search_type>is</search_type>
<value>MacPro7,1</value>
</criterion>
<criterion>
<name>Model Identifier</name>
<priority>7</priority>
<and_or>or</and_or>
<search_type>is</search_type>
<value>Macmini8,1</value>
</criterion>
<criterion>
<name>Model Identifier</name>
<priority>8</priority>
<and_or>or</and_or>
<search_type>is</search_type>
<value>MacBookAir8,1</value>
</criterion>
<criterion>
<name>Model Identifier</name>
<priority>9</priority>
<and_or>or</and_or>
<search_type>is</search_type>
<value>MacBookAir8,2</value>
</criterion>
<criterion>
<name>Model Identifier</name>
<priority>10</priority>
<and_or>or</and_or>
<search_type>is</search_type>
<value>MacBookAir9,1</value>
</criterion>
<criterion>
<name>Model Identifier</name>
<priority>11</priority>
<and_or>or</and_or>
<search_type>is</search_type>
<value>MacBookPro15,1</value>
</criterion>
<criterion>
<name>Model Identifier</name>
<priority>12</priority>
<and_or>or</and_or>
<search_type>is</search_type>
<value>MacBookPro15,2</value>
</criterion>
<criterion>
<name>Model Identifier</name>
<priority>13</priority>
<and_or>or</and_or>
<search_type>is</search_type>
<value>MacBookPro15,3</value>
</criterion>
<criterion>
<name>Model Identifier</name>
<priority>14</priority>
<and_or>or</and_or>
<search_type>is</search_type>
<value>MacBookPro15,4</value>
</criterion>
<criterion>
<name>Model Identifier</name>
<priority>15</priority>
<and_or>or</and_or>
<search_type>is</search_type>
<value>MacBookPro16,1</value>
</criterion>
<criterion>
<name>Model Identifier</name>
<priority>16</priority>
<and_or>or</and_or>
<search_type>is</search_type>
<value>MacBookPro16,2</value>
</criterion>
<criterion>
<name>Model Identifier</name>
<priority>17</priority>
<and_or>or</and_or>
<search_type>is</search_type>
<value>MacBookPro16,3</value>
</criterion>
<criterion>
<name>Model Identifier</name>
<priority>18</priority>
<and_or>or</and_or>
<search_type>is</search_type>
<value>MacBookPro16,4</value>
</criterion>
</criteria>
<computers/>
</computer_group>

To narrow down if the Mac has a T1 or T2 chip installed, I also created the following smart group XML files:

Jamf Pro smart group containing model identifiers for Intel Macs with T1 chips:


This file contains bidirectional Unicode text that may be interpreted or compiled differently than what appears below. To review, open the file in an editor that reveals hidden Unicode characters.
Learn more about bidirectional Unicode characters


<?xml version="1.0" encoding="UTF-8"?>
<computer_group>
<name>Intel Macs with T1 chips</name>
<is_smart>true</is_smart>
<criteria>
<criterion>
<name>Model Identifier</name>
<priority>0</priority>
<and_or>or</and_or>
<search_type>is</search_type>
<value>MacBookPro13,2</value>
</criterion>
<criterion>
<name>Model Identifier</name>
<priority>1</priority>
<and_or>or</and_or>
<search_type>is</search_type>
<value>MacBookPro13,3</value>
</criterion>
<criterion>
<name>Model Identifier</name>
<priority>2</priority>
<and_or>or</and_or>
<search_type>is</search_type>
<value>MacBookPro14,2</value>
</criterion>
<criterion>
<name>Model Identifier</name>
<priority>3</priority>
<and_or>or</and_or>
<search_type>is</search_type>
<value>MacBookPro14,3</value>
</criterion>
</criteria>
<computers/>
</computer_group>

Jamf Pro smart group containing model identifiers for Intel Macs with T2 chips:


This file contains bidirectional Unicode text that may be interpreted or compiled differently than what appears below. To review, open the file in an editor that reveals hidden Unicode characters.
Learn more about bidirectional Unicode characters


<?xml version="1.0" encoding="UTF-8"?>
<computer_group>
<name>Intel Macs with T2 chips</name>
<is_smart>true</is_smart>
<criteria>
<criterion>
<name>Model Identifier</name>
<priority>0</priority>
<and_or>or</and_or>
<search_type>is</search_type>
<value>iMac20,1</value>
</criterion>
<criterion>
<name>Model Identifier</name>
<priority>1</priority>
<and_or>or</and_or>
<search_type>is</search_type>
<value>iMacPro1,1</value>
</criterion>
<criterion>
<name>Model Identifier</name>
<priority>2</priority>
<and_or>or</and_or>
<search_type>is</search_type>
<value>MacPro7,1</value>
</criterion>
<criterion>
<name>Model Identifier</name>
<priority>3</priority>
<and_or>or</and_or>
<search_type>is</search_type>
<value>Macmini8,1</value>
</criterion>
<criterion>
<name>Model Identifier</name>
<priority>4</priority>
<and_or>or</and_or>
<search_type>is</search_type>
<value>MacBookAir8,1</value>
</criterion>
<criterion>
<name>Model Identifier</name>
<priority>5</priority>
<and_or>or</and_or>
<search_type>is</search_type>
<value>MacBookAir8,2</value>
</criterion>
<criterion>
<name>Model Identifier</name>
<priority>6</priority>
<and_or>or</and_or>
<search_type>is</search_type>
<value>MacBookAir9,1</value>
</criterion>
<criterion>
<name>Model Identifier</name>
<priority>7</priority>
<and_or>or</and_or>
<search_type>is</search_type>
<value>MacBookPro15,1</value>
</criterion>
<criterion>
<name>Model Identifier</name>
<priority>8</priority>
<and_or>or</and_or>
<search_type>is</search_type>
<value>MacBookPro15,2</value>
</criterion>
<criterion>
<name>Model Identifier</name>
<priority>9</priority>
<and_or>or</and_or>
<search_type>is</search_type>
<value>MacBookPro15,3</value>
</criterion>
<criterion>
<name>Model Identifier</name>
<priority>10</priority>
<and_or>or</and_or>
<search_type>is</search_type>
<value>MacBookPro15,4</value>
</criterion>
<criterion>
<name>Model Identifier</name>
<priority>11</priority>
<and_or>or</and_or>
<search_type>is</search_type>
<value>MacBookPro16,1</value>
</criterion>
<criterion>
<name>Model Identifier</name>
<priority>12</priority>
<and_or>or</and_or>
<search_type>is</search_type>
<value>MacBookPro16,2</value>
</criterion>
<criterion>
<name>Model Identifier</name>
<priority>13</priority>
<and_or>or</and_or>
<search_type>is</search_type>
<value>MacBookPro16,3</value>
</criterion>
<criterion>
<name>Model Identifier</name>
<priority>14</priority>
<and_or>or</and_or>
<search_type>is</search_type>
<value>MacBookPro16,4</value>
</criterion>
</criteria>
<computers/>
</computer_group>

These smart group XML files can be imported into a Jamf Pro server via Jamf’s Classic API. To upload it using the Classic API, download the XML file to a convenient location, then run the command shown below (substituting as appropriate):


This file contains bidirectional Unicode text that may be interpreted or compiled differently than what appears below. To review, open the file in an editor that reveals hidden Unicode characters.
Learn more about bidirectional Unicode characters


curl -su username:password https://jamfpro.server.here:port.number.here/JSSResource/computergroups/id/0 -T /path/to/filename.xml -X POST
view raw

gistfile1.txt

hosted with ❤ by GitHub

For on-premise Jamf Pro servers, this API command will be similar to what’s shown below:


This file contains bidirectional Unicode text that may be interpreted or compiled differently than what appears below. To review, open the file in an editor that reveals hidden Unicode characters.
Learn more about bidirectional Unicode characters


curl -su username:password https://jamfpro.server.here:8443/JSSResource/computergroups/id/0 -T /path/to/filename.xml -X POST
view raw

gistfile1.txt

hosted with ❤ by GitHub

For Jamf Cloud-hosted Jamf Pro servers, this API command will be similar to what’s shown below:


This file contains bidirectional Unicode text that may be interpreted or compiled differently than what appears below. To review, open the file in an editor that reveals hidden Unicode characters.
Learn more about bidirectional Unicode characters


curl -su username:password https://jamfpro.server.name.here.jamfcloud.com/JSSResource/computergroups/id/0 -T /path/to/filename.xml -X POST
view raw

gistfile1.txt

hosted with ❤ by GitHub

If the smart group was successfully uploaded, you should next see output similar to that shown below:


This file contains bidirectional Unicode text that may be interpreted or compiled differently than what appears below. To review, open the file in an editor that reveals hidden Unicode characters.
Learn more about bidirectional Unicode characters


<?xml version="1.0" encoding="UTF-8"?><computer_group><id>64</id></computer_group>computername:~ username$
view raw

gistfile1.txt

hosted with ❤ by GitHub

Amazon Web Services’s new EC2 metadata tag option doesn’t allow spaces in tag names

$
0
0

Beginning on January 6th, Amazon Web Services added a new option to include your instance’s tags as part of the instance’s metadata when the instance is launched:

https://aws.amazon.com/about-aws/whats-new/2022/01/instance-tags-amazon-ec2-instance-metadata-service/

By including this data in the instance metadata, this information no longer needs the DescribeInstances or DescribeTags API calls to retrieve tag information. For shops which use tag information extensively, this will cut down on the number of API calls you need to make and allow tag retrieval to scale better.

There is one limitation: tags stored in metadata cannot have spaces. If you have the “tags in metadata” option enabled and you have a tag with spaces in it, you’ll see a message similar to the one below:

‘Tag Name Here’ is not a valid tag key. Tag keys must match pattern ([0-9a-zA-Z-_+=,.@:]{1,255}), and must not be a reserved name (‘.’, ‘..’, ‘_index’)

This was an issue for me yesterday because I’m using AWS’s Patch Manager to keep my instances updated and that uses the following tag:

Patch Group

This tag must be used by patching groups and is referenced in the documentation this way:

Patch groups require use of the tag key Patch Group. You can specify any tag value, but the tag key must be Patch Group.

https://docs.aws.amazon.com/systems-manager/latest/userguide/sysman-patch-group-tagging.html

Screen Shot 2022 01 11 at 2 31 34 PM

The result was that I set up a new instance yesterday with my tags, including the Patch Group tag, and received the following message when I tried to launch the instance:

‘Patch Group’ is not a valid tag key. Tag keys must match pattern ([0-9a-zA-Z-_+=,.@:]{1,255}), and must not be a reserved name (‘.’, ‘..’, ‘_index’)

I put in a ticket to AWS Support and the fix is the following:

When setting up new EC2 instances, make sure that the Allow tags in metadata setting under the Advanced Details section is set to Disabled.

Screen Shot 2022 01 11 at 8 57 42 AM

This turns off including your instance’s tags with the instance’s metadata as part of the instance’s launch. This addresses the issue because tag information will not be added to your instance’s metadata and thus removes the metadata tagging limitations from the instance creation process. Now your tags can include spaces again, though you’re also back to having to retrieve tag information via the API.

On Monday, January 10th 2022, the Allow tags in metadata setting was set to Enabled by default. However, I suspect AWS got enough support calls about this particular issue that they made a change to the default settings. As of Tuesday, January 11th 2022, the Allow tags in metadata setting is now set to Disabled by default.

Backing up Self Service icon graphic files from Jamf Pro

$
0
0

While working with Self Service policies on Jamf Pro, I prefer to download the graphic files used for the Self Service icons and back them up to GitHub or a similar internal source control tool. The reasons I do this are the following:

  1. I have an off-server backup for the graphic files.
  2. I can track changes to the Self Service policy icons.

To help me manage this, I have a script which does the following:

  1. Use the Jamf Pro Classic API to identify which policies are Self Service policies with icons.
  2. Download each Self Service icon’s graphic file using the URI for each file.
  3. Save the downloaded graphics file to a specified download directory, using a filename format like shown below:

policy_name_here-jamf_pro_policy_id_here-graphics_file_name_here

As part of the download process, any spaces are removed from the graphic file’s file names and the policy names. Any colons ( : ) are likewise replaced with dashes ( ) to prevent problems for the macOS filesystem.

For more details, please see below the jump.

For authentication, the script can accept hard-coded values in the script, manual input or values stored in a ~/Library/Preferences/com.github.jamfpro-info.plist file.

The plist file can be created by running the following commands and substituting your own values where appropriate:

To store the Jamf Pro URL in the plist file:

defaults write com.github.jamfpro-info jamfpro_url https://jamf.pro.server.goes.here:port_number_goes_here

To store the account username in the plist file:

defaults write com.github.jamfpro-info jamfpro_user account_username_goes_here

To store the account password in the plist file:

defaults write com.github.jamfpro-info jamfpro_password account_password_goes_here

When the script runs, you should see output similar to that shown below.


This file contains bidirectional Unicode text that may be interpreted or compiled differently than what appears below. To review, open the file in an editor that reveals hidden Unicode characters.
Learn more about bidirectional Unicode characters


username@computername ~ % /Users/Shared/Jamf_Pro_Download_Self_Service_Icons.sh
A location to store downloaded scripts has not been specified.
Downloaded Self Service icons will be stored in /var/folders/j1/xv08602n6vs80zmnmxrzj7m80000ks/T/tmp.u2DUeALb.
Checking 14 policies for Self Service icons …
Downloading AmazonCorretto11-108-AmazonCorettoJDK11.png to /var/folders/j1/xv08602n6vs80zmnmxrzj7m80000ks/T/tmp.u2DUeALb.
Downloading Arq-109-Arq.png to /var/folders/j1/xv08602n6vs80zmnmxrzj7m80000ks/T/tmp.u2DUeALb.
Downloading MicrosoftOneNote-23-Microsoft_OneNote.png to /var/folders/j1/xv08602n6vs80zmnmxrzj7m80000ks/T/tmp.u2DUeALb.
Downloading MicrosoftOffice365-94-Office2016.png to /var/folders/j1/xv08602n6vs80zmnmxrzj7m80000ks/T/tmp.u2DUeALb.
Downloading GetLogs-107-Acme-corp.png to /var/folders/j1/xv08602n6vs80zmnmxrzj7m80000ks/T/tmp.u2DUeALb.
Downloading BoottomacOSRecoveryorDiagnostics-106-Screen Shot 2020-03-24 at 4.34.21 PM copy.png to /var/folders/j1/xv08602n6vs80zmnmxrzj7m80000ks/T/tmp.u2DUeALb.
Downloading EncryptMacs-6-FileVault.png to /var/folders/j1/xv08602n6vs80zmnmxrzj7m80000ks/T/tmp.u2DUeALb.
Downloading CheckforAppleSoftwareUpdates-105-install.png to /var/folders/j1/xv08602n6vs80zmnmxrzj7m80000ks/T/tmp.u2DUeALb.
Downloading MicrosoftRemoteDesktop-22-Microsoft_Remote_Desktop.png to /var/folders/j1/xv08602n6vs80zmnmxrzj7m80000ks/T/tmp.u2DUeALb.
Downloading Slack-104-Slack.png to /var/folders/j1/xv08602n6vs80zmnmxrzj7m80000ks/T/tmp.u2DUeALb.
10 Self Service icon files downloaded to /var/folders/j1/xv08602n6vs80zmnmxrzj7m80000ks/T/tmp.u2DUeALb.
username@computername ~ %
view raw

gistfile1.txt

hosted with ❤ by GitHub

Screen Shot 2022 01 12 at 3 02 30 PM


The graphic files themselves will be stored in either a user-specified directory or, if no directory is specified, a directory created by the script.

Screen Shot 2022 01 12 at 3 03 54 PM

I’ve also included support for using Bearer Tokens for authentication for the Jamf Pro Classic API, which is a feature available on Jamf Pro 10.35.0 and later. This is enabled by default, so the script will try to get a Bearer Token and use it for authentication.

If you’re using this script with Jamf Pro 10.34.2 and earlier, please set the NoBearerToken variable in the script as follows:

NoBearerToken="yes"

This will set the script to use Basic Authentication instead of Bearer Tokens for authentication to the Classic API.

The script is available below, and at the following addresses on GitHub:

https://github.com/rtrouton/rtrouton_scripts/tree/master/rtrouton_scripts/Casper_Scripts/Jamf_Pro_Download_Self_Service_Icons


This file contains bidirectional Unicode text that may be interpreted or compiled differently than what appears below. To review, open the file in an editor that reveals hidden Unicode characters.
Learn more about bidirectional Unicode characters


#!/bin/bash
# This script uses the Jamf Pro Classic API to detect which Self Service policies
# have icons and downloads the icon graphic files to a download directory.
# Set default exit code
exitCode=0
# If you're on Jamf Pro 10.34.2 or earlier, which doesn't support using Bearer Tokens
# for Classic API authentication, set the NoBearerToken variable to the following value
# as shown below:
#
# yes
#
# NoBearerToken="yes"
#
# If you're on Jamf Pro 10.35.0 or later, which does support using Bearer Tokens
# for Classic API authentication, set the NoBearerToken variable to the following value
# as shown below:
#
# NoBearerToken=""
NoBearerToken=""
# If you choose to specify a directory to save the downloaded Self Service icons
# into, please enter the complete directory path into the SelfServiceIconDownloadDirectory
# variable below.
SelfServiceIconDownloadDirectory=""
# If the SelfServiceIconDownloadDirectory isn't specified above, a directory will be
# created and the complete directory path displayed by the script.
if [[ -z "$SelfServiceIconDownloadDirectory" ]]; then
SelfServiceIconDownloadDirectory=$(mktemp -d)
echo "A location to store downloaded scripts has not been specified."
echo "Downloaded Self Service icons will be stored in $SelfServiceIconDownloadDirectory."
fi
GetJamfProAPIToken() {
# This function uses Basic Authentication to get a new bearer token for API authentication.
# Use user account's username and password credentials with Basic Authorization to request a bearer token.
if [[ $(/usr/bin/sw_vers -productVersion | awk -F . '{print $1}') -lt 12 ]]; then
api_token=$(/usr/bin/curl -X POST –silent -u "${jamfpro_user}:${jamfpro_password}" "$jamfpro_url/api/v1/auth/token" | python -c 'import sys, json; print json.load(sys.stdin)["token"]')
else
api_token=$(/usr/bin/curl -X POST –silent -u "${jamfpro_user}:${jamfpro_password}" "$jamfpro_url/api/v1/auth/token" –silent | plutil -extract token raw –)
fi
}
APITokenValidCheck() {
# Verify that API authentication is using a valid token by running an API command
# which displays the authorization details associated with the current API user.
# The API call will only return the HTTP status code.
api_authentication_check=$(/usr/bin/curl –write-out %{http_code} –silent –output /dev/null "$jamfpro_url/api/v1/auth" –request GET –header "Authorization: Bearer ${api_token}")
}
CheckAndRenewAPIToken() {
# Verify that API authentication is using a valid token by running an API command
# which displays the authorization details associated with the current API user.
# The API call will only return the HTTP status code.
APITokenValidCheck
# If the api_authentication_check has a value of 200, that means that the current
# bearer token is valid and can be used to authenticate an API call.
if [[ ${api_authentication_check} == 200 ]]; then
# If the current bearer token is valid, it is used to connect to the keep-alive endpoint. This will
# trigger the issuing of a new bearer token and the invalidation of the previous one.
if [[ $(/usr/bin/sw_vers -productVersion | awk -F . '{print $1}') -lt 12 ]]; then
api_token=$(/usr/bin/curl "$jamfpro_url/api/v1/auth/keep-alive" –silent –request POST –header "Authorization: Bearer ${api_token}" | python -c 'import sys, json; print json.load(sys.stdin)["token"]')
else
api_token=$(/usr/bin/curl "$jamfpro_url/api/v1/auth/keep-alive" –silent –request POST –header "Authorization: Bearer ${api_token}" | plutil -extract token raw –)
fi
else
# If the current bearer token is not valid, this will trigger the issuing of a new bearer token
# using Basic Authentication.
GetJamfProAPIToken
fi
}
InvalidateToken() {
# Verify that API authentication is using a valid token by running an API command
# which displays the authorization details associated with the current API user.
# The API call will only return the HTTP status code.
APITokenValidCheck
# If the api_authentication_check has a value of 200, that means that the current
# bearer token is valid and can be used to authenticate an API call.
if [[ ${api_authentication_check} == 200 ]]; then
# If the current bearer token is valid, an API call is sent to invalidate the token.
authToken=$(/usr/bin/curl "$jamfpro_url/api/v1/auth/invalidate-token" –silent –header "Authorization: Bearer ${api_token}" -X POST)
# Explicitly set value for the api_token variable to null.
api_token=""
fi
}
# If you choose to hardcode API information into the script, set one or more of the following values:
#
# The username for an account on the Jamf Pro server with sufficient API privileges
# The password for the account
# The Jamf Pro URL
# Set the Jamf Pro URL here if you want it hardcoded.
jamfpro_url=""
# Set the username here if you want it hardcoded.
jamfpro_user=""
# Set the password here if you want it hardcoded.
jamfpro_password=""
# Read the appropriate values from ~/Library/Preferences/com.github.jamfpro-info.plist
# if the file is available. To create the file, run the following commands:
#
# defaults write $HOME/Library/Preferences/com.github.jamfpro-info jamfpro_url https://jamf.pro.server.here
# defaults write $HOME/Library/Preferences/com.github.jamfpro-info jamfpro_user API_account_username_goes_here
# defaults write $HOME/Library/Preferences/com.github.jamfpro-info jamfpro_password API_account_password_goes_here
#
if [[ -f "$HOME/Library/Preferences/com.github.jamfpro-info.plist" ]]; then
if [[ -z "$jamfpro_url" ]]; then
jamfpro_url=$(defaults read $HOME/Library/Preferences/com.github.jamfpro-info jamfpro_url)
fi
if [[ -z "$jamfpro_user" ]]; then
jamfpro_user=$(defaults read $HOME/Library/Preferences/com.github.jamfpro-info jamfpro_user)
fi
if [[ -z "$jamfpro_password" ]]; then
jamfpro_password=$(defaults read $HOME/Library/Preferences/com.github.jamfpro-info jamfpro_password)
fi
fi
# If the Jamf Pro URL, the account username or the account password aren't available
# otherwise, you will be prompted to enter the requested URL or account credentials.
if [[ -z "$jamfpro_url" ]]; then
read -p "Please enter your Jamf Pro server URL : " jamfpro_url
fi
if [[ -z "$jamfpro_user" ]]; then
read -p "Please enter your Jamf Pro user account : " jamfpro_user
fi
if [[ -z "$jamfpro_password" ]]; then
read -p "Please enter the password for the $jamfpro_user account: " -s jamfpro_password
fi
echo
# Remove the trailing slash from the Jamf Pro URL if needed.
jamfpro_url=${jamfpro_url%%/}
if [[ -z "NoBearerToken" ]]; then
GetJamfProAPIToken
fi
# The following function downloads individual Jamf Pro policy as XML data
# then mines the policy data for the relevant information.
CheckSelfServicePolicyIcons(){
local PolicyId="$1"
if [[ -n "$PolicyId" ]]; then
if [[ -z "NoBearerToken" ]]; then
APITokenValidCheck
local DownloadedXMLData=$(/usr/bin/curl -s –header "Authorization: Bearer ${api_token}" -H "Accept: application/xml" "${jamfpro_url}/JSSResource/policies/id/$PolicyId")
else
local DownloadedXMLData=$(/usr/bin/curl -su "${jamfpro_user}:${jamfpro_password}" -H "Accept: application/xml" "${jamfpro_url}/JSSResource/policies/id/$PolicyId")
fi
local PolicyName=$( echo "$DownloadedXMLData" | xmllint –xpath '/policy/general/name/text()'2>/dev/null)
local SelfServicePolicyCheck=$(echo "$DownloadedXMLData" | xmllint –xpath '/policy/self_service/use_for_self_service/text()'2>/dev/null)
local SelfServiceIcon=$(echo "$DownloadedXMLData" | xmllint –xpath '/policy/self_service/self_service_icon/id/text()'2>/dev/null)
local SelfServiceIconName=$(echo "$DownloadedXMLData" | xmllint –xpath '/policy/self_service/self_service_icon/filename/text()'2>/dev/null)
local SelfServiceIconURI=$(echo "$DownloadedXMLData" | xmllint –xpath '/policy/self_service/self_service_icon/uri/text()'2>/dev/null)
# If a policy is detected as being a Self Service policy with an icon where a download URL is also available,
# the icon is downloaded to the Self Service icon download directory. Spaces and colons will be removed from
# the policy names and icon filenames.
if [[ "$SelfServicePolicyCheck" = "true" ]] && [[ -n "$SelfServiceIcon" ]] && [[ -n "$SelfServiceIconURI" ]]; then
DownloadSafePolicyName=$(echo ${PolicyName} | sed -e 's/:/-/g' -e 's/ //g')
DownloadSafeIconName=$(echo ${SelfServiceIconName} | sed -e 's/:/-/g' -e 's/ //g')
echo "Downloading $DownloadSafePolicyName$PolicyId$SelfServiceIconName to $SelfServiceIconDownloadDirectory."
curl -s ${SelfServiceIconURI} -X GET > "${SelfServiceIconDownloadDirectory}"/"${DownloadSafePolicyName}""${PolicyId}""${DownloadSafeIconName}"
fi
fi
}
# Download all Jamf Pro policy ID numbers
if [[ -z "NoBearerToken" ]]; then
APITokenValidCheck
PolicyIDList=$(/usr/bin/curl -s –header "Authorization: Bearer ${api_token}" -H "Accept: application/xml" "${jamfpro_url}/JSSResource/policies" | xmllint –xpath '//id'2>/dev/null)
else
PolicyIDList=$(/usr/bin/curl -su "${jamfpro_user}:${jamfpro_password}" -H "Accept: application/xml" "${jamfpro_url}/JSSResource/policies" | xmllint –xpath '//id'2>/dev/null)
fi
PolicyIDs=$(echo "$PolicyIDList" | grep -Eo "[0-9]+")
PoliciesCount=$(echo "$PolicyIDs" | grep -c ^)
echo "Checking $PoliciesCount policies for Self Service icons …"
echo
# Download latest version of all Self Service icon graphic files. For performance reasons, we parallelize the execution.
MaximumConcurrentJobs=10
ActiveJobs=0
for anID in ${PolicyIDs}; do
((ActiveJobs=ActiveJobs%MaximumConcurrentJobs)); ((ActiveJobs++==0)) && wait
CheckSelfServicePolicyIcons $anID &
done
# Wait for remaining concurrent jobs to finish
sleep 3
DirectoryCount=$(ls ${SelfServiceIconDownloadDirectory} | wc -l | awk '$1=$1')
# Display how many Self Service icon files were downloaded.
echo ""
echo "$DirectoryCount Self Service icon files downloaded to $SelfServiceIconDownloadDirectory."
if [[ -z "NoBearerToken" ]]; then
InvalidateToken
fi
exit $exitCode

Jamf Pro server installer for macOS retirement planned for March 2022

$
0
0

To follow up on my earlier post on the Jamf Pro Server Installer for macOS being retired, Jamf has added the following to the Deprecations and Removals section of the Jamf Pro 10.35.0 release notes:

Support ending for the Jamf Pro Server Installer for macOS—Support for using the Jamf Pro Installer for macOS will be discontinued in a future release (estimated removal date: March 2022). Mac computers with Apple silicon are not supported by the Jamf Pro Installer for macOS. If you want to migrate your Jamf Pro server from macOS to Jamf Cloud, contact Jamf Support via Jamf Account. If you want to keep your server on premise, you can migrate your Jamf Pro server from macOS to one of the following servers: Red Hat Enterprise Linux, Ubuntu, or Windows. For more information, see the Migrating to Another Server article.

Screen Shot 2022 01 14 at 10 23 54 AM


For those folks who are running on-premise Jamf Pro servers on Macs, I strongly recommend contacting Jamf Support and plan a migration if you haven’t already. As of January 14th, 2022, Jamf’s published support for running Jamf Pro includes the following OS, database and Java versions:


This file contains bidirectional Unicode text that may be interpreted or compiled differently than what appears below. To review, open the file in an editor that reveals hidden Unicode characters.
Learn more about bidirectional Unicode characters


Recommended Configuration:
Operating Systems:
Windows Server 2019
Ubuntu Server 20.04 LTS
Red Hat Enterprise Linux 7.x
Database software versions:
MySQL 8.0 – InnoDB
Amazon Aurora (MySQL 5.7 compatible)
MySQL 5.7.13 or later – InnoDB
Java version:
OpenJDK 11
Minimum Supported:
Operating Systems:
Windows Server 2016
Windows Server 2012 R2
Ubuntu Server 18.04 LTS
macOS 10.15
macOS 10.14
Database software versions:
MySQL 5.7.13 – InnoDB
MySQL 5.7.13 on Amazon RDS – InnoDB
Java version:
Oracle Java 11
view raw

gistfile1.txt

hosted with ❤ by GitHub

Python 2.7 removed from macOS Monterey 12.3 beta

$
0
0

As part of the macOS Monterey 12.3 beta cycle, Apple included the following note in the publicly accessible release notes for the macOS Monterey 12.3 beta release:


This file contains bidirectional Unicode text that may be interpreted or compiled differently than what appears below. To review, open the file in an editor that reveals hidden Unicode characters.
Learn more about bidirectional Unicode characters


Python
Deprecations
Python 2.7 was removed from macOS in this update. Developers should use Python 3 or an alternative language instead. (39795874)
view raw

gistfile1.txt

hosted with ❤ by GitHub

Screen Shot 2022 01 27 at 2 19 03 PM


https://developer.apple.com/documentation/macos-release-notes/macos-12_3-release-notes

This is a development which Apple has warned about for a while, beginning with macOS Catalina’s release notes:

Screen Shot 2022 01 27 at 2 36 48 PM

https://developer.apple.com/documentation/macos-release-notes/macos-catalina-10_15-release-notes

Apple has not included a Python 3 runtime with macOS Monterey, so the removal of Python 2.7 from macOS 12.3 and later will mean that Apple is no longer shipping a Python runtime as part of macOS.

For those who want or need to use an Apple-supplied Python distribution, Python 3 is included as part of Xcode and the Xcode Command Line Tools. Those tools are not part of macOS and will need to be installed separately.

As an alternative, a number of shops have been deploying their own Python 3 distribution. For more information on this, please see Greg Neagle’s Snakes on a Plan session from MacSysAdmin 2020:

Session slides:
http://docs.macsysadmin.se/2020/pdf/SnakesOnAPlan.pdf

Session video:
http://docs.macsysadmin.se/2020/video/Day1Session1.mp4

Viewing all 764 articles
Browse latest View live