Quantcast
Channel: rtrouton – Der Flounder
Viewing all 764 articles
Browse latest View live

Identifying Universal 2 apps on macOS Mojave and later

$
0
0

As Apple introduces its new Apple Silicon Macs, it’s important that Mac admins be able to identify if their environment’s software will be able to run natively on both Intel and Apple Silicon as Universal 2 apps or if they’ll need Apple’s Rosetta 2 translation service installed first on their Apple Silicon Macs to allow their apps to run.

To assist with this identification effort, Apple has provided two tools:

Both have been around for a while and initially helped identify the original Universal binaries, which were compiled to support both PowerPC and Intel processors. They’ve now been updated for this new processor transition and either will be able to identify if an app’s binary was compiled for the following:

  • x86_64 (Intel)
  • arm64 (Apple Silicon)
  • Both x86_64 and arm64 (Universal 2)

For more details, please see below the jump.

To identify if an app is Intel-only or Universal using the lipo tool, please use the command shown below:

lipo -detailed_info /path/to/binary

For example, on macOS Catalina 10.15.7 Apple’s Safari browser is an Intel-only binary, since macOS Catalina won’t run on an Apple Silicon Mac. Running lipo on macOS Catalina 10.15.7’s Safari should produce output similar to what’s shown below:

username@computername ~ % lipo -detailed_info /Applications/Safari.app/Contents/MacOS/Safari
input file /Applications/Safari.app/Contents/MacOS/Safari is not a fat file
Non-fat file: /Applications/Safari.app/Contents/MacOS/Safari is architecture: x86_64
username@computername ~ %

Likewise, Jamf Pro 10.25.2’s jamf binary now supports both Intel and Apple Silicon. Running the lipo command described above should produce output similar to what’s shown below:

username@computername ~ % lipo -detailed_info /usr/local/jamf/bin/jamf
Fat header in: /usr/local/jamf/bin/jamf
fat_magic 0xcafebabe
nfat_arch 2
architecture x86_64
cputype CPU_TYPE_X86_64
cpusubtype CPU_SUBTYPE_X86_64_ALL
capabilities 0x0
offset 16384
size 6441136
align 2^14 (16384)
architecture arm64
cputype CPU_TYPE_ARM64
cpusubtype CPU_SUBTYPE_ARM64_ALL
capabilities 0x0
offset 6471680
size 6121168
align 2^14 (16384)
username@computername ~ %

To identify if an app is Intel-only or Universal using the file tool, please use the command shown below:

file /path/to/binary

Running the file command described above on macOS Catalina 10.15.7’s Safari should produce output similar to what’s shown below:

username@computername ~ % file /Applications/Safari.app/Contents/MacOS/Safari
/Applications/Safari.app/Contents/MacOS/Safari: Mach-O 64-bit executable x86_64
username@computername ~ %

Running the file command described above on the Jamf Pro 10.25.2 jamf binary should produce output similar to what’s shown below:

username@computername ~ % file /usr/local/jamf/bin/jamf
/usr/local/jamf/bin/jamf: Mach-O universal binary with 2 architectures: [x86_64:Mach-O 64-bit executable x86_64] [arm64]
/usr/local/jamf/bin/jamf (for architecture x86_64):	Mach-O 64-bit executable x86_64
/usr/local/jamf/bin/jamf (for architecture arm64):	Mach-O 64-bit executable arm64
username@computername ~ %

For more information about app testing, Howard Oakley has a blog post discussing the lipo tool in more detail which I recommend checking out. I’ve linked to it below:

Magic, lipo and testing for Universal binaries:
https://eclecticlight.co/2020/07/24/magic-lipo-and-testing-for-universal-binaries/


Resizing an AWS macOS EC2 instance’s boot drive to use all available disk space

$
0
0

I’ve started working with Amazon Web Service’s new macOS EC2 instances and after a while, I noticed that no matter how much EBS drive space I assigned to a EC2 instance running macOS, the instance would only have around 30 GBs of usable space. In this example, I had assigned around 200 GBs of EBS storage, but the APFS container was only using around 30 GBs of the available space.

Screen Shot 2020 12 19 at 3 23 59 PM

After talking with AWS Support, there’s a fix for this using APFS container resizing. This is a topic I’ve discussed previously in the context of resizing boot drives for virtual machines. For more details, see below the jump.

To resize a macOS EC2 instance’s boot volume, you need to do two things:

1. Identify the appropriate APFS container:

APFS containers act as storage pools for APFS volumes. APFS volumes are what act as the mounted filesystem, where you store your files, directories, metadata, etc. When you grow the APFS container, the APFS volumes will likewise get additional space.

To identify the container for the instance’s boot volume, use the command shown below:

/usr/sbin/diskutil list physical external | awk '/Apple_APFS/ {print $7}'

Screen Shot 2020 12 19 at 3 47 03 PM

2. Once the appropriate APFS container has been identified, use diskutil to resize the container with all available disk space.

You can specify a size of zero (0) to grow the targeted container using all unallocated drive space.

/usr/sbin/diskutil apfs resizeContainer apfs_container_id_goes_here 0

In this example, I have an instance where my APFS-formatted boot drive is using 32 GBs of space, but the instance has 200 GBs of available EBS disk space.

Assuming that the command above gave us disk1s2 as a result, the command shown below can be used to resize the boot drive’s APFS container with all available disk space.

/usr/sbin/diskutil apfs resizeContainer disk1s2 0
ec2-user@ip-172-31-23-238 ~ % /usr/sbin/diskutil apfs resizeContainer disk1s2 0
Started APFS operation
Aligning grow delta to 182,536,110,080 bytes and targeting a new physical store size of 214,538,608,640 bytes
Determined the maximum size for the targeted physical store of this APFS Container to be 214,537,580,544 bytes
Resizing APFS Container designated by APFS Container Reference disk2
The specific APFS Physical Store being resized is disk1s2
Verifying storage system
Using live mode
Performing fsck_apfs -n -x -l -S /dev/disk1s2
Checking the container superblock
Checking the EFI jumpstart record
Checking the space manager
Checking the space manager free queue trees
Checking the object map
Checking volume
Checking the APFS volume superblock
The volume Macintosh HD – Data was formatted by newfs_apfs (1412.141.1) and last modified by apfs_kext (1412.141.1)
Checking the object map
Checking the snapshot metadata tree
Checking the snapshot metadata
Checking the extent ref tree
Checking the fsroot tree
Checking volume
Checking the APFS volume superblock
The volume Preboot was formatted by diskmanagementd (1412.141.1) and last modified by apfs_kext (1412.141.1)
Checking the object map
Checking the snapshot metadata tree
Checking the snapshot metadata
Checking the extent ref tree
Checking the fsroot tree
Checking volume
Checking the APFS volume superblock
The volume Recovery was formatted by diskmanagementd (1412.141.1) and last modified by apfs_kext (1412.141.1)
Checking the object map
Checking the snapshot metadata tree
Checking the snapshot metadata
Checking the extent ref tree
Checking the fsroot tree
Checking volume
Checking the APFS volume superblock
The volume VM was formatted by diskmanagementd (1412.141.1) and last modified by
Checking the object map
Checking the snapshot metadata tree
Checking the snapshot metadata
Checking the extent ref tree
Checking the fsroot tree
Checking volume
Checking the APFS volume superblock
The volume Macintosh HD was formatted by diskmanagementd (1412.141.1) and last modified by apfs_kext (1412.141.1)
Checking the object map
Checking the snapshot metadata tree
Checking the snapshot metadata
Checking the extent ref tree
Checking the fsroot tree
Verifying allocated space
The volume /dev/disk1s2 appears to be OK
Storage system check exit code is 0
Growing APFS Physical Store disk1s2 from 32,002,498,560 to 214,538,608,640 bytes
Modifying partition map
Growing APFS data structures
Finished APFS operation
ec2-user@ip-172-31-23-238 ~ %
view raw
gistfile1.txt
hosted with ❤ by GitHub

Once the container resizing has completed, the OS should now recognize and be able to use the now-allocated space.

Screen Shot 2020 12 19 at 3 35 47 PM

This can be confirmed by other disk space measuring tools.

ec2-user@ip-172-31-23-238 ~ % df -h
Filesystem Size Used Avail Capacity iused ifree %iused Mounted on
/dev/disk2s5 200Gi 10Gi 181Gi 6% 488252 2094615348 0% /
devfs 186Ki 186Ki 0Bi 100% 642 0 100% /dev
/dev/disk2s1 200Gi 5.7Gi 181Gi 4% 161309 2094942291 0% /System/Volumes/Data
/dev/disk2s4 200Gi 2.0Gi 181Gi 2% 1 2095103599 0% /private/var/vm
map auto_home 0Bi 0Bi 0Bi 100% 0 0 100% /System/Volumes/Data/home
ec2-user@ip-172-31-23-238 ~ %
view raw
gistfile1.txt
hosted with ❤ by GitHub

Setting up AutoPkg, AutoPkgr and JSSImporter on an Amazon Web Services macOS EC2 instance

$
0
0

One of the outcomes of the recent Amazon Web Service’s Insight conference was AWS’s announcement that, as of November 30th, macOS EC2 instances were going to be available as on-demand instances or as part of one of AWS’s reduced cost plans for those who needed them long-term.

There are a few differences about AWS’s macOS offerings, as opposed to their Linux and Windows offerings. macOS EC2 instances are set up to run on actual Apple hardware, as opposed to being completely virtualized. This means that there are the following dependencies to be aware of:

  1. macOS EC2 instances must run on dedicated hosts (AWS has stated these are Mac Minis)
  2. One macOS EC2 instance can be provisioned per dedicated host.

AWS has also stipulated that that dedicated hosts for macOS EC2 instances have a minimum billing duration of 24 hours. That means that even if your dedicated host was only up and running for one hour, you will be billed as if it was running for 24 hours.

For now, only certain AWS regions have EC2 Mac instances available. As of December 20th, 2020, macOS EC2 instances are available in the following AWS Regions:

  • US-East-1 (Northern Virginia)
  • US-East-2 (Ohio)
  • US-West-2 (Oregon)
  • EU-West-1 (Ireland)
  • AP-Southeast-1 (Singapore)

The macOS EC2 instances at this time support two versions of macOS:

macOS Big Sur is not yet supported as of December 20th, 2020, but AWS has stated that Big Sur support will be coming shortly.

By default, macOS EC2 instances will include the following pre-installed software:

For folks looking to build services or do continuous integration testing on macOS, it’s clear that AWS went to considerable lengths to have macOS EC2 instances be as fully-featured as their other EC2 offerings. Amazon has also either made it possible to install the tools you need or just went ahead and installed them for you. They’ve also included drivers for their faster networking options and made it possible to manage and monitor Mac EC2 instances using AWS’s tools just like their Linux and Windows EC2 instances.

That said, all of this comes with a price tag. Here’s how it works out (all figures expressed in US dollars):

mac1 Dedicated Hosts (on-demand pricing):

$1.083/hour (currently with a 24 hour minimum charge, after which billing is by the second.)
$25.99/day
$181.93/week
$9493.58/year

Now, you can sign up for an AWS Savings Plan and save some money by paying up-front for one year or three years. Paying for three years, all cash up front is the cheapest option currently available:

$0.764/hour
$18.33/day
$128.31/week
$6697.22/year

Now some folks are going to look at that and have a heart attack, while others are going to shrug because the money involved amounts to a rounding error on their existing AWS bill. I’m mainly going through this to point out that hosting Mac services on AWS is going to come with costs. None of AWS’s existing Mac offerings are part of AWS’s Free Tier.

OK, so we’ve discussed a lot of the background but let’s get to the point: How do you set up AutoPkg to run in the AWS cloud? For more details, please see below the jump.

If you’ve worked with Amazon Web Service’s EC2 service previously, getting AutoPkg up and running in AWS should be fairly straightforward. That said, if you haven’t worked with either AWS or EC2 before, there may be a bit of a learning curve. For folks in this situation, I gave a talk on Amazon Web Services which should help get you started:

Getting Started with Amazon Web Services: http://docs.macsysadmin.se/2018/video/Day4Session4.mp4

In this example, I’m going to setting up a macOS EC2 instance with the following:

  • git
  • AutoPkg
  • AutoPkgr
  • JSSImporter

Pre-requisites:

  • An Amazon Web Services account
  • Money (at least $25.99)

Setting up a dedicated host

To run a macOS instance in EC2, you need to first choose an actual Mac Mini to run that instance on. Amazon refers to this as a dedicated host and the process looks like this:

1. Open the Amazon EC2 web console at https://console.aws.amazon.com/ec2/.

2. In the navigation pane, choose Dedicated Hosts.

Screen Shot 2020 12 18 at 2 48 07 PM

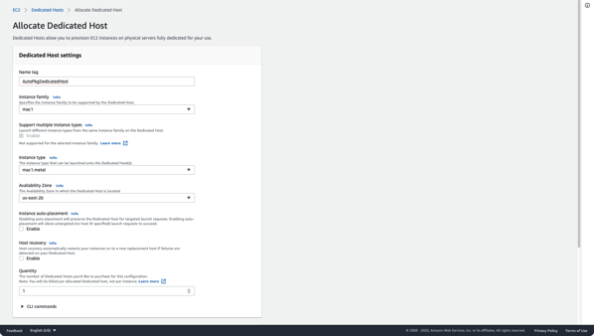
3. Choose Allocate Dedicated Host and then do the following:

Screen Shot 2020 12 18 at 2 58 25 PM

For Name Tag:, give it an appropriate name.

Screen Shot 2020 12 18 at 3 02 02 PM

For Instance family, choose mac1.

Screen Shot 2020 12 18 at 3 30 34 PM

For Support multiple instance types, uncheck the Enable checkbox.

For Instance type, select mac1.metal.

Screen Shot 2020 12 18 at 3 05 35 PM

For Availability Zone, choose the Availability Zone for the Dedicated Host. (For this example, I’m in US-East-2 and I’m choosing us-east-2b.)

Screen Shot 2020 12 18 at 3 30 34 PM

For Instance auto-placement, do not check anything.
For Host recovery, do not check anything.
For Quantity, keep 1.

Screen Shot 2020 12 18 at 3 30 34 PM

Click the Allocate button. (This is the part where Amazon charges you $25.99)

Screen Shot 2020 12 18 at 3 30 57 PM

At this point, the Dedicated Host should be created.

Screen Shot 2020 12 18 at 3 32 58 PM


Setting up a macOS EC2 instance

If you haven’t previously done so, set up an AWS SSH key pair for use with EC2 instances:

https://docs.aws.amazon.com/cli/latest/userguide/cli-services-ec2-keypairs.html

Once your keypair has been created, select the Dedicated Host that you created and then do the following:

Choose Actions, Launch instances onto host.

Screen Shot 2020 12 18 at 5 13 00 PM

Select a macOS AMI. For this example, I’m selecting macOS Catalina 10.15.7.

Screen Shot 2020 12 18 at 5 14 12 PM

Select the mac1.metal instance type.

Screen Shot 2020 12 18 at 5 15 13 PM

Click the Next: Configure Instance Details button.

Screen Shot 2020 12 18 at 5 15 14 PM

On the Configure Instance Details page, verify the following:

Tenancy: Set as dedicated host.


Screen Shot 2020 12 18 at 5 16 17 PM

Host is set as the Dedicated Host you created.

Screen Shot 2020 12 18 at 5 16 17 PM

Update Affinity as needed. Mine is set to Off.

In User Data, I have a script that the Mac EC2 instance can run at boot.

This user data script does the following:

Configures Mac EC2 instance with the following:

  • Account password for the default ec2-user account
  • Set the Mac to auto-login as the default ec2-user account
  • git
  • AutoPkg
  • AutoPkgr
  • JSSImporter

Once these tools and modules are installed, the script configures AutoPkg to use the recipe repos defined in the AutoPkg repos section.

If you want to use this user data script, it’s available from the following address on GitHub:

https://github.com/rtrouton/aws_scripts/tree/master/setup_mac_ec2_instance_for_autopkg

Before adding the user data script to the instance build process, check the variables in the script and verify that they are set up the way you want. There is also an upper limit of 15K in size for this script.

Screen Shot 2020 12 18 at 5 29 46 PM


From there, either copy and paste the script into the available user data blank or select the user data script as a file.

Screen Shot 2020 12 18 at 5 31 12 PM

Double-check your Tenancy, Host and User Data settings to make sure everything is set as desired, then click the Next: Add Storage button.

Screen Shot 2020 12 18 at 5 31 13 PM

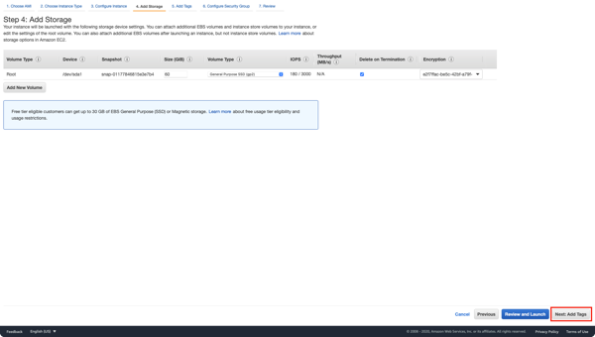
Set how much storage you want. For this example, I’m setting it at 60 GBs of storage.

Screen Shot 2020 12 18 at 5 34 29 PM


Note: Depending on how many AutoPkg recipes you’re running and the size of the installers, you may want to double or even triple the amount of storage I’m setting. Another thing to be aware of is that, the instance’s boot volume will need to be resized to recognize the additional space. If using the user data script linked above, boot volume resizing is included as part of the script’s run.

Once storage is set, click the Next:Add Tags button.

Screen Shot 2020 12 18 at 5 34 30 PM

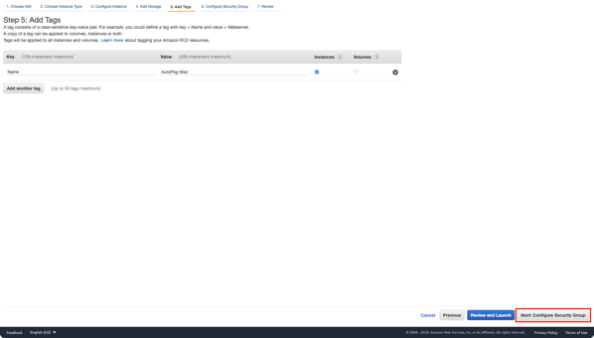
Set tags as desired, then click the Next: Security Group button.

Screen Shot 2020 12 18 at 5 36 07 PM

Choose the options to set a security group as desired.

Screen Shot 2020 12 18 at 5 38 32 PM

If you don’t have a security group available, I recommend creating one and setting it to allow SSH from only your IP address, then click the Review and Launch button.

Screen Shot 2020 12 18 at 5 38 33 PM

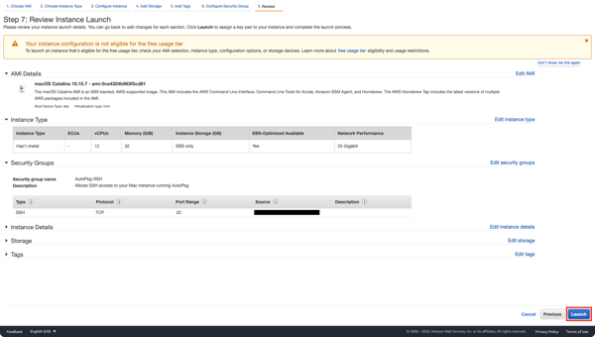
Review your instance’s settings and make sure everything is OK. Once you’re sure, click the Launch button.

Screen Shot 2020 12 18 at 5 39 47 PM

When prompted, select your SSH keypair, then click the Launch instances button.

Screen Shot 2020 12 18 at 5 46 14 PM

Your Mac instance will now launch on the dedicated host. To see if it in the Instances list, click the View instances on host button.

Screen Shot 2020 12 18 at 5 48 07 PM

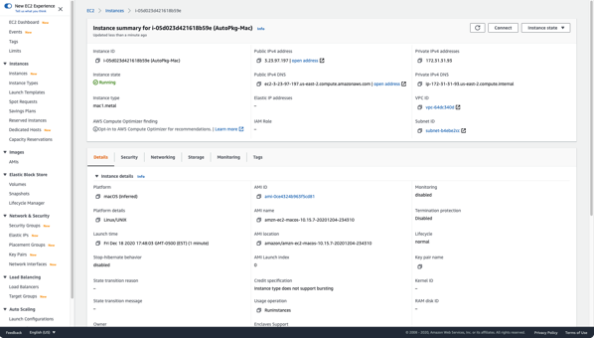
To find out its public DNS address and other useful information, click on the instance ID.

Screen Shot 2020 12 18 at 5 48 32 PM

Screen Shot 2020 12 18 at 5 48 51 PM

Wait about fifteen minutes for your instance to finish setting itself up. After that you should be able to connect to it via SSH and (assuming you configured the right variables for VNC access) also via remote screen sharing.

Connecting to the macOS EC2 instance following setup

Following setup, you can connect to the newly-built EC2 instance via SSH. To do so, open Terminal and use the following SSH command:

ssh -i /path/my-key-pair.pem ec2-user@my-instance-public-dns-name

For example, if your SSH keypair was stored in ~/.ssh and named AutoPkg_SSH_Keypair.pem, you would use the following command to connect to a macOS EC2 instance whose address is ec2-3-23-97-197.us-east-2.compute.amazonaws.com:

ssh -i ~/.ssh/AutoPkg_SSH_Keypair.pem ec2-user@ec2-3-23-97-197.us-east-2.compute.amazonaws.com

No password is needed in this case, as you are using your SSH keypair to authenticate the SSH session.

Screen Shot 2020 12 18 at 9 53 52 PM


To connect via VNC, I recommend setting up VNC to run over an SSH tunnel. The reason for this is that VNC by default does not encrypt its traffic so all network communication between you and the instance (including any passwords) would be sent in the clear. Using an SSH tunnel will allow you to wrap this unencrypted traffic inside SSH’s encryption, which should secure it against third parties.

To set up VNC to run inside an SSH tunnel, you will need to first set up a password for the ec2-user account if you haven’t done so already. You can do this by connecting to the instance via SSH and running the following passwd command:

sudo passwd ec2-user

Screen Shot 2020 12 18 at 9 57 35 PM

Once the command has been run, follow the prompts to change the password. Once the password is set up, run the following SSH command on your end:

ssh -L 5900:localhost:5900 -i /path/my-key-pair.pem ec2-user@my-instance-public-dns-name

For example, if your SSH keypair was stored in ~/.ssh on your Mac and named AutoPkg_SSH_Keypair.pem, you would use the following command to set up an SSH tunnel for VNC between your Mac and a macOS EC2 instance whose address is ec2-3-23-97-197.us-east-2.compute.amazonaws.com:

ssh -L 5900:localhost:5900 -i ~/.ssh/AutoPkg_SSH_Keypair.pem ec2-user@ec2-3-23-97-197.us-east-2.compute.amazonaws.com

Once that’s done, do the following:

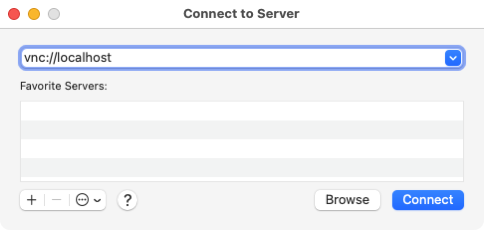
1. Under the Go menu, select Connect to Server.
2. In the Connect to Server window, enter the following:

vnc://localhost:5900

Screen Shot 2020 12 18 at 9 47 35 PM

When prompted, use the following username and password:

Username: ec2-user
Password: Whatever password you defined in the script for the ec2-user account to use.

Screen Shot 2020 12 18 at 9 48 51 PM

Once connected, you’ll be able to work with the Mac instance like you would any other remotely-accessible Mac.

Screen Shot 2020 12 18 at 9 49 33 PM

Screen Shot 2020 12 18 at 9 50 05 PM

In the case of a AutoPkg server built using the user data script I linked to above, you could open AutoPkgr and start setting up your recipes to begin scheduled runs.

Screen Shot 2020 12 18 at 9 50 25 PM

Adobe Flash is dead – let’s get it removed

$
0
0

After 24 years and 1078 known security vulnerabilities, Adobe Flash has reached end of life status as of December 31, 2020.

Screen Shot 2021 01 01 at 1 25 22 PM

To assist with the process of removing Adobe Flash, I’ve written an uninstall script which will completely remove Adobe Flash. For more details, please see below the jump.

This script is designed to uninstall the Adobe Flash plug-ins and their associated components. As part of this, it runs the following actions:

  1. Stop Adobe Flash Install Manager
  2. If running, unload the launchdaemon used by the Adobe Flash update process.
  3. Remove the Adobe Flash plug-ins, Adobe Flash Install Manager and their associated components.
  4. Remove Adobe Flash preference pane settings at the user level.
  5. Forget the installer package receipts.

The script is available below and at the following address on GitHub:

https://github.com/rtrouton/rtrouton_scripts/tree/master/rtrouton_scripts/uninstallers/adobe_flash_uninstall

#!/bin/bash
# This script uninstalls Adobe Flash software
AdobeFlashUninstall (){
echo "Uninstalling Adobe Flash software…"
# kill the Adobe Flash Player Install Manager
echo "Stopping Adobe Flash Install Manager."
killall "Adobe Flash Player Install Manager"
if [[ -f "/Library/LaunchDaemons/com.adobe.fpsaud.plist" ]]; then
echo "Stopping Adobe Flash update process."
/bin/launchctl bootout system "/Library/LaunchDaemons/com.adobe.fpsaud.plist"
fi
if [[ -f "/Library/Application Support/Macromedia/mms.cfg" ]]; then
echo "Deleting Adobe Flash update preferences."
rm "/Library/Application Support/Macromedia/mms.cfg"
fi
if [[ -e "/Library/Application Support/Adobe/Flash Player Install Manager/fpsaud" ]]; then
echo "Deleting Adobe software update app and support files."
rm "/Library/LaunchDaemons/com.adobe.fpsaud.plist"
rm "/Library/Application Support/Adobe/Flash Player Install Manager/FPSAUConfig.xml"
rm "/Library/Application Support/Adobe/Flash Player Install Manager/fpsaud"
fi
if [[ -e "/Library/Internet Plug-Ins/Flash Player.plugin" ]]; then
echo "Deleting NPAPI browser plug-in files."
rm -Rf "/Library/Internet Plug-Ins/Flash Player.plugin"
rm -Rf "/Library/Internet Plug-Ins/Flash Player Enabler.plugin"
rm "/Library/Internet Plug-Ins/flashplayer.xpt"
fi
if [[ -e "/Library/Internet Plug-Ins/PepperFlashPlayer/PepperFlashPlayer.plugin" ]]; then
echo "Deleting PPAPI browser plug-in files."
rm -Rf "/Library/Internet Plug-Ins/PepperFlashPlayer/PepperFlashPlayer.plugin"
rm "/Library/Internet Plug-Ins/PepperFlashPlayer/manifest.json"
fi
if [[ -e "/Library/PreferencePanes/Flash Player.prefPane" ]]; then
echo "Deleting Flash Player preference pane from System Preferences."
rm -Rf "/Library/PreferencePanes/Flash Player.prefPane"
fi
# Removing Adobe Flash preference pane settings at user level
allLocalUsers=$(/usr/bin/dscl . -list /Users UniqueID | awk '$2>500 {print $1}')
for userName in ${allLocalUsers}; do
# get path to user's home directory
userHome=$(/usr/bin/dscl . -read "/Users/$userName" NFSHomeDirectory 2>/dev/null | /usr/bin/sed 's/^[^\/]*//g')
/usr/bin/defaults delete "${userHome}/Library/Preferences/com.apple.systempreferences.plist" com.adobe.preferences.flashplayer 2>/dev/null
done
#Remove receipts
rm -Rf /Library/Receipts/*FlashPlayer*
pkgutil –forget com.adobe.pkg.FlashPlayer >/dev/null 2>&1
pkgutil –forget com.adobe.pkg.PepperFlashPlayer >/dev/null 2>&1
# Remove Adobe Flash Player Install Manager.app
if [[ -e "/Applications/Utilities/Adobe Flash Player Install Manager.app" ]]; then
echo "Deleting the Adobe Flash Player Install Manager app."
rm -Rf "/Applications/Utilities/Adobe Flash Player Install Manager.app"
fi
echo "Uninstall completed successfully."
}
# Set exit error code
ERROR=0
# Check to see if Adobe Flash sofware is installed by locating either the Flash NPAPI or PPAPI browser
# plug-ins in /Library/Internet Plug-Ins or the Adobe Flash Player Install Manager.app in /Applications/Utilities
if [[ -e "/Library/Internet Plug-Ins/Flash Player.plugin" ]] || [[ -e "/Library/Internet Plug-Ins/PepperFlashPlayer/PepperFlashPlayer.plugin" ]] || [[ -e "/Applications/Utilities/Adobe Flash Player Install Manager.app" ]]; then
# Run the Adobe Flash Player software uninstaller
AdobeFlashUninstall
if [[ $? -eq 0 ]]; then
echo "Adobe Flash Player uninstalled successfully."
else
echo "Error: Failed to uninstall Adobe Flash Player software."
ERROR=1
fi
else
echo "Error: Adobe Flash Player software is not installed."
ERROR=1
fi
exit $ERROR

FileVault login screen differences between Intel and Apple Silicon Macs

$
0
0

As new Apple Silicon Macs (ASM) have begun making their way to organizations which use FileVault encryption to secure their fleets, a difference between Intel Macs and ASMs has become apparent.

Intel Macs:

  • Supports account icons and password blanks at the FileVault login screen
  • Unable to support username blanks at the FileVault login screen
  • Unable to support smart cards for login at the FileVault login screen

Screen Shot 2021 01 16 at 5 50 36 PM

ASMs:

  • Supports account icons and password blanks at the FileVault login screen
  • Supports username and password blanks at the FileVault login screen
  • Supports smart cards for login at the FileVault login screen

Screen Shot 2021 01 16 at 6 00 32 PM

Screen Shot 2021 01 16 at 6 13 52 PM

Why the differences between platforms? For more details, please see below the jump.

Intel Macs

On Intel Macs, Apple is dependent on using the EFI login environment for the FileVault 2 login screen. This is a very limited environment in terms of functionality and is used in the FileVault 2 context to provide a way to boot the Mac while the main boot volume is locked by FileVault’s encryption. Once EFI has booted the Mac, the Mac then uses authentication from the user and the tools stored on the not-encrypted Preboot volume to unlock the much-larger encrypted boot volume.

EFI’s limitations mean that only a password blank is truly supported, with Apple having pushed the limits to support correctly matching up multiple account icons with the corresponding multiple account passwords.

Apple Silicon Macs

On ASMs, there is now a unified macOS login experience which includes FileVault logins. For details on this, I recommend checking out the Explore the new system architecture of Apple Silicon Macs session video from WWDC 2020. The explanation is available starting around 20:14.

Screen Shot 2021 01 17 at 11 51 39 AM

On Apple Silicon Macs, macOS has a unified log-in experience. It supports a richer UI with accelerated graphics that is also consistent with macOS look and feel. This experience is made possible by fully booting macOS without requiring the user to unlock the system.

The unified log-in experience allows the introduction of new features even when FileVault is on. For example, it now has built-in support for authentication with CCID and PIV-compatible smart cards, as well as VoiceOver support for accessibility improvements.

In summary, the reason the FileVault login screen is different on ASMs is that Apple no longer needs to use the EFI login environment. Instead, ASMs are able to fully boot macOS while still securing user data within a locked volume which is protected by FileVault.

This is a huge leap forward for ASMs in terms of FileVault login functionality, as there is no longer a login functionality divide between enabling FileVault and not enabling FileVault. As of macOS Big Sur and the M1 ASMs, FileVault logins should now be able to use whichever authentication methods are supported by macOS. More importantly for the future, as native support for new authentication methods are added to the OS, FileVault logins should be able to use them natively as well.

Backing up Der Flounder Revisited

$
0
0

Nine years ago, I wrote a post on how I backup this blog. Overall, the reasons I’m backing up haven’t changed:

  • I like this blog and don’t want to see it or its data disappear because of data loss.
  • WordPress.com’s free hosting doesn’t provide me with an automated backup method.

To create the backups, I make a nightly mirror using HTTrack. As time has passed and host machines were replaced, I’ve moved the backup host a few times. For the last move, I decided for budgetary reasons to move off of using Macs and onto a Raspberry Pi. For those wanting to know more, please see below the jump.

The current backup host is a Raspberry Pi 3 Model B running Raspbian Buster, which is closely based on Debian Linux. To set up an automated backup using HTTrack, I used the following procedure:

1. Installed HTTrack for Debian by running the commands below with root privileges:

apt-get update
apt-get install webhttrack

2. Creating a backup directory in the pi user’s home directory by running the following command:

mkdir -p /home/pi/derflounder_backup

2. Set up the following script as /usr/local/bin/der_flounder_backup.sh

#!/bin/bash

backupDirectoryPath="/home/pi/derflounder_backup"

/usr/bin/httrack "https://derflounder.wordpress.com/" -O "$backupDirectoryPath" "+https://derflounder.wordpress.com/*" "+https://derflounder.files.wordpress.com/*" -v

For the script itself:

  • I’m first specifying the starting point. In this case, it is https://derflounder.wordpress.com/.
  • We can specify where the mirrored data will go using the -O flag (note that $backupDirectoryPath is a path I defined earlier on in my script. In this case, the data is being stored in /home/pi/derflounder_backup.
  • The quotations where I have “+” with something are urls from which it is allowed to download, and process. If you do not specify any, it will only download from the domain you specify.
  • The “-v” flag specifies httrack to run in verbose mode.

4. Set up a cron job like the one shown below to run the backup script. In my case, I set it up in the pi user’s crontab to run nightly at 2:00 AM:

0 2 * * *  /usr/local/bin/der_flounder_backup.sh

Meanwhile, like the Macs who did this job before it, I’m also backing up the Raspberry Pi that the backup is stored on, so that I have multiple copies of the backed-up data available.

Listing the full OS installers available from Apple’s Software Update feed on macOS Big Sur

$
0
0

One of the changes in macOS Big Sur is that the softwareupdate command has been updated with new functionality.

usage: softwareupdate <cmd> [<args> …]
** Manage Updates:
-l | –list List all appropriate update labels (options: –no-scan, –product-types)
-d | –download Download Only
-i | –install Install
<label> … specific updates
-a | –all All appropriate updates
-R | –restart Automatically restart (or shut down) if required to complete installation.
-r | –recommended Only recommended updates
–list-full-installers List the available macOS Installers
–fetch-full-installer Install the latest recommended macOS Installer
–full-installer-version The version of macOS to install. Ex: –full-installer-version 10.15
–install-rosetta Install Rosetta 2
–background Trigger a background scan and update operation
** Other Tools:
–dump-state Log the internal state of the SU daemon to /var/log/install.log
–evaluate-products Evaluate a list of product keys specified by the –products option
–history Show the install history. By default, only displays updates installed by softwareupdate.
–all Include all processes in history (including App installs)
** Options:
–no-scan Do not scan when listing or installing updates (use available updates previously scanned)
–product-types <type> Limit a scan to a particular product type only – ignoring all others
Ex: –product-types macOS || –product-types macOS,Safari
–products A comma-separated (no spaces) list of product keys to operate on.
–force Force an operation to complete. Use with –background to trigger a background scan regardless of "Automatically check" pref
–agree-to-license Agree to the software license agreement without user interaction.
–verbose Enable verbose output
–help Print this help
view raw gistfile1.txt hosted with ❤ by GitHub

Among the changes is the ability to scan Apple’s Software Update feed and display a list of the currently available full OS installers. To access this list, run the command below with root privileges:

softwareupdate --list-full-installers

The list you receive will be dependent on whether or not your Mac can run a particular OS version. As an example, here’s the list you would receive inside of a VMware VM as of March 3rd, 2021.

Screen Shot 2021 03 03 at 8 26 35 AM

Once you have the right macOS installer identified, you can use the softwareupdate tool to download it.

One thing to be aware of is that multiple versions of a macOS full installer may show up in the Software Update feed. As an example of this, the list above includes multiple entries for macOS 10.15.6 and 10.15.7. These installers would be for hardware-specific builds of that macOS version’s full installer. Unfortunately, it’s not easy to tell the various installers apart using the softwareupdate command because the build number is not included.

If you do need to be able to download an installer with a specific build number, I recommend using the installinstallmacos.py tool. This tool also references the Apple Software Update feed, so the information you get back should be similar but also include the relevant build numbers for the macOS full installers.


Selectively removing the drop shadow from screenshots on macOS Big Sur

$
0
0

One of my personal preferences with macOS is removing the drop shadow from screenshots. On macOS Catalina and earlier, I was able to to turn off drop shadows on screenshots by running the following commands:

defaults write com.apple.screencapture disable-shadow true
killall SystemUIServer

This appears to not work on fresh installs of macOS Big Sur, though it appears to still work on Big Sur Macs who had the setting applied prior to upgrading to Big Sur. However, when using keyboard shortcuts to make screenshots, it looks like there’s a way to selectively add or remove the drop shadow at the time of making the screenshot. For more details, please see below the jump.

To take a screenshot of window or menu with a drop shadow:

1. Click Command + Shift + 4 + Spacebar
2. Wait for the mouse pointer to change into a camera icon.
3. Click on the window to take the screenshot.

The screenshot should be taken and have a drop shadow.

Screen Shot 2021 03 03 at 9 30 59 AM


To take a screenshot of window or menu without a drop shadow:

1. Click Command + Shift + 4 + Spacebar
2. Wait for the mouse pointer to change into a camera icon.
3. Hold down the Option key
4. Click on the window to take the screenshot.
5. Release the Option key

The screenshot should be taken and not have a drop shadow.

Screen Shot 2021 03 03 at 9 31 14 AM


Using Twocanoes’ Signing Manager to sign AutoPkg-built installer packages

$
0
0

As part of many application or package building workflows, there is a requirement to sign the end result to guarantee that the app or package has not been tampered with. With the advent of Apple’s notarization process, this has become even more important because an app or installer package must be signed before it can be notarized.

However, in order to sign apps or packages, you must have the signing certificate available. This has often meant putting copies of Apple signing certificates, complete with the certificate’s private key, onto the Mac or Macs used to build the application and/or installer package. This has security concerns because if the signing certificate’s private key is compromised, you must now revoke the existing certificate, get a new one from Apple and re-sign everything that used that now-revoked signing certificate.

To assist with the security concerns, Twocanoes Software has developed Signing Manager. This tool provides a way to centralize hosting of signing certificates and make their signing capabilities securely available to Macs which need them. In my own case, I’m investigating Signing Manager in the context of signing AutoPkg-built installer packages. For more details, please see below the jump.

Signing Manager consists of a server which hosts certificates and a client which logs into the server using an API key. Let’s take a look at how you set up a certificate to be shared. In this example, I’ll be using Twocanoes’ own signing server and a sample Package Signing certificate.

Importing the signing certificate into the Signing Manager server

Pre-requisites:

  • Signing certificate’s public and private keys stored in a .p12 file
  • The password to unlock the .p12 file

Screen Shot 2021 03 05 at 1 17 20 PM


1. Log into the Signing Manager server.
2. Make note of the Signing Server Domain URL and API key. You’ll need them later with the Signing Manager client software.

Screen Shot 2021 03 05 at 11 50 12 AM

3. Click on the Identities link.

Screen Shot 2021 03 05 at 11 50 13 AM

3. Click on the Import Identity button.

Screen Shot 2021 03 05 at 11 57 52 AM

4. Select your signing certificate’s .p12 file and enter the password for it into the password blank.

Screen Shot 2021 03 05 at 11 58 20 AM

5. Click the Import button.

Screen Shot 2021 03 05 at 11 58 21 AM


Your certificate should now be imported.

Screen Shot 2021 03 05 at 11 58 49 AM


Enabling the signing certificate for access on a client Mac.

1. Install the Signing Manager client software.
2. In the Signing Manager, set the following:

  • In the Signing Server blank, enter the Signing Server Domain URL.
  • In the API Key blank, enter the API key

Screen Shot 2021 03 05 at 8 51 00 AM


Once entered and verified, click the OK button.

3. You should now see the certificate appear in the Signing Manager app window, along with a notification that a smartcard has been inserted.

Screen Shot 2021 03 05 at 4 33 45 PM


Signing Manager sets up a virtual smart card with the signing certificate’s information stored inside. Your Mac should be able to work with the certificate information on this virtual smart card like it can with certificates stored in your Mac’s own keychain files.

The Signing Manager client software also includes several useful features:

1. Copying the Common Name from the certificate:

Clicking the Copy CN button will add the Common Name of the selected certificate to the clipboard.

2. Copying the Fingerprint, or SHA1 hash of the certificate to the clipboard.

Clicking the Copy Fingerprint button will add the SHA1 hash of the selected certificate to the clipboard.

Note: The Fingerprint name is what will be used as the certificate name when signing.

3. Copying an example codesign command with certificate name to clipboard.

Clicking the Copy codesign command button will copy the example codesign command to the clipboard.

4. Copying an example productsign command with certificate name to clipboard.

Clicking the Copy productsign command button will copy the example productsign command to the clipboard.

5. Displaying certificate information

Clicking the Show Certificate button will display information about the selected certificate.


Signing an AutoPkg-built installer package

In most ways, using a Signing Manager-hosted certificate for signing is identical to using a certificate stored in a Mac’s keychain. The main difference will be the name of the certificate, as Signing Manager will use the Fingerprint identifier for the certificate. Specifically, you can use Apple’s codesign and productsign tools with a Signing Manager-hosted certificate just like you would a certificate stored locally on your Mac inside a keychain.

This similarity allows it to be easily integrated into an AutoPkg workflow which uses the PkgSigner processor. This AutoPkg processor uses productsign to do the following:

  1. Identify an unsigned package built by an AutoPkg recipe.
  2. Rename the unsigned package from /path/to/package_name_here.pkg to /path/to/package_name_here-unsigned.pkg.
  3. Sign the package.
  4. Save the signed package as /path/to/package_name_here.pkg, so that the name matches the original package. Renaming the signed package to match the original unsigned package’s name allows AutoPkg to continue to work with the now-signed installer package.

The main difference should be that a keychain-stored certificate would be named something like this:

Developer ID Installer: Rich Trouton (XF95CST45F)

The Signing Manager-hosted certificate would instead be identified by the Fingerprint value, which may look something like this:

4A72196F535A51A98FF2480132F024222B65060C

With that in mind, let’s take a look at how a Signing Manager-hosted certificate could be integrated into an AutoPkg workflow, using a process I’ve written about previously.

For this example, a .pkg recipe for Postman which includes the PkgSigner processor is being used:

<?xml version="1.0" encoding="UTF-8"?>
<!DOCTYPE plist PUBLIC "-//Apple//DTD PLIST 1.0//EN" "http://www.apple.com/DTDs/PropertyList-1.0.dtd"&gt;
<plist version="1.0">
<dict>
<key>Description</key>
<string>Downloads the latest version of Postman and creates an installer package.</string>
<key>Identifier</key>
<string>net.trouton.pkg.postman</string>
<key>Input</key>
<dict>
<key>NAME</key>
<string>Postman</string>
<key>VENDOR</key>
<string>Postman</string>
<key>SOFTWARETITLE</key>
<string>Labs</string>
<key>SOFTWARETYPE</key>
<string>Postman</string>
<key>SIGNINGCERTIFICATE</key>
<string>Put_Signing_Certificate_into_AutoPkg_recipe_override</string>
</dict>
<key>MinimumVersion</key>
<string>1.0.0</string>
<key>ParentRecipe</key>
<string>com.github.dataJAR-recipes.download.postman</string>
<key>Process</key>
<array>
<dict>
<key>Arguments</key>
<dict>
<key>predicate</key>
<string>SIGNINGCERTIFICATE == "Put_Signing_Certificate_into_AutoPkg_recipe_override"</string>
</dict>
<key>Processor</key>
<string>StopProcessingIf</string>
</dict>
<dict>
<key>Processor</key>
<string>PkgRootCreator</string>
<key>Arguments</key>
<dict>
<key>pkgroot</key>
<string>%RECIPE_CACHE_DIR%/%SOFTWARETYPE%</string>
<key>pkgdirs</key>
<dict>
<key>Applications</key>
<string>0755</string>
</dict>
</dict>
</dict>
<dict>
<key>Processor</key>
<string>Unarchiver</string>
<key>Arguments</key>
<dict>
<key>archive_path</key>
<string>%pathname%</string>
<key>destination_path</key>
<string>%pkgroot%/Applications</string>
<key>purge_destination</key>
<true />
</dict>
</dict>
<dict>
<key>Processor</key>
<string>Versioner</string>
<key>Arguments</key>
<dict>
<key>input_plist_path</key>
<string>%pkgroot%/Applications/%SOFTWARETYPE%.app/Contents/Info.plist</string>
<key>plist_version_key</key>
<string>CFBundleShortVersionString</string>
</dict>
</dict>
<dict>
<key>Processor</key>
<string>PkgCreator</string>
<key>Arguments</key>
<dict>
<key>pkgname</key>
<string>%VENDOR%_%SOFTWARETITLE%_%SOFTWARETYPE%_%version%</string>
<key>pkg_request</key>
<dict>
<key>version</key>
<string>%version%</string>
<key>id</key>
<string>com.postmanlabs.mac</string>
<key>options</key>
<string>purge_ds_store</string>
<key>chown</key>
<array>
<dict>
<key>path</key>
<string>Applications</string>
<key>user</key>
<string>root</string>
<key>group</key>
<string>wheel</string>
</dict>
</array>
</dict>
</dict>
</dict>
<dict>
<key>Processor</key>
<string>PkgSigner</string>
<key>Arguments</key>
<dict>
<key>pkg_path</key>
<string>%RECIPE_CACHE_DIR%/%VENDOR%_%SOFTWARETITLE%_%SOFTWARETYPE%_%version%.pkg</string>
<key>signing_cert</key>
<string>%SIGNINGCERTIFICATE%</string>
</dict>
</dict>
<dict>
<key>Arguments</key>
<dict>
<key>path_list</key>
<array>
<string>%RECIPE_CACHE_DIR%/%SOFTWARETYPE%</string>
</array>
</dict>
<key>Processor</key>
<string>PathDeleter</string>
</dict>
</array>
</dict>
</plist>
view raw
gistfile1.txt
hosted with ❤ by GitHub
<?xml version="1.0" encoding="UTF-8"?>
<!DOCTYPE plist PUBLIC "-//Apple//DTD PLIST 1.0//EN" "http://www.apple.com/DTDs/PropertyList-1.0.dtd"&gt;
<plist version="1.0">
<dict>
<key>Description</key>
<string>Downloads the latest version of Postman and creates a signed installer package.</string>
<key>Identifier</key>
<string>net.trouton.pkg.postman</string>
<key>Input</key>
<dict>
<key>NAME</key>
<string>Postman</string>
<key>VENDOR</key>
<string>Postman</string>
<key>SOFTWARETITLE</key>
<string>Labs</string>
<key>SOFTWARETYPE</key>
<string>Postman</string>
<key>SIGNINGCERTIFICATE</key>
<string>Put_Signing_Certificate_into_AutoPkg_recipe_override</string>
</dict>
<key>MinimumVersion</key>
<string>1.0.0</string>
<key>ParentRecipe</key>
<string>com.github.dataJAR-recipes.download.postman</string>
<key>Process</key>
<array>
<dict>
<key>Arguments</key>
<dict>
<key>predicate</key>
<string>SIGNINGCERTIFICATE == "Put_Signing_Certificate_into_AutoPkg_recipe_override"</string>
</dict>
<key>Processor</key>
<string>StopProcessingIf</string>
</dict>
<dict>
<key>Processor</key>
<string>PkgRootCreator</string>
<key>Arguments</key>
<dict>
<key>pkgroot</key>
<string>%RECIPE_CACHE_DIR%/%SOFTWARETYPE%</string>
<key>pkgdirs</key>
<dict>
<key>Applications</key>
<string>0755</string>
</dict>
</dict>
</dict>
<dict>
<key>Processor</key>
<string>Unarchiver</string>
<key>Arguments</key>
<dict>
<key>archive_path</key>
<string>%pathname%</string>
<key>destination_path</key>
<string>%pkgroot%/Applications</string>
<key>purge_destination</key>
<true />
</dict>
</dict>
<dict>
<key>Processor</key>
<string>Versioner</string>
<key>Arguments</key>
<dict>
<key>input_plist_path</key>
<string>%pkgroot%/Applications/%SOFTWARETYPE%.app/Contents/Info.plist</string>
<key>plist_version_key</key>
<string>CFBundleShortVersionString</string>
</dict>
</dict>
<dict>
<key>Processor</key>
<string>PkgCreator</string>
<key>Arguments</key>
<dict>
<key>pkgname</key>
<string>%VENDOR%_%SOFTWARETITLE%_%SOFTWARETYPE%_%version%</string>
<key>pkg_request</key>
<dict>
<key>version</key>
<string>%version%</string>
<key>id</key>
<string>com.postmanlabs.mac</string>
<key>options</key>
<string>purge_ds_store</string>
<key>chown</key>
<array>
<dict>
<key>path</key>
<string>Applications</string>
<key>user</key>
<string>root</string>
<key>group</key>
<string>wheel</string>
</dict>
</array>
</dict>
</dict>
</dict>
<dict>
<key>Processor</key>
<string>PkgSigner</string>
<key>Arguments</key>
<dict>
<key>pkg_path</key>
<string>%RECIPE_CACHE_DIR%/%VENDOR%_%SOFTWARETITLE%_%SOFTWARETYPE%_%version%.pkg</string>
<key>signing_cert</key>
<string>%SIGNINGCERTIFICATE%</string>
</dict>
</dict>
<dict>
<key>Arguments</key>
<dict>
<key>path_list</key>
<array>
<string>%RECIPE_CACHE_DIR%/%SOFTWARETYPE%</string>
</array>
</dict>
<key>Processor</key>
<string>PathDeleter</string>
</dict>
</array>
</dict>
</plist>
view raw
Postman.pkg.recipe
hosted with ❤ by GitHub

An override of the recipe would be needed, in order to include the Fingerprint value from Signing Manager into the SIGNINGCERTIFICATE key’s value in the recipe override.

<?xml version="1.0" encoding="UTF-8"?>
<!DOCTYPE plist PUBLIC "-//Apple//DTD PLIST 1.0//EN" "http://www.apple.com/DTDs/PropertyList-1.0.dtd"&gt;
<plist version="1.0">
<dict>
<key>Identifier</key>
<string>local.pkg.Postman</string>
<key>Input</key>
<dict>
<key>DOWNLOAD_URL</key>
<string>https://dl.pstmn.io/download/latest/osx</string&gt;
<key>NAME</key>
<string>Postman</string>
<key>SIGNINGCERTIFICATE</key>
<string>4A72196F535A51A98FF2480132F024222B65060C</string>
<key>SOFTWARETITLE</key>
<string>Labs</string>
<key>SOFTWARETYPE</key>
<string>Postman</string>
<key>VENDOR</key>
<string>Postman</string>
</dict>
<key>ParentRecipe</key>
<string>net.trouton.pkg.postman</string>
<key>ParentRecipeTrustInfo</key>
<dict>
<key>non_core_processors</key>
<dict>
<key>PkgSigner</key>
<dict>
<key>git_hash</key>
<string>3c6c09b14d63dfa4b40f737ee079bf1d3842aef5</string>
<key>path</key>
<string>~/Library/AutoPkg/RecipeRepos/com.github.rtrouton.signing_manager_autopkg_recipes/Postman/PkgSigner.py</string>
<key>sha256_hash</key>
<string>464d1756f190a0161a6a00358cd42042bcdb5213802624d9ac58d3e723877a56</string>
</dict>
</dict>
<key>parent_recipes</key>
<dict>
<key>com.github.dataJAR-recipes.download.postman</key>
<dict>
<key>git_hash</key>
<string>ec4d1a926dbec4bb4e1d44dbe425e2c771d18f37</string>
<key>path</key>
<string>~/Library/AutoPkg/RecipeRepos/com.github.autopkg.dataJAR-recipes/Postman/Postman.download.recipe</string>
<key>sha256_hash</key>
<string>6ce36a3ad1b99cd4804cd9acfbd16e1763d757c8d6d1aae44c10f4a992c7ba6b</string>
</dict>
<key>net.trouton.pkg.postman</key>
<dict>
<key>git_hash</key>
<string>3c6c09b14d63dfa4b40f737ee079bf1d3842aef5</string>
<key>path</key>
<string>~/Library/AutoPkg/RecipeRepos/com.github.rtrouton.signing_manager_autopkg_recipes/Postman/Postman.pkg.recipe</string>
<key>sha256_hash</key>
<string>3aa55bc6b5af7417409b6a40e9ccdeb83e8c2e59ce4fe88bfbe35c044b235632</string>
</dict>
</dict>
</dict>
</dict>
</plist>
view raw
gistfile1.txt
hosted with ❤ by GitHub
<?xml version="1.0" encoding="UTF-8"?>
<!DOCTYPE plist PUBLIC "-//Apple//DTD PLIST 1.0//EN" "http://www.apple.com/DTDs/PropertyList-1.0.dtd"&gt;
<plist version="1.0">
<dict>
<key>Identifier</key>
<string>local.pkg.Postman</string>
<key>Input</key>
<dict>
<key>DOWNLOAD_URL</key>
<string>https://dl.pstmn.io/download/latest/osx</string>
<key>NAME</key>
<string>Postman</string>
<key>SIGNINGCERTIFICATE</key>
<string>4A72196F535A51A98FF2480132F024222B65060C</string>
<key>SOFTWARETITLE</key>
<string>Labs</string>
<key>SOFTWARETYPE</key>
<string>Postman</string>
<key>VENDOR</key>
<string>Postman</string>
</dict>
<key>ParentRecipe</key>
<string>net.trouton.pkg.postman</string>
<key>ParentRecipeTrustInfo</key>
<dict>
<key>non_core_processors</key>
<dict>
<key>PkgSigner</key>
<dict>
<key>git_hash</key>
<string>3c6c09b14d63dfa4b40f737ee079bf1d3842aef5</string>
<key>path</key>
<string>~/Library/AutoPkg/RecipeRepos/com.github.rtrouton.signing_manager_autopkg_recipes/Postman/PkgSigner.py</string>
<key>sha256_hash</key>
<string>464d1756f190a0161a6a00358cd42042bcdb5213802624d9ac58d3e723877a56</string>
</dict>
</dict>
<key>parent_recipes</key>
<dict>
<key>com.github.dataJAR-recipes.download.postman</key>
<dict>
<key>git_hash</key>
<string>ec4d1a926dbec4bb4e1d44dbe425e2c771d18f37</string>
<key>path</key>
<string>~/Library/AutoPkg/RecipeRepos/com.github.autopkg.dataJAR-recipes/Postman/Postman.download.recipe</string>
<key>sha256_hash</key>
<string>6ce36a3ad1b99cd4804cd9acfbd16e1763d757c8d6d1aae44c10f4a992c7ba6b</string>
</dict>
<key>net.trouton.pkg.postman</key>
<dict>
<key>git_hash</key>
<string>3c6c09b14d63dfa4b40f737ee079bf1d3842aef5</string>
<key>path</key>
<string>~/Library/AutoPkg/RecipeRepos/com.github.rtrouton.signing_manager_autopkg_recipes/Postman/Postman.pkg.recipe</string>
<key>sha256_hash</key>
<string>3aa55bc6b5af7417409b6a40e9ccdeb83e8c2e59ce4fe88bfbe35c044b235632</string>
</dict>
</dict>
</dict>
</dict>
</plist>
view raw
Postman.pkg.recipe
hosted with ❤ by GitHub

When the recipe override is run in verbose mode, the Fingerprint value shows up as the signing certificate used to successfully sign the certificate using the PkgSigner processor:

Screen Shot 2021 03 05 at 6 13 20 PM


Processing local.pkg.Postman…
{'AUTOPKG_VERSION': '2.3.1',
'DOWNLOAD_URL': 'https://dl.pstmn.io/download/latest/osx&#39;,
'NAME': 'Postman',
'PARENT_RECIPES': ['/Users/username/Library/AutoPkg/RecipeRepos/com.github.rtrouton.signing_manager_autopkg_recipes/Postman/Postman.pkg.recipe',
'/Users/username/Library/AutoPkg/RecipeRepos/com.github.autopkg.dataJAR-recipes/Postman/Postman.download.recipe'],
'RECIPE_CACHE_DIR': '/Users/username/Library/AutoPkg/Cache/local.pkg.Postman',
'RECIPE_DIR': '/Users/username/Library/AutoPkg/RecipeOverrides',
'RECIPE_OVERRIDE_DIRS': ['~/Library/AutoPkg/RecipeOverrides'],
'RECIPE_PATH': '/Users/username/Library/AutoPkg/RecipeOverrides/Postman.pkg.recipe',
'RECIPE_REPOS': {'/Users/username/Library/AutoPkg/RecipeRepos/com.github.autopkg.dataJAR-recipes': {'URL': 'https://github.com/autopkg/dataJAR-recipes&#39;},
'/Users/username/Library/AutoPkg/RecipeRepos/com.github.autopkg.hjuutilainen-recipes': {'URL': 'https://github.com/autopkg/hjuutilainen-recipes&#39;},
'/Users/username/Library/AutoPkg/RecipeRepos/com.github.rtrouton.signing_manager_autopkg_recipes': {'URL': 'https://github.com/rtrouton/signing_manager_autopkg_recipes&#39;}},
'RECIPE_SEARCH_DIRS': ['.',
'~/Library/AutoPkg/Recipes',
'/Library/AutoPkg/Recipes',
'/Users/username/Library/AutoPkg/RecipeRepos/com.github.rtrouton.signing_manager_autopkg_recipes',
'/Users/username/Library/AutoPkg/RecipeRepos/com.github.autopkg.hjuutilainen-recipes',
'/Users/username/Library/AutoPkg/RecipeRepos/com.github.autopkg.dataJAR-recipes',
'/Users/username/Library/AutoPkg/RecipeOverrides',
'/Users/username/Library/AutoPkg/RecipeRepos/com.github.rtrouton.signing_manager_autopkg_recipes/Postman',
'/Users/username/Library/AutoPkg/RecipeRepos/com.github.rtrouton.signing_manager_autopkg_recipes/Postman'],
'SIGNINGCERTIFICATE': '4A72196F535A51A98FF2480132F024222B65060C',
'SOFTWARETITLE': 'Labs',
'SOFTWARETYPE': 'Postman',
'VENDOR': 'Postman',
'verbose': 4}
URLDownloader
{'Input': {'filename': 'Postman.zip',
'url': 'https://dl.pstmn.io/download/latest/osx&#39;}}
URLDownloader: No value supplied for prefetch_filename, setting default value of: False
URLDownloader: No value supplied for CHECK_FILESIZE_ONLY, setting default value of: False
URLDownloader: Curl command: ['/usr/bin/curl', '–silent', '–show-error', '–no-buffer', '–dump-header', '-', '–speed-time', '30', '–location', '–url', 'https://dl.pstmn.io/download/latest/osx&#39;, '–fail', '–output', '/Users/username/Library/AutoPkg/Cache/local.pkg.Postman/downloads/tmpgnvvfjc8']
URLDownloader: Downloaded /Users/username/Library/AutoPkg/Cache/local.pkg.Postman/downloads/Postman.zip
{'Output': {'download_changed': True,
'pathname': '/Users/username/Library/AutoPkg/Cache/local.pkg.Postman/downloads/Postman.zip',
'url_downloader_summary_result': {'data': {'download_path': '/Users/username/Library/AutoPkg/Cache/local.pkg.Postman/downloads/Postman.zip'},
'summary_text': 'The following '
'new items were '
'downloaded:'}}}
EndOfCheckPhase
{'Input': {}}
{'Output': {}}
Unarchiver
{'Input': {'archive_path': '/Users/username/Library/AutoPkg/Cache/local.pkg.Postman/downloads/Postman.zip',
'destination_path': '/Users/username/Library/AutoPkg/Cache/local.pkg.Postman/Postman',
'purge_destination': True}}
Unarchiver: No value supplied for USE_PYTHON_NATIVE_EXTRACTOR, setting default value of: False
Unarchiver: Guessed archive format 'zip' from filename Postman.zip
Unarchiver: Unarchived /Users/username/Library/AutoPkg/Cache/local.pkg.Postman/downloads/Postman.zip to /Users/username/Library/AutoPkg/Cache/local.pkg.Postman/Postman
{'Output': {}}
CodeSignatureVerifier
{'Input': {'input_path': '/Users/username/Library/AutoPkg/Cache/local.pkg.Postman/Postman/Postman.app',
'requirement': 'identifier "com.postmanlabs.mac" and anchor apple '
'generic and certificate '
'1[field.1.2.840.113635.100.6.2.6] /* exists */ and '
'certificate leaf[field.1.2.840.113635.100.6.1.13] '
'/* exists */ and certificate leaf[subject.OU] = '
'H7H8Q7M5CK'}}
CodeSignatureVerifier: Verifying code signature…
CodeSignatureVerifier: Deep verification enabled…
CodeSignatureVerifier: Strict verification not defined. Using codesign defaults…
CodeSignatureVerifier: /Users/username/Library/AutoPkg/Cache/local.pkg.Postman/Postman/Postman.app: valid on disk
CodeSignatureVerifier: /Users/username/Library/AutoPkg/Cache/local.pkg.Postman/Postman/Postman.app: satisfies its Designated Requirement
CodeSignatureVerifier: /Users/username/Library/AutoPkg/Cache/local.pkg.Postman/Postman/Postman.app: explicit requirement satisfied
CodeSignatureVerifier: Signature is valid
{'Output': {}}
Versioner
{'Input': {'input_plist_path': '/Users/username/Library/AutoPkg/Cache/local.pkg.Postman/Postman/Postman.app/Contents/Info.plist',
'plist_version_key': 'CFBundleShortVersionString'}}
Versioner: No value supplied for skip_single_root_dir, setting default value of: False
Versioner: Found version 8.0.6 in file /Users/username/Library/AutoPkg/Cache/local.pkg.Postman/Postman/Postman.app/Contents/Info.plist
{'Output': {'version': '8.0.6'}}
StopProcessingIf
{'Input': {'predicate': 'SIGNINGCERTIFICATE == '
'"Put_Signing_Certificate_into_AutoPkg_recipe_override"'}}
StopProcessingIf: (SIGNINGCERTIFICATE == "Put_Signing_Certificate_into_AutoPkg_recipe_override") is False
{'Output': {}}
PkgRootCreator
{'Input': {'pkgdirs': {'Applications': '0755'},
'pkgroot': '/Users/username/Library/AutoPkg/Cache/local.pkg.Postman/Postman'}}
PkgRootCreator: Created /Users/username/Library/AutoPkg/Cache/local.pkg.Postman/Postman
PkgRootCreator: Creating Applications
PkgRootCreator: Created /Users/username/Library/AutoPkg/Cache/local.pkg.Postman/Postman/Applications
{'Output': {}}
Unarchiver
{'Input': {'USE_PYTHON_NATIVE_EXTRACTOR': False,
'archive_path': '/Users/username/Library/AutoPkg/Cache/local.pkg.Postman/downloads/Postman.zip',
'destination_path': '/Users/username/Library/AutoPkg/Cache/local.pkg.Postman/Postman/Applications',
'purge_destination': True}}
Unarchiver: Guessed archive format 'zip' from filename Postman.zip
Unarchiver: Unarchived /Users/username/Library/AutoPkg/Cache/local.pkg.Postman/downloads/Postman.zip to /Users/username/Library/AutoPkg/Cache/local.pkg.Postman/Postman/Applications
{'Output': {}}
Versioner
{'Input': {'input_plist_path': '/Users/username/Library/AutoPkg/Cache/local.pkg.Postman/Postman/Applications/Postman.app/Contents/Info.plist',
'plist_version_key': 'CFBundleShortVersionString',
'skip_single_root_dir': False}}
Versioner: Found version 8.0.6 in file /Users/username/Library/AutoPkg/Cache/local.pkg.Postman/Postman/Applications/Postman.app/Contents/Info.plist
{'Output': {'version': '8.0.6'}}
PkgCreator
{'Input': {'pkg_request': {'chown': [{'group': 'wheel',
'path': 'Applications',
'user': 'root'}],
'id': 'com.postmanlabs.mac',
'options': 'purge_ds_store',
'version': '8.0.6'}}}
PkgCreator: Connecting
PkgCreator: Sending packaging request
PkgCreator: Disconnecting
PkgCreator: Failed to close socket: [Errno 9] Bad file descriptor
{'Output': {'new_package_request': True,
'pkg_creator_summary_result': {'data': {'identifier': 'com.postmanlabs.mac',
'pkg_path': '/Users/username/Library/AutoPkg/Cache/local.pkg.Postman/Postman_Labs_Postman_8.0.6.pkg',
'version': '8.0.6'},
'report_fields': ['identifier',
'version',
'pkg_path'],
'summary_text': 'The following '
'packages were '
'built:'},
'pkg_path': '/Users/username/Library/AutoPkg/Cache/local.pkg.Postman/Postman_Labs_Postman_8.0.6.pkg'}}
PkgSigner
{'Input': {'pkg_path': '/Users/username/Library/AutoPkg/Cache/local.pkg.Postman/Postman_Labs_Postman_8.0.6.pkg',
'signing_cert': '4A72196F535A51A98FF2480132F024222B65060C'}}
['/usr/bin/productsign', '–sign', '4A72196F535A51A98FF2480132F024222B65060C', '/Users/username/Library/AutoPkg/Cache/local.pkg.Postman/Postman_Labs_Postman_8.0.6-unsigned.pkg', '/Users/username/Library/AutoPkg/Cache/local.pkg.Postman/Postman_Labs_Postman_8.0.6.pkg']
productsign: signing product with identity "Package Signing" from keychain (null)
productsign: adding certificate "ca.twocanoes.com"
productsign: Wrote signed product archive to /Users/username/Library/AutoPkg/Cache/local.pkg.Postman/Postman_Labs_Postman_8.0.6.pkg
{'Output': {'pkg_path': '/Users/username/Library/AutoPkg/Cache/local.pkg.Postman/Postman_Labs_Postman_8.0.6.pkg'}}
PathDeleter
{'Input': {'path_list': ['/Users/username/Library/AutoPkg/Cache/local.pkg.Postman/Postman']}}
PathDeleter: Deleted /Users/username/Library/AutoPkg/Cache/local.pkg.Postman/Postman
{'Output': {}}
{'AUTOPKG_VERSION': '2.3.1',
'CHECK_FILESIZE_ONLY': False,
'DOWNLOAD_URL': 'https://dl.pstmn.io/download/latest/osx&#39;,
'NAME': 'Postman',
'PARENT_RECIPES': ['/Users/username/Library/AutoPkg/RecipeRepos/com.github.rtrouton.signing_manager_autopkg_recipes/Postman/Postman.pkg.recipe',
'/Users/username/Library/AutoPkg/RecipeRepos/com.github.autopkg.dataJAR-recipes/Postman/Postman.download.recipe'],
'RECIPE_CACHE_DIR': '/Users/username/Library/AutoPkg/Cache/local.pkg.Postman',
'RECIPE_DIR': '/Users/username/Library/AutoPkg/RecipeOverrides',
'RECIPE_OVERRIDE_DIRS': ['~/Library/AutoPkg/RecipeOverrides'],
'RECIPE_PATH': '/Users/username/Library/AutoPkg/RecipeOverrides/Postman.pkg.recipe',
'RECIPE_REPOS': {'/Users/username/Library/AutoPkg/RecipeRepos/com.github.autopkg.dataJAR-recipes': {'URL': 'https://github.com/autopkg/dataJAR-recipes&#39;},
'/Users/username/Library/AutoPkg/RecipeRepos/com.github.autopkg.hjuutilainen-recipes': {'URL': 'https://github.com/autopkg/hjuutilainen-recipes&#39;},
'/Users/username/Library/AutoPkg/RecipeRepos/com.github.rtrouton.signing_manager_autopkg_recipes': {'URL': 'https://github.com/rtrouton/signing_manager_autopkg_recipes&#39;}},
'RECIPE_SEARCH_DIRS': ['.',
'~/Library/AutoPkg/Recipes',
'/Library/AutoPkg/Recipes',
'/Users/username/Library/AutoPkg/RecipeRepos/com.github.rtrouton.signing_manager_autopkg_recipes',
'/Users/username/Library/AutoPkg/RecipeRepos/com.github.autopkg.hjuutilainen-recipes',
'/Users/username/Library/AutoPkg/RecipeRepos/com.github.autopkg.dataJAR-recipes',
'/Users/username/Library/AutoPkg/RecipeOverrides',
'/Users/username/Library/AutoPkg/RecipeRepos/com.github.rtrouton.signing_manager_autopkg_recipes/Postman',
'/Users/username/Library/AutoPkg/RecipeRepos/com.github.rtrouton.signing_manager_autopkg_recipes/Postman'],
'SIGNINGCERTIFICATE': '4A72196F535A51A98FF2480132F024222B65060C',
'SOFTWARETITLE': 'Labs',
'SOFTWARETYPE': 'Postman',
'USE_PYTHON_NATIVE_EXTRACTOR': False,
'VENDOR': 'Postman',
'archive_path': '/Users/username/Library/AutoPkg/Cache/local.pkg.Postman/downloads/Postman.zip',
'destination_path': '/Users/username/Library/AutoPkg/Cache/local.pkg.Postman/Postman/Applications',
'download_changed': True,
'etag': '',
'filename': 'Postman.zip',
'input_path': '/Users/username/Library/AutoPkg/Cache/local.pkg.Postman/Postman/Postman.app',
'input_plist_path': '/Users/username/Library/AutoPkg/Cache/local.pkg.Postman/Postman/Applications/Postman.app/Contents/Info.plist',
'last_modified': '',
'new_package_request': True,
'path_list': ['/Users/username/Library/AutoPkg/Cache/local.pkg.Postman/Postman'],
'pathname': '/Users/username/Library/AutoPkg/Cache/local.pkg.Postman/downloads/Postman.zip',
'pkg_creator_summary_result': {'data': {'identifier': 'com.postmanlabs.mac',
'pkg_path': '/Users/username/Library/AutoPkg/Cache/local.pkg.Postman/Postman_Labs_Postman_8.0.6.pkg',
'version': '8.0.6'},
'report_fields': ['identifier',
'version',
'pkg_path'],
'summary_text': 'The following packages were '
'built:'},
'pkg_path': '/Users/username/Library/AutoPkg/Cache/local.pkg.Postman/Postman_Labs_Postman_8.0.6.pkg',
'pkg_request': {'chown': [{'group': 'wheel',
'path': 'Applications',
'user': 'root'}],
'id': 'com.postmanlabs.mac',
'infofile': '',
'options': 'purge_ds_store',
'pkgdir': '/Users/username/Library/AutoPkg/Cache/local.pkg.Postman',
'pkgname': 'Postman_Labs_Postman_8.0.6',
'pkgroot': '/Users/username/Library/AutoPkg/Cache/local.pkg.Postman/Postman',
'pkgtype': 'flat',
'resources': '',
'scripts': '',
'version': '8.0.6'},
'pkgdirs': {'Applications': '0755'},
'pkgname': 'Postman_Labs_Postman_8.0.6',
'pkgroot': '/Users/username/Library/AutoPkg/Cache/local.pkg.Postman/Postman',
'plist_version_key': 'CFBundleShortVersionString',
'predicate': 'SIGNINGCERTIFICATE == '
'"Put_Signing_Certificate_into_AutoPkg_recipe_override"',
'prefetch_filename': False,
'purge_destination': True,
'requirement': 'identifier "com.postmanlabs.mac" and anchor apple generic and '
'certificate 1[field.1.2.840.113635.100.6.2.6] /* exists */ '
'and certificate leaf[field.1.2.840.113635.100.6.1.13] /* '
'exists */ and certificate leaf[subject.OU] = H7H8Q7M5CK',
'signing_cert': '4A72196F535A51A98FF2480132F024222B65060C',
'skip_single_root_dir': False,
'stop_processing_recipe': False,
'url': 'https://dl.pstmn.io/download/latest/osx&#39;,
'url_downloader_summary_result': {'data': {'download_path': '/Users/username/Library/AutoPkg/Cache/local.pkg.Postman/downloads/Postman.zip'},
'summary_text': 'The following new items '
'were downloaded:'},
'verbose': 4,
'version': '8.0.6'}
Receipt written to /Users/username/Library/AutoPkg/Cache/local.pkg.Postman/receipts/local.pkg-receipt-20210305-130108.plist
The following new items were downloaded:
Download Path
————-
/Users/username/Library/AutoPkg/Cache/local.pkg.Postman/downloads/Postman.zip
The following packages were built:
Identifier Version Pkg Path
———- ——- ——–
com.postmanlabs.mac 8.0.6 /Users/username/Library/AutoPkg/Cache/local.pkg.Postman/Postman_Labs_Postman_8.0.6.pkg
view raw
gistfile1.txt
hosted with ❤ by GitHub

By itself, Signing Manager is an amazing tool. For those interested in using AutoPkg on a cloud service or as part of a continuous integration workflow, it opens up all kinds of possibilities because it means it’s no longer necessary to have one or multiple copies of your signing certificates on the same Macs where you’re running AutoPkg. Now you can have your signing certificate stored in a secured central place and also have it available on-demand to remote clients in a secure manner.

Jamf Pro server installer for macOS being retired

$
0
0

As part of the release notes for Jamf Pro 10.28, there is this note in the Deprecations and Removals section:

Support ending for the Jamf Pro Server Installer for macOS — Support for using the Jamf Pro Installer for macOS will be discontinued in a future release. Mac computers with Apple silicon are not supported by the Jamf Pro Installer for macOS. If you want to migrate your Jamf Pro server from macOS to Jamf Cloud, contact Jamf Support. If you want to keep your server on premise, you can migrate your Jamf Pro server from macOS to one of the following servers: Red Hat Enterprise Linux, Ubuntu, or Windows. For more information, see the Migrating to Another Server Knowledge Base article.

Screen Shot 2021 03 17 at 1 55 31 PM

For those folks who are running on-premise Jamf Pro servers on Macs, it looks like it’s time to contact Jamf Support and plan a migration if you haven’t already. As of March 17th, 2021, Jamf’s published support for running Jamf Pro includes the following OS, database and Java versions:

Recommended Configuration:
Operating Systems:
Windows Server 2019
Ubuntu Server 20.04 LTS
Red Hat Enterprise Linux 7.x
macOS 10.15.5
Database software versions:
MySQL 8.0 – InnoDB
Amazon Aurora (MySQL 5.7 compatible)
MySQL 5.7.8 or later – InnoDB
Java version:
OpenJDK 11
Minimum Supported:
Operating Systems:
Windows Server 2016
Windows Server 2012 R2
Ubuntu Server 18.04 LTS
macOS 10.14.5
Database software versions:
MySQL 5.7.8 – InnoDB
MySQL 5.7.8 on Amazon RDS – InnoDB
Java version:
Oracle Java 11
view raw
gistfile1.txt
hosted with ❤ by GitHub

Connecting to AWS EC2 instances via Session Manager

$
0
0

When folks have needed command line access to instances running in Amazon Web Service’s EC2 service, SSH has been the usual method used. However, in addition to using SSH to connect to EC2 instances in AWS, it is also possible to connect remotely via Session Manager, one of the services provided by AWS’s Systems Manager tool.

Session Manager uses the Systems Manager agent to provide secure remote access to the Mac’s command line interface without needing to change security groups and allow SSH access to the instance. In fact, Session Manager allows remote access to EC2 instances which have security groups configured to allow no inbound access at all. For more details, please see below the jump.

To access EC2 instances via Session Manager, please use the procedure shown below:

1. Verify that the Systems Manager agent is installed and configured properly.
2. Select the desired EC2 instance.

Screen Shot 2021 04 01 at 3 04 54 PM

3. Click the Connect button.

Screen Shot 2021 04 01 at 3 04 55 PM

4. In the Connect to instance window, select the Session Manager tab then click the Connect button.

Screen Shot 2021 04 01 at 3 03 22 PM

5. A new browser window will open up.

Screen Shot 2021 04 01 at 3 03 50 PM

Note: The active user at this point is the Systems Manager agent’s user account, which is ssm-user.

Screen Shot 2021-04-01 at 3.03.59 PM

To get access to the ec2-user account (the default account used on most EC2 instances running macOS or Linux), you’ll need to switch accounts. To do this, run the command shown below to change to the ec2-user account:

sudo su ec2-user

Screen Shot 2021 04 01 at 3 04 19 PM

6. You should now be logged in as the ec2-user account.

Screen Shot 2021 04 01 at 3 04 27 PM

To close the remote session, use the procedure shown below.

1. Verify that all work has been completed.
2. Click the Terminate button.

Screen Shot 2021 04 01 at 3 04 28 PM

3. When prompted for confirmation, click the Terminate button.

Screen Shot 2021 04 01 at 3 04 41 PM

Using Markdown comments to add search keywords to Self Service descriptions

$
0
0

For those using Jamf Pro’s Self Service, one of the handier features can be the Search function built into the app. This search is able to examine Self Service policies and use the information in the policy and Self Service description to populate its search results. For the most part, just the displayed information in the policy should allow Self Service’s search to display relevant policies.

However, you may have a need to force the search process to include policies that would otherwise fall outside of the search parameters. For those who need this ability, thanks to Self Service’s support of Markdown it’s possible to invisibly add search keywords to a Self Service policy description. For more details, please see below the jump.

Markdown is a markup language which uses specific syntax to produce formatted text. In the image below, the left side shows what appears in the Markdown editor and the right side shows how the formatted document would appear.

Screen Shot 2021 04 02 at 4 30 53 PM

Among the syntax options is the ability to add comments using the HTML comment tag. These show up in the Markdown editor, but they don’t show up in the displayed document.

Screen Shot 2021 04 02 at 4 31 54 PM


Since Self Service descriptions only display the formatted text, but the search function can search everything in the description, we can use the comment syntax to add search keywords which Self Service’s search can use but which are invisible to someone looking at the Self Service description via the Self Service app.

To add search keywords, add the syntax tags for Markdown commenting to your Self Service description and add the search keywords you want to use within the tags. An example is shown below:

<!-- Search Keywords Go Here -->

For example, if you wanted to add search keywords like Java and JDK to a Java install policy, you could add the following to your Self Service description:

<!--Java, JDK-->


Screen Shot 2021 04 02 at 4 54 28 PM

Screen Shot 2021 04 02 at 9 07 36 AM


Even if the displayed text in the policy or the Self Service description never mentions either Java or JDK, Self Service’s search will include this policy when you search for those terms.

Screen Shot 2021 04 02 at 9 07 48 AM


Here’s another example, using Backup as a search keyword:

<!--Backup-->


Screen Shot 2021 04 02 at 12 04 38 PM


Screen Shot 2021 04 02 at 9 08 17 AM


Screen Shot 2021 04 02 at 9 08 03 AM


Note: Self Service’s search is case-insensitive so searching for backup or BACKUP when you have Backup as the search keyword should also display the relevant policy or policies.

Using the Jamf Pro API to mass-delete obsolete packages and scripts

$
0
0

If you’re using AutoPkg and tools like jamf-upload or JSSImporter to automate the uploading of packages and scripts to your Jamf Pro server, it may be necessary to periodically delete a large number of now-obsolete installer packages or scripts from your server. To help with this, I’ve written a couple of scripts to help automate the deletion process by using a list of Jamf IDs and the API to perform the following tasks:

  1. Delete the relevant installer packages or scripts.
  2. Generate a report of which packages or scripts were deleted.

For more details, please see below the jump.

Both scripts work with a text file of Jamf Pro IDs, and also include error checking to make sure that the text file’s entries contained only positive numbers.

To use these scripts, you will need four things:

  1. A text file containing the Jamf Pro package or script IDs you wish to delete.
  2. The address of the appropriate Jamf Pro server
  3. The username of an account on the Jamf Pro server which has the necessary privileges to delete computers and/or mobile devices.
  4. The password to that account.

The test file should contain only the relevant Jamf Pro IDs and appear similar to this:

924
1041
1079
1234
1244
1263
1269
1765
1213
1235
1253
1260
1273
1219
1334
1351
1298
1320
1394
1415
1430
1375
1464
1506
1444
1566
1585
1595
1606
1529
1542
1684
1625
1627
1654
1726
1742
1756
1705
1768
1772
1786
1527
1635
1677

Once you have the text file and the other prerequisites, the scripts can be run using the following commands:

To delete installer packages:

/path/to/delete_Jamf_Pro_Packages.sh /path/to/text_filename_here.txt

To delete scripts:

/path/to/delete_Jamf_Pro_Scripts.sh /path/to/text_filename_here.txt

For authentication, the scripts can accept manual input or values stored in a ~/Library/Preferences/com.github.jamfpro-info.plist file.

The plist file can be created by running the following commands and substituting your own values where appropriate:

To store the Jamf Pro URL in the plist file:

defaults write com.github.jamfpro-info jamfpro_url https://jamf.pro.server.goes.here:port_number_goes_here

To store the account username in the plist file:

defaults write com.github.jamfpro-info jamfpro_user account_username_goes_here

To store the account password in the plist file:

defaults write com.github.jamfpro-info jamfpro_password account_password_goes_here

It is also possible to simulate a run of the script, to make sure everything is working before running the actual deletion. To put the script into simulation mode, comment out the following line of the script.

delete_Jamf_Pro_Packages.sh

/usr/bin/curl -su ${jamfpro_user}:${jamfpro_password} "${jamfproIDURL}/$PackagesID" -X DELETE

delete_Jamf_Pro_Scripts.sh

/usr/bin/curl -su ${jamfpro_user}:${jamfpro_password} "${jamfproIDURL}/$ScriptsID" -X DELETE

To take it out of simulation mode and enable deletion, uncomment the line.

In simulation mode, you can test out if the script is reading the text file properly and the authentication method. For example, the following output should be seen in simulation mode if the text file is being read properly and manual input is being used.

username@computername ~ % /path/to/delete_Jamf_Pro_Scripts.sh ~/Desktop/home_scripts_report.txt

Please enter your Jamf Pro server URL : https://jamf.pro.server.goes.here:8443
Please enter your Jamf Pro user account : jpadmin
Please enter the password for the jpadmin account:
Deleting iscasperonline.sh - script ID 13.

Deleted iscasperonline.sh - script ID 13.

Deleting xcode_uninstall.sh - script ID 15.

Deleted xcode_uninstall.sh - script ID 15.

Report on deleted scripts available here: /var/folders/wz/mp27mjl97h505nvff787hh3c0000gn/T/tmp.IaiOiHgI.tsv
username@computername ~ %

The following output should be seen in production mode if the text file is being read properly and the needed values are being read from a ~/Library/Preferences/com.github.jamfpro-info.plist file.

username@computername ~ % /path/to/delete_Jamf_Pro_Scripts.sh ~/Desktop/home_scripts_report.txt

Deleting iscasperonline.sh - script ID 13.
<?xml version="1.0" encoding="UTF-8"?><script><id>13</id></script>
Deleted iscasperonline.sh - script ID 13.

Deleting xcode_uninstall.sh - script ID 15.
<?xml version="1.0" encoding="UTF-8"?><script><id>15</id></script>
Deleted xcode_uninstall.sh - script ID 15.

Report on deleted scripts available here: /var/folders/wz/mp27mjl97h505nvff787hh3c0000gn/T/tmp.vZgL8WOk.tsv
username@computername ~ %

Once the script has completed its run, it will generate a report on the deleted items in tab-separated format and display the .tsv file’s location.

Screen Shot 2021 04 16 at 2 43 29 PM

The scripts are available below, and at the following addresses on GitHub:

https://github.com/rtrouton/rtrouton_scripts/tree/master/rtrouton_scripts/Casper_Scripts/delete_Jamf_Pro_Packages

https://github.com/rtrouton/rtrouton_scripts/tree/master/rtrouton_scripts/Casper_Scripts/delete_Jamf_Pro_Scripts


delete_Jamf_Pro_Packages.sh:

#!/bin/bash
##########################################################################################
# Packages Delete Script for Jamf Pro
#
#
# Usage: Call script with the following four parameters
# – a text file of the Jamf Pro package IDs you wish to delete
#
# You will be prompted for:
# – The URL of the appropriate Jamf Pro server
# – Username for an account on the Jamf Pro server with sufficient API privileges
# – Password for the account on the Jamf Pro server
#
# The script will:
# – Delete the specified packages using their Jamf Pro package IDs
# – Generate a report of all successfully deleted packages in TSV format
#
# Example: ./delete_Jamf_Pro_Packages.sh jamf_pro_id_numbers.txt
#
##########################################################################################
filename="$1"
ERROR=0
report_file="$(mktemp).tsv"
if [[ -n $filename && -r $filename ]]; then
# If you choose to hardcode API information into the script, uncomment the lines below
# and set one or more of the following values:
#
# The username for an account on the Jamf Pro server with sufficient API privileges
# The password for the account
# The Jamf Pro URL
#jamfpro_url="" ## Set the Jamf Pro URL here if you want it hardcoded.
#jamfpro_user="" ## Set the username here if you want it hardcoded.
#jamfpro_password="" ## Set the password here if you want it hardcoded.
# If you do not want to hardcode API information into the script, you can also store
# these values in a ~/Library/Preferences/com.github.jamfpro-info.plist file.
#
# To create the file and set the values, run the following commands and substitute
# your own values where appropriate:
#
# To store the Jamf Pro URL in the plist file:
# defaults write com.github.jamfpro-info jamfpro_url https://jamf.pro.server.goes.here:port_number_goes_here
#
# To store the account username in the plist file:
# defaults write com.github.jamfpro-info jamfpro_user account_username_goes_here
#
# To store the account password in the plist file:
# defaults write com.github.jamfpro-info jamfpro_password account_password_goes_here
#
# If the com.github.jamfpro-info.plist file is available, the script will read in the
# relevant information from the plist file.
if [[ -f "$HOME/Library/Preferences/com.github.jamfpro-info.plist" ]]; then
if [[ -z "$jamfpro_url" ]]; then
jamfpro_url=$(defaults read $HOME/Library/Preferences/com.github.jamfpro-info jamfpro_url)
fi
if [[ -z "$jamfpro_user" ]]; then
jamfpro_user=$(defaults read $HOME/Library/Preferences/com.github.jamfpro-info jamfpro_user)
fi
if [[ -z "$jamfpro_password" ]]; then
jamfpro_password=$(defaults read $HOME/Library/Preferences/com.github.jamfpro-info jamfpro_password)
fi
fi
# If the Jamf Pro URL, the account username or the account password aren't available
# otherwise, you will be prompted to enter the requested URL or account credentials.
if [[ -z "$jamfpro_url" ]]; then
read -p "Please enter your Jamf Pro server URL : " jamfpro_url
fi
if [[ -z "$jamfpro_user" ]]; then
read -p "Please enter your Jamf Pro user account : " jamfpro_user
fi
if [[ -z "$jamfpro_password" ]]; then
read -p "Please enter the password for the $jamfpro_user account: " -s jamfpro_password
fi
echo ""
# Remove the trailing slash from the Jamf Pro URL if needed.
jamfpro_url=${jamfpro_url%%/}
# Set up the Jamf Pro Computer ID URL
jamfproIDURL="${jamfpro_url}/JSSResource/packages/id"
while read -r PackagesID
do
# Verify that the input is a number. All Jamf Pro
# IDs are positive numbers, so any other input will
# not be a valid Jamf Pro ID.
if [[ "$PackagesID" =~ ^[0-9]+$ ]]; then
if [[ ! -f "$report_file" ]]; then
/usr/bin/touch "$report_file"
printf "Deleted Package ID Number\tDeleted Package Name\n" > "$report_file"
fi
# Get package display name
PackagesName=$(/usr/bin/curl -su "${jamfpro_user}:${jamfpro_password}" -H "Accept: application/xml" "${jamfpro_url}/JSSResource/packages/id/$PackagesID" | xmllint –xpath '//package/name/text()'2>/dev/null)
# Remove comment from line below to preview
# the results of the deletion command.
echo -e "Deleting $PackagesName – package ID $PackagesID."
# Remove comment from line below to actually run
# the deletion command.
/usr/bin/curl -su ${jamfpro_user}:${jamfpro_password} "${jamfproIDURL}/$PackagesID" -X DELETE
if [[ $? -eq 0 ]]; then
printf "$PackagesID\t %s\n" "$PackagesName" >> "$report_file"
echo -e "\nDeleted $PackagesName – package ID $PackagesID.\n"
else
echo -e "\nERROR! Failed to delete $PackagesName – package ID $PackagesID.\n"
fi
else
echo "All Jamf Pro IDs are expressed as numbers. The following input is not a number: $PackagesID"
fi
done < "$filename"
else
echo "Input file does not exist or is not readable"
ERROR=1
fi
if [[ -f "$report_file" ]]; then
echo "Report on deleted installer packages available here: $report_file"
fi
exit "$ERROR"

delete_Jamf_Pro_Scripts.sh:

#!/bin/bash
##########################################################################################
# Scripts Delete Script for Jamf Pro
#
#
# Usage: Call script with the following four parameters
# – a text file of the Jamf Pro script IDs you wish to delete
#
# You will be prompted for:
# – The URL of the appropriate Jamf Pro server
# – Username for an account on the Jamf Pro server with sufficient API privileges
# – Password for the account on the Jamf Pro server
#
# The script will:
# – Delete the specified scripts using their Jamf Pro script IDs
# – Generate a report of all successfully deleted scripts in TSV format
#
# Example: ./delete_Jamf_Pro_Scripts.sh jamf_pro_id_numbers.txt
#
##########################################################################################
filename="$1"
ERROR=0
report_file="$(mktemp).tsv"
if [[ -n $filename && -r $filename ]]; then
# If you choose to hardcode API information into the script, uncomment the lines below
# and set one or more of the following values:
#
# The username for an account on the Jamf Pro server with sufficient API privileges
# The password for the account
# The Jamf Pro URL
#jamfpro_url="" ## Set the Jamf Pro URL here if you want it hardcoded.
#jamfpro_user="" ## Set the username here if you want it hardcoded.
#jamfpro_password="" ## Set the password here if you want it hardcoded.
# If you do not want to hardcode API information into the script, you can also store
# these values in a ~/Library/Preferences/com.github.jamfpro-info.plist file.
#
# To create the file and set the values, run the following commands and substitute
# your own values where appropriate:
#
# To store the Jamf Pro URL in the plist file:
# defaults write com.github.jamfpro-info jamfpro_url https://jamf.pro.server.goes.here:port_number_goes_here
#
# To store the account username in the plist file:
# defaults write com.github.jamfpro-info jamfpro_user account_username_goes_here
#
# To store the account password in the plist file:
# defaults write com.github.jamfpro-info jamfpro_password account_password_goes_here
#
# If the com.github.jamfpro-info.plist file is available, the script will read in the
# relevant information from the plist file.
if [[ -f "$HOME/Library/Preferences/com.github.jamfpro-info.plist" ]]; then
if [[ -z "$jamfpro_url" ]]; then
jamfpro_url=$(defaults read $HOME/Library/Preferences/com.github.jamfpro-info jamfpro_url)
fi
if [[ -z "$jamfpro_user" ]]; then
jamfpro_user=$(defaults read $HOME/Library/Preferences/com.github.jamfpro-info jamfpro_user)
fi
if [[ -z "$jamfpro_password" ]]; then
jamfpro_password=$(defaults read $HOME/Library/Preferences/com.github.jamfpro-info jamfpro_password)
fi
fi
# If the Jamf Pro URL, the account username or the account password aren't available
# otherwise, you will be prompted to enter the requested URL or account credentials.
if [[ -z "$jamfpro_url" ]]; then
read -p "Please enter your Jamf Pro server URL : " jamfpro_url
fi
if [[ -z "$jamfpro_user" ]]; then
read -p "Please enter your Jamf Pro user account : " jamfpro_user
fi
if [[ -z "$jamfpro_password" ]]; then
read -p "Please enter the password for the $jamfpro_user account: " -s jamfpro_password
fi
echo ""
# Remove the trailing slash from the Jamf Pro URL if needed.
jamfpro_url=${jamfpro_url%%/}
# Set up the Jamf Pro Computer ID URL
jamfproIDURL="${jamfpro_url}/JSSResource/scripts/id"
while read -r ScriptsID
do
# Verify that the input is a number. All Jamf Pro
# IDs are positive numbers, so any other input will
# not be a valid Jamf Pro ID.
if [[ "$ScriptsID" =~ ^[0-9]+$ ]]; then
if [[ ! -f "$report_file" ]]; then
/usr/bin/touch "$report_file"
printf "Deleted Script ID Number\tDeleted Script Name\n" > "$report_file"
fi
# Get script display name
ScriptsName=$(/usr/bin/curl -su "${jamfpro_user}:${jamfpro_password}" -H "Accept: application/xml" "${jamfpro_url}/JSSResource/scripts/id/$ScriptsID" | xmllint –xpath '//script/name/text()'2>/dev/null)
# Remove comment from line below to preview
# the results of the deletion command.
echo -e "Deleting $ScriptsName – script ID $ScriptsID."
# Remove comment from line below to actually run
# the deletion command.
#/usr/bin/curl -su ${jamfpro_user}:${jamfpro_password} "${jamfproIDURL}/$ScriptsID" -X DELETE
if [[ $? -eq 0 ]]; then
printf "$ScriptsID\t %s\n" "$ScriptsName" >> "$report_file"
echo -e "\nDeleted $ScriptsName – script ID $ScriptsID.\n"
else
echo -e "\nERROR! Failed to delete $ScriptsName – script ID $ScriptsID.\n"
fi
else
echo "All Jamf Pro IDs are expressed as numbers. The following input is not a number: $ScriptsID"
fi
done < "$filename"
else
echo "Input file does not exist or is not readable"
ERROR=1
fi
if [[ -f "$report_file" ]]; then
echo "Report on deleted scripts available here: $report_file"
fi
exit "$ERROR"

Workaround for timeouts when deleting installer packages from Jamf Pro

$
0
0

I use AutoPkg and JSSImporter to keep my Jamf Pro server updated with the latest installers for the software used by my shop. However, this means that I usually have a large number of no-longer-needed installers stored in my Jamf Pro server’s distribution point and I need to periodically clear the obsolete packages out by deleting them. Recently, as part of removing 500+ unneeded packages from Jamf Pro using a script, I noticed the following behavior occurring:

1. Run an API command similar to the one below:

username@computername ~ % /usr/bin/curl -su username:'password' "https://jamf.pro.server.here/JSSResource/packages/id/1213" -X DELETE

2. Long pause (around 60 seconds)
3. Receive the following output:

<html>
<head><title>504 Gateway Time-out</title></head>
<body>
<center><h1>504 Gateway Time-out</h1></center>
</body>
</html>

4. Check the package and it has been deleted from Jamf Pro.

The 504 Gateway Time-out error indicated that either the load balancer in front my Jamf Pro server was timing out before the API command could report success or failure. I was seeing this behavior when running the API commands manually or as part of a script, so I decided to see if I saw the same behavior when deleting the package from the Jamf Pro admin console. When I checked, I did.

I sent in a support request to Jamf to ask about this and there is a PI open for this:

PI-009627: Having a large amount of packages uploaded to a distribution point can cause various timeouts

For others experiencing this issue, while Jamf addresses this product issue, the workaround for the timeout issue is (if possible) to increase the timeout value. In my case, increasing the load balancer timeout from 60 seconds to 120 addressed the timeout issue and allowed my API and GUI package deletions to complete successfully without timing out.

Note: This does not fix the issue of the package deletion taking a while. It just makes sure that the deletion command, either via the API or using the GUI in the admin console, doesn’t timeout before reporting success or failure.

Using VLC to convert a video to play at twice normal speed

$
0
0

As part of preparing for an upcoming talk, I’m working on a presentation which includes a video. As part of adding the video to my Keynote slides I thought that increasing the playback speed would help with the pacing of the talk but I didn’t see a way in Keynote to have that happen as part of the video’s playback without having to manually run the video.

After some research, I found a straightforward way to use the open-source VLC video tool to double the playback speed of a video and save the changes. For more details, please see below the jump.

Pre-requisites:

To have VLC read a video file and save it as a new file which plays at twice the speed of the original file, please use the process below:

1. Open VLC
2. Under the File menu, select Convert / Stream…

Screen Shot 2021 05 09 at 4 39 01 PM

3. In the Convert & Stream window, click the Open media… button.

Screen Shot 2021 05 09 at 4 44 11 PM

4. Select the video where you want to increase the playback speed.
5. Select the video profile you want. (In this case, I’m selecting the default option: Video – H.264 + MP3 (MP4) )
6. Click the Customize… button

Screen Shot 2021 05 08 at 7 46 50 PM

7. Set the Scale option to 2.

Screen Shot 2021 05 09 at 4 47 21 PM

Screen Shot 2021 05 09 at 4 47 43 PM

Screen Shot 2021 05 09 at 4 48 28 PM

8. Click the Apply button.

Screen Shot 2021 05 09 at 4 48 29 PM

9. In the Choose Destination section of the Convert & Stream window, click the Save As File button.

Screen Shot 2021 05 08 at 7 46 51 PM

10. Choose the name and location to save the sped-up file.

Screen Shot 2021 05 08 at 7 47 12 PM

10. Click the Save button.

Screen Shot 2021 05 08 at 7 47 18 PM

VLC will then do the following:

1. List the file in its playlist.
2. Play back the original file at two times normal speed.
3. Record the original file’s playback to the new file. In this case, because I chose the Video – H.264 + MP3 (MP4) profile, the new file is saved as an .m4v file.

Screen Shot 2021 05 08 at 7 47 51 PM


Using Signing Manager with autopkg-conductor

$
0
0

I’ve recently been working with Twocanoes Software’s Signing Manager in combination with my autopkg-conductor tool for managing AutoPkg runs. I’m happy to report it’s possible, but you may need to make some adjustments to how autopkg-conductor is being launched. For more details, please see below the jump.

As originally written, autopkg-conductor uses a LaunchDaemon to manage when the autopkg-conductor script is run. This was an idea I adopted from AutoPkgr, which also uses a LaunchDaemon to perform AutoPkg runs. The reason for using a LaunchDaemon is that the LaunchDaemon will be able to perform the scheduled AutoPkg run regardless of if the Mac is logged in at the loginwindow or not.

<?xml version="1.0" encoding="UTF-8"?>
<!DOCTYPE plist PUBLIC "-//Apple//DTD PLIST 1.0//EN" "http://www.apple.com/DTDs/PropertyList-1.0.dtd"&gt;
<plist version="1.0">
<dict>
<key>AbandonProcessGroup</key>
<true/>
<key>EnvironmentVariables</key>
<dict>
<key>PATH</key>
<string>/usr/local/bin:/usr/bin:/bin:/usr/sbin:/sbin</string>
</dict>
<key>Label</key>
<string>com.github.autopkg-nightly-run</string>
<key>ProgramArguments</key>
<array>
<string>/usr/local/bin/autopkg-conductor.sh</string>
</array>
<key>RunAtLoad</key>
<false/>
<key>StartCalendarInterval</key>
<array>
<dict>
<key>Hour</key>
<integer>2</integer>
<key>Minute</key>
<integer>0</integer>
</dict>
</array>
<key>UserName</key>
<string>autopkg</string>
</dict>
</plist>

For the most part, this works fine to successfully trigger the autopkg-conductor script. However, a problem occurred once Signing Manager was added to the mix and I tried using it with the PkgSigner AutoPkg processor. The reason for this is that Signing Manager puts credentials into the login keychain and the user context was not correct to access those credentials. Instead, I was seeing errors like this when the LaunchDaemon triggered a run of autopkg-conductor:

productsign: error: Could not find appropriate signing identity for "6116291774E14F3E8A4CB6266F560C07".
JSSImporter can't find a package at '/Users/autopkg/Library/AutoPkg/Cache/local.jss.Postman-AutoUpdate/Postman_Labs_Postman_8.3.1.pkg'!
Failed.
JSSImporter can't find a package at '/Users/autopkg/Library/AutoPkg/Cache/local.jss.Atom-AutoUpdate/GitHub_Atom_1.56.0.pkg'!
Failed.
JSSImporter can't find a package at '/Users/autopkg/Library/AutoPkg/Cache/local.jss.SapMachineJDK11/SAP_SapMachine_11.0.11.pkg'!
Failed.
JSSImporter can't find a package at '/Users/autopkg/Library/AutoPkg/Cache/local.jss.FioriLaunchpad/Fiori_Launchpad_1.0.9.pkg'!
Failed.
JSSImporter can't find a package at '/Users/autopkg/Library/AutoPkg/Cache/local.jss.Code42/Code42_8.6.0.pkg'!
Failed.
JSSImporter can't find a package at '/Users/autopkg/Library/AutoPkg/Cache/local.jss.CitrixWorkspace/Citrix_Workspace_21.04.0.pkg'!
Failed.
JSSImporter can't find a package at '/Users/autopkg/Library/AutoPkg/Cache/local.jss.VMwareFusion/VMware_Fusion_12.1.1.pkg'!
Failed.
JSSImporter can't find a package at '/Users/autopkg/Library/AutoPkg/Cache/local.jss.Slack/Slack_4.16.2.pkg'!
Failed.
JSSImporter can't find a package at '/Users/autopkg/Library/AutoPkg/Cache/local.jss.SAPGUI/SAP_SAPGUI_7.70rev1.pkg'!
Failed.
JSSImporter can't find a package at '/Users/autopkg/Library/AutoPkg/Cache/local.jss.CiscoAnyConnect/Cisco_AnyConnectSecureMobilityClient_4.9.06037.pkg'!
Failed.
JSSImporter can't find a package at '/Users/autopkg/Library/AutoPkg/Cache/local.jss.MURAL/MURAL_1.0.10.pkg'!
Failed.
view raw
gistfile1.txt
hosted with ❤ by GitHub

After Twocanoes Support did some research, they recommended adding the following key to autopkg-conductor‘s LaunchDaemon:

Key: SessionCreate
Value: true

My LaunchDaemon now looked like this:

<?xml version="1.0" encoding="UTF-8"?>
<!DOCTYPE plist PUBLIC "-//Apple//DTD PLIST 1.0//EN" "http://www.apple.com/DTDs/PropertyList-1.0.dtd"&gt;
<plist version="1.0">
<dict>
<key>AbandonProcessGroup</key>
<true/>
<key>EnvironmentVariables</key>
<dict>
<key>PATH</key>
<string>/usr/local/bin:/usr/bin:/bin:/usr/sbin:/sbin</string>
</dict>
<key>Label</key>
<string>com.github.autopkg-nightly-run</string>
<key>ProgramArguments</key>
<array>
<string>/usr/local/bin/autopkg-conductor.sh</string>
</array>
<key>RunAtLoad</key>
<false/>
<key>StartCalendarInterval</key>
<array>
<dict>
<key>Hour</key>
<integer>2</integer>
<key>Minute</key>
<integer>0</integer>
</dict>
</array>
<key>UserName</key>
<string>autopkg</string>
<key>SessionCreate</key>
<true/>
</dict>
</plist>
view raw
gistfile1.txt
hosted with ❤ by GitHub

With renewed hope, I used the LaunchDaemon to trigger a run. Same errors:

productsign: error: Could not find appropriate signing identity for "6116291774E14F3E8A4CB6266F560C07".
JSSImporter can't find a package at '/Users/autopkg/Library/AutoPkg/Cache/local.jss.Postman-AutoUpdate/Postman_Labs_Postman_8.3.1.pkg'!
Failed.
JSSImporter can't find a package at '/Users/autopkg/Library/AutoPkg/Cache/local.jss.Atom-AutoUpdate/GitHub_Atom_1.56.0.pkg'!
Failed.
JSSImporter can't find a package at '/Users/autopkg/Library/AutoPkg/Cache/local.jss.SapMachineJDK11/SAP_SapMachine_11.0.11.pkg'!
Failed.
JSSImporter can't find a package at '/Users/autopkg/Library/AutoPkg/Cache/local.jss.FioriLaunchpad/Fiori_Launchpad_1.0.9.pkg'!
Failed.
JSSImporter can't find a package at '/Users/autopkg/Library/AutoPkg/Cache/local.jss.Code42/Code42_8.6.0.pkg'!
Failed.
JSSImporter can't find a package at '/Users/autopkg/Library/AutoPkg/Cache/local.jss.CitrixWorkspace/Citrix_Workspace_21.04.0.pkg'!
Failed.
JSSImporter can't find a package at '/Users/autopkg/Library/AutoPkg/Cache/local.jss.VMwareFusion/VMware_Fusion_12.1.1.pkg'!
Failed.
JSSImporter can't find a package at '/Users/autopkg/Library/AutoPkg/Cache/local.jss.Slack/Slack_4.16.2.pkg'!
Failed.
JSSImporter can't find a package at '/Users/autopkg/Library/AutoPkg/Cache/local.jss.SAPGUI/SAP_SAPGUI_7.70rev1.pkg'!
Failed.
JSSImporter can't find a package at '/Users/autopkg/Library/AutoPkg/Cache/local.jss.CiscoAnyConnect/Cisco_AnyConnectSecureMobilityClient_4.9.06037.pkg'!
Failed.
JSSImporter can't find a package at '/Users/autopkg/Library/AutoPkg/Cache/local.jss.MURAL/MURAL_1.0.10.pkg'!
Failed.
view raw
gistfile1.txt
hosted with ❤ by GitHub

This was clearly a case of context. I was running as the right user, but something about the session context wasn’t quite right to allow me access to the login keychain and access the Signing Manager credential.

After some additional research, Twocanoes Support recommended the following:

  1. Have the user account be logged in at the login window (as opposed to running logged out.)
  2. Replace the LaunchDaemon with a LaunchAgent.

I then unloaded the LaunchDaemon and replaced it with a practically identical LaunchAgent, with the two following keys removed:

Key: UserName
Value: Account which I was running AutoPkg from (in this case, the user account was named autopkg)

Key: SessionCreate
Value: true

The LaunchAgent appeared as shown below:

<?xml version="1.0" encoding="UTF-8"?>
<!DOCTYPE plist PUBLIC "-//Apple//DTD PLIST 1.0//EN" "http://www.apple.com/DTDs/PropertyList-1.0.dtd"&gt;
<plist version="1.0">
<dict>
<key>AbandonProcessGroup</key>
<true/>
<key>EnvironmentVariables</key>
<dict>
<key>PATH</key>
<string>/usr/local/bin:/usr/bin:/bin:/usr/sbin:/sbin</string>
</dict>
<key>Label</key>
<string>com.github.autopkg-nightly-run</string>
<key>ProgramArguments</key>
<array>
<string>/usr/local/bin/autopkg-conductor.sh</string>
</array>
<key>RunAtLoad</key>
<false/>
<key>StartCalendarInterval</key>
<array>
<dict>
<key>Hour</key>
<integer>2</integer>
<key>Minute</key>
<integer>0</integer>
</dict>
</array>
</dict>
</plist>
view raw
gistfile1.txt
hosted with ❤ by GitHub

To test it out, I changed the following value in the LaunchAgent:

Key: RunAtLoad

From: false
To: true

After making that change, I logged out, logged in and * bang * my AutoPkg runs started being able to access the signing identity provided by Signing Manager and sign my packages using the PkgSigner AutoPkg processor.

productsign: using timestamp authority for signature
productsign: signing product with identity "Developer ID Installer: Rich Trouton (XF95CST45F)" from keychain (null)
productsign: adding certificate "Developer ID Certification Authority"
productsign: adding certificate "Apple Root CA"
productsign: Wrote signed product archive to /Users/ec2-user/Library/AutoPkg/Cache/local.jss.Postman-AutoUpdate/Postman_Labs_Postman_8.3.1.pkg
productsign: using timestamp authority for signature
productsign: signing product with identity "Developer ID Installer: Rich Trouton (XF95CST45F)" from keychain (null)
productsign: adding certificate "Developer ID Certification Authority"
productsign: adding certificate "Apple Root CA"
productsign: Wrote signed product archive to /Users/autopkg/Library/AutoPkg/Cache/local.jss.Atom-AutoUpdate/GitHub_Atom_1.56.0.pkg
productsign: using timestamp authority for signature
productsign: signing product with identity "Developer ID Installer: Rich Trouton (XF95CST45F)" from keychain (null)
productsign: adding certificate "Developer ID Certification Authority"
productsign: adding certificate "Apple Root CA"
productsign: Wrote signed product archive to /Users/autopkg/Library/AutoPkg/Cache/local.jss.SapMachineJDK11/SAP_SapMachine_11.0.11.pkg
productsign: using timestamp authority for signature
productsign: signing product with identity "Developer ID Installer: Rich Trouton (XF95CST45F)" from keychain (null)
productsign: adding certificate "Developer ID Certification Authority"
productsign: adding certificate "Apple Root CA"
productsign: Wrote signed product archive to /Users/autopkg/Library/AutoPkg/Cache/local.jss.FioriLaunchpad/Fiori_Launchpad_1.0.9.pkg
productsign: using timestamp authority for signature
productsign: signing product with identity "Developer ID Installer: Rich Trouton (XF95CST45F)" from keychain (null)
productsign: adding certificate "Developer ID Certification Authority"
productsign: adding certificate "Apple Root CA"
productsign: Wrote signed product archive to /Users/autopkg/Library/AutoPkg/Cache/local.jss.Code42/Code42_8.6.0.pkg
productsign: using timestamp authority for signature
productsign: signing product with identity "Developer ID Installer: Rich Trouton (XF95CST45F)" from keychain (null)
productsign: adding certificate "Developer ID Certification Authority"
productsign: adding certificate "Apple Root CA"
productsign: Wrote signed product archive to /Users/autopkg/Library/AutoPkg/Cache/local.jss.CitrixWorkspace/Citrix_Workspace_21.04.0.pkg
productsign: using timestamp authority for signature
productsign: signing product with identity "Developer ID Installer: Rich Trouton (XF95CST45F)" from keychain (null)
productsign: adding certificate "Developer ID Certification Authority"
productsign: adding certificate "Apple Root CA"
productsign: Wrote signed product archive to /Users/autopkg/Library/AutoPkg/Cache/local.jss.VMwareFusion/VMware_Fusion_12.1.1.pkg
productsign: using timestamp authority for signature
productsign: signing product with identity "Developer ID Installer: Rich Trouton (XF95CST45F)" from keychain (null)
productsign: adding certificate "Developer ID Certification Authority"
productsign: adding certificate "Apple Root CA"
productsign: Wrote signed product archive to /Users/autopkg/Library/AutoPkg/Cache/local.jss.Slack/Slack_4.16.2.pkg
productsign: using timestamp authority for signature
productsign: signing product with identity "Developer ID Installer: Rich Trouton (XF95CST45F)" from keychain (null)
productsign: adding certificate "Developer ID Certification Authority"
productsign: adding certificate "Apple Root CA"
productsign: Wrote signed product archive to /Users/autopkg/Library/AutoPkg/Cache/local.jss.SAPGUI/SAP_SAPGUI_7.70rev1.pkg
productsign: using timestamp authority for signature
productsign: signing product with identity "Developer ID Installer: Rich Trouton (XF95CST45F)" from keychain (null)
productsign: adding certificate "Developer ID Certification Authority"
productsign: adding certificate "Apple Root CA"
productsign: Wrote signed product archive to /Users/autopkg/Library/AutoPkg/Cache/local.jss.CiscoAnyConnect/Cisco_AnyConnectSecureMobilityClient_4.9.06037.pkg
productsign: using timestamp authority for signature
productsign: signing product with identity "Developer ID Installer: Rich Trouton (XF95CST45F)" from keychain (null)
productsign: adding certificate "Developer ID Certification Authority"
productsign: adding certificate "Apple Root CA"
productsign: Wrote signed product archive to /Users/autopkg/Library/AutoPkg/Cache/local.jss.MURAL/MURAL_1.0.10.pkg
view raw
gistfile1.txt
hosted with ❤ by GitHub

Once my testing was completed, I changed the RunAtLoad key’s value back to false.

Transitioning from a LaunchDaemon to a LaunchAgent does mean I will need to leave the account I’m using for AutoPkg logged in at the login window, which has security implications to consider carefully.

In my particular case, AutoPkg is being run on a virtual machine where there is not a physical display attached and access to screen sharing is restricted, so for my particular case my opinion is that the trade-off is worth it.

With regards to Signing Manager’s operation, I also had some additional questions about it with regards to my AutoPkg runs which got answered during testing:

  • Question: Does the Signing Manager app need to be launched, or will productsign (used by the AutoPkg PkgSigner processor) be able to get the certificate without the app being launched?
  • Answer: After configuring Signing Manager, there’s no need to launch the app. As long as productsign is given the right signing identity (which Signing Manager refers to as a “fingerprint”), signing will work.
  • Question: If you need to reboot your Mac, do you need to do anything following the reboot in order to having signing work?
  • Answer: No

AutoPkg repo and logfile cleanup scripts for use with autopkg-conductor

$
0
0

As part of running autopkg-conductor over a long period of time, you may see a large percentage of disk space used on the Mac where you’re running AutoPkg and autopkg-conductor. This is because AutoPkg doesn’t remove older files from ~/Library/AutoPkg/Cache and autopkg-conductor does not remove older logfiles from ~/Library/Logs. To assist with this issue, I’ve written a couple of scripts. For more details, please see below the jump.

To assist with preserving available disk space on your AutoPkg host Mac, the following scripts are available:

  • 801.clean-autopkg-repo
  • 802.remove.autopkg.conductor.logs

Both scripts are designed to be installed into the following location:

/etc/periodic/daily

Installing them in that location will enable the periodic tool to run both scripts daily on your AutoPkg host Mac.

Permissions for both scripts should be set as follows:

root:wheel - rwxr-xr-x

The 801.clean-autopkg-repo script does the following task:

  • Determine which files in the ~/Library/AutoPkg/Cache directory are older than the number of days specified in the script (by default, 20 days)
  • Delete all files in the ~/Library/AutoPkg/Cache directory which are older than the specified number of days

This script is available below and also from GitHub at the following location:

https://github.com/rtrouton/autopkg-conductor/blob/main/cleanup_scripts/801.clean-autopkg-repo

#!/bin/bash
# Remove AutoPkg-downloaded files older than a specified number of days
# Add username of the account used to run AutoPkg
autopkg_username="autopkg"
# Age of files to retain. For example, setting the following number
# will delete anything older than 20 days
#
# autopkg_cache_age="20"
autopkg_cache_age="20"
/usr/bin/find "/Users/$autopkg_username/Library/AutoPkg/Cache" -mindepth 1 -mtime +"$autopkg_cache_age" -delete

The 802.remove.autopkg.conductor.logs script is designed to do the following:

  • Determine which autopkg-conductor log files in the ~/Library/Logs directory are older than the number of days specified in the script (by default, 20 days)
  • Delete all relevant logfiles in the ~/Library/Logs directory which are older than the specified number of days.

This script is available below and also from GitHub at the following location:

https://github.com/rtrouton/autopkg-conductor/blob/main/cleanup_scripts/802.remove.autopkg.conductor.logs

#!/bin/bash
# Remove autopkg-conductor logfiles older than a specified number of days
# Add username of the account used to run AutoPkg
autopkg_username="autopkg"
# Age of logfiles to retain. For example, setting the following number
# will delete anything older than 20 days
#
# autopkg_log_age="20"
autopkg_log_age="20"
/usr/bin/find "/Users/$autopkg_username/Library/Logs" -name "autopkg-run-for*" -mindepth 1 -mtime +"$autopkg_log_age" -delete

Blocking account logins to the ?failover login page on Jamf Pro

$
0
0

As part of Jamf Pro’s single-sign on (SSO) logins, there’s an option to bypass the SSO login using the following URL:

https://your.jamf.pro.server.here:8443/?failover

Screen Shot 2021 05 21 at 11 02 14 AM

This URL is designed to let you bypass the SSO login page and take you to Jamf Pro’s own login, so that if your SSO provider is having a bad day, you can still log into your Jamf Pro server.

For those wanting to make sure that that their folks are only using SSO for logins, this can seem like a security hole. Fortunately, there’s a way to plug it. For more details, please see below the jump.

If you want to block access to the failover login for a specific user or a group, here’s how to do this:

  1. Go to Settings: System Settings: Jamf Pro User Accounts & Groups
  2. Identify the user or group where you want to block their ability to login using the the failover URL.
  3. Go to Jamf Pro Server Actions and locate the Sso Settings checkboxes.
  4. Uncheck the Update checkbox for the Jamf Pro Server Actions: Sso Settings.
  5. Save changes.

Screen Shot 2021 05 21 at 11 36 58 AM

This change will do two things:

  1. Prevent that account from being able to edit the Single Sign On settings in Settings: System Settings.
  2. Remove that account’s ability to log in to the Jamf Pro server using the the ?failover login page.

Screen Shot 2021 05 21 at 11 46 18 AM

Once the change is made, you should be able to test by trying to log into the Jamf Pro server with an affected account using the ?failover login page. If all goes well, access should be blocked.

Screen Shot 2021 05 21 at 11 10 22 AM

Using curl for telnet testing on macOS High Sierra and later

$
0
0

As part of introducing macOS High Sierra, Apple removed the telnet tool from macOS. This was part of Apple’s overall effort to improve security, as telnet does not use encryption and its traffic can be intercepted and read. However, telnet did (and does) serve a useful function as a quick way to check if it is possible to connect to a remote server on a particular port.

While there are alternative tools available for this task (like netcat), it’s also possible to still create a telnet connection on macOS using another tool: curl

For more details, please see below the jump.

You can use curl to create a telnet connection using a command similar to the one shown below:

curl -v telnet://ip.address.here:port.number.here

Note: You can also use a DNS address in place of ip.address.here.

For example, if you want to check if https://www.yahoo.com is responding on port 443, use the curl command shown below:

curl -v telnet://www.yahoo.com:443

You should see output similar to that shown below:

username@computername ~ % curl -v telnet://www.yahoo.com:443
* Trying 74.6.143.26...
* TCP_NODELAY set
* Connected to www.yahoo.com (74.6.143.26) port 443 (#0)
^C
username@computername ~ %

Note: Once successfully connected, use Control+C to break the telnet connection.

If the port is not open, you should see different output. For example, if you want to check if http://www.yahoo.com is responding on port 444, use the curl command shown below:

curl -v telnet://www.yahoo.com:444

Port 444 is not open, so you should see output similar to that shown below:

username@computername ~ % curl -v telnet://www.yahoo.com:444
* Trying 74.6.143.26...
* TCP_NODELAY set
* connect to 74.6.143.26 port 444 failed: Connection refused
* Trying 74.6.143.25...
* TCP_NODELAY set
* connect to 74.6.143.25 port 444 failed: Connection refused
* Failed to connect to www.yahoo.com port 444: Connection refused
* Closing connection 0
curl: (7) Failed to connect to www.yahoo.com port 444: Connection refused
username@computername ~ %

Using the Jamf Pro API to send device lock commands via MDM to multiple Macs

$
0
0

Most Mac admins have had this conversation at one point or another over the course of their careers:

“$Very Important Person left their Mac behind in a cab! What do we do?”
“OK, no worries. We can send a command to lock the computer or have it erase itself. Do you want it locked or wiped?”

At that point, the admin pulls up their MDM admin console and depending on what the response was (lock or wipe), send out the appropriate MDM command accompanied by a PIN code. Once received, the Mac will then turn itself into a paperweight which does or doesn’t erase itself.

Doing these one at a time is a pretty straightforward process. For example, here’s how it looks in Jamf Pro to send a device lock command via MDM:

1. Log into Jamf Pro using an account which can send lock commands via MDM.
2. Go to the appropriate computer inventory record.

Screen Shot 2021 05 28 at 2 48 00 PM

3. Select the Management tab.

Screen Shot 2021 05 28 at 2 48 01 PM

4. In the Management Commands section of the Management tab, click the Lock Computer button.

Screen Shot 2021 05 28 at 1 57 43 PM

5. Enter the PIN code which will later be used to unlock the Mac. If desired, you can also enter a message which will appear on the lock screen.

Screen Shot 2021 05 28 at 1 58 56 PM

6. Click the Lock Computer button.

Screen Shot 2021 05 28 at 1 58 57 PM

7. Click the OK button in the confirmation window.

Screen Shot 2021 05 28 at 1 59 42 PM


Once the device lock command has been sent, the Lock Computer button’s text should temporarily change to Command Sent.

Screen Shot 2021 05 28 at 1 59 49 PM


For a small number of machines (10 or less), the method outlined above works fine. But once you get beyond that number, this process gets time-consuming and unwieldy. Fortunately, there is also a way to use the Jamf Pro Classic API to send device lock commands. For more details, please see below the jump.

Pre-requisites:

If setting up a specific Jamf Pro user account for this purpose with limited rights, here are the required API privileges for the account on the Jamf Pro server:

Jamf Pro Server Objects:

Computers: Create

Jamf Pro Server Action:

Send Computer Remote Lock Command

Once you have your Jamf Pro account credentials handled, you can use an API command similar to the one shown below to send a device lock command (referred to in Apple’s MDM documentation as DeviceLock.)


/usr/bin/curl -su username_here:password_here https://jamf.pro.server.address.here:port_here/JSSResource/computercommands/command/DeviceLock/passcode/PIN_code_goes_here/id/Jamf_Pro_Computer_ID_goes_here -H "Content-Type: application/xml" -X POST

For example, here’s the command used to lock a Jamf Pro-enrolled Mac with the following Jamf Pro server, Jamf Pro account with the necessary privileges, Jamf Pro computer ID and desired PIN code.


/usr/bin/curl -su mdmlock:correct_horse_Battery_Staple https://jamfpro.company.com:8443/JSSResource/computercommands/command/DeviceLock/passcode/123456/id/9345 -H "Content-Type: application/xml" -X POST


Note: Using the API to send lock commands does have a limitation, where it is not possible to include a message to appear on the lock screen. If a message must appear on the lock screen, I recommend using the method described earlier for sending lock commands from the computer inventory record in the Jamf Pro admin console.

To help make the task of sending MDM lock commands easier, I’ve written a script which uses the API command above to read input from a .csv file and use that information to send device lock commands to multiple Macs. This script reads a .csv file formatted as follows:

Jamf Pro ID, PIN Code” as the first line

Subsequent lines:
Column 1: A Mac’s Jamf Pro ID
Column 2: Device Lock PIN code


Jamf Pro ID PIN Code
26 165234
52 197898
1226 201145
view raw
mdmlock.csv
hosted with ❤ by GitHub

For authentication, the script can accept manual input or values stored in a ~/Library/Preferences/com.github.jamfpro-info.plist file.

The plist file can be created by running the following commands and substituting your own values where appropriate:

To store the Jamf Pro URL in the plist file:

defaults write com.github.jamfpro-info jamfpro_url https://jamf.pro.server.goes.here:port_number_goes_here

To store the account username in the plist file:

defaults write com.github.jamfpro-info jamfpro_user account_username_goes_here

To store the account password in the plist file:

defaults write com.github.jamfpro-info jamfpro_password account_password_goes_here

Once you have authentication handled, the script is designed to run as shown below:

/path/to/Jamf_Pro_MDM_Device_Lock.sh /path/to/filename_goes_here.csv

Once executed, the script will then do the following:

  1. Skip the first line of the .csv file (this is the “Jamf Pro ID, PIN Code” line.)
  2. Read each subsequent line of the .csv one at a time and assign the values of column 1 and column 2 to separate variables.
  3. Use the variables in an API POST call to identify a Jamf Pro computer inventory record using the Jamf Pro ID listed in the .csv file and lock the Mac in question using the PIN code listed in the .csv file.

A successful MDM lock should produce output similar to that shown below:


Attempting to send MDM lock to Jamf Pro ID 2935 with PIN code 348202.
<?xml version="1.0" encoding="UTF-8"?><computer_command><command><name>DeviceLock</name><command_uuid>98d915a4-6132-4535-b474-c8381e48425a</command_uuid><computer_id>2935</computer_id></command></computer_command>
Successfully locked computer with Jamf Pro ID 1925 with PIN code 348202.
view raw
gistfile1.txt
hosted with ❤ by GitHub

Failures should look similar to this:

Attempting to send MDM lock to Jamf Pro ID 1234567890 with PIN code 348201.

ERROR! MDM lock of computer with Jamf Pro ID 1234567890 failed.
Attempting to send MDM lock to Jamf Pro ID 29352935 with PIN code 12345.

Invalid PIN code data provided: 12345
Attempting to send MDM lock to Jamf Pro ID AA2319 with PIN code 348206.

Invalid Jamf Pro ID data provided: AA2319


username@computername ~ % /path/to/Jamf_Pro_MDM_Device_Lock.sh filename_goes_here.csv
Attempting to send MDM lock to Jamf Pro ID 1234567890 with PIN code 348201.
ERROR! MDM lock of computer with Jamf Pro ID 1234567890 failed.
Attempting to send MDM lock to Jamf Pro ID 2935 with PIN code 348202.
<?xml version="1.0" encoding="UTF-8"?><computer_command><command><name>DeviceLock</name><command_uuid>98d915a4-6132-4535-b474-c8381e48425a</command_uuid><computer_id>2935</computer_id></command></computer_command>
Successfully locked computer with Jamf Pro ID 1925 with PIN code 348202.
Attempting to send MDM lock to Jamf Pro ID 29352935 with PIN code 12345.
Invalid PIN code data provided: 12345
Attempting to send MDM lock to Jamf Pro ID AA2319 with PIN code 348206.
Invalid Jamf Pro ID data provided: AA2319
username@computername ~ %
view raw
gistfile1.txt
hosted with ❤ by GitHub


This script is available below and also from GitHub at the following location:

https://github.com/rtrouton/rtrouton_scripts/tree/main/rtrouton_scripts/Casper_Scripts/Jamf_Pro_MDM_Device_Lock

#!/bin/bash
# Sends MDM lock commands using Jamf Pro's Classic API.
#
# This script reads a .csv file formatted as follows:
#
# "Jamf Pro ID, PIN Code" as the first line
#
# Subsequent lines:
# Column 1: A Mac's Jamf Pro ID
# Column 2: Device Lock PIN code
#
# Example:
#
# Jamf Pro ID, PIN Code
# 26,165234
# 52,197898
# 1226,201145
#
# This script is designed to run as shown below:
#
# /path/to/Jamf_Pro_MDM_Device_Lock.sh filename_goes_here.csv
#
# Once executed, the script will then do the following:
#
# Skip the first line of the .csv file (this is the "Jamf Pro ID, PIN Code" line.)
# Read each subsequent line of the .csv one at a time and assign the values of column 1
# and column 2 to separate variables.
#
# Use the variables in an API PUT call to identify a Jamf Pro computer inventory record
# using the Jamf Pro ID listed in the .csv file and lock the Mac in question using the
# the PIN code listed in the .csv file.
#
# A successful MDM lock should produce output similar to that shown below:
#
# Attempting to send MDM lock to Jamf Pro ID 1925 with PIN code 348202.
# <?xml version="1.0" encoding="UTF-8"?><computer_command><command><name>DeviceLock</name><command_uuid>98d915a4-6132-4535-b474-c8381e48425a</command_uuid><computer_id>1925</computer_id></command></computer_command>
# Successfully locked computer with Jamf Pro ID 1925 with PIN code 348202.
#
# Failures should look similar to this:
#
# Attempting to send MDM lock to Jamf Pro ID 1234567890 with PIN code 348201.
#
# ERROR! MDM lock of computer with Jamf Pro ID 1234567890 failed.
#
# Attempting to send MDM lock to Jamf Pro ID 19251925 with PIN code 12345.
#
# Invalid PIN code data provided: 12345
#
# Attempting to send MDM lock to Jamf Pro ID AA2319 with PIN code 348206.
#
# Invalid Jamf Pro ID data provided: AA2319
#
# If setting up a specific user account with limited rights, here are the required API privileges
# for the account on the Jamf Pro server:
#
# Jamf Pro Server Objects:
#
# Computers: Create
#
# Jamf Pro Server Action:
#
# Send Computer Remote Lock Command
# If you choose to hardcode API information into the script, set one or more of the following values:
#
# The username for an account on the Jamf Pro server with sufficient API privileges
# The password for the account
# The Jamf Pro URL
# Set the Jamf Pro URL here if you want it hardcoded.
jamfpro_url=""
# Set the username here if you want it hardcoded.
jamfpro_user=""
# Set the password here if you want it hardcoded.
jamfpro_password=""
# If you do not want to hardcode API information into the script, you can also store
# these values in a ~/Library/Preferences/com.github.jamfpro-info.plist file.
#
# To create the file and set the values, run the following commands and substitute
# your own values where appropriate:
#
# To store the Jamf Pro URL in the plist file:
# defaults write com.github.jamfpro-info jamfpro_url https://jamf.pro.server.goes.here:port_number_goes_here
#
# To store the account username in the plist file:
# defaults write com.github.jamfpro-info jamfpro_user account_username_goes_here
#
# To store the account password in the plist file:
# defaults write com.github.jamfpro-info jamfpro_password account_password_goes_here
#
# If the com.github.jamfpro-info.plist file is available, the script will read in the
# relevant information from the plist file.
jamfpro_plist="$HOME/Library/Preferences/com.github.jamfpro-info.plist"
filename="$1"
exitCode=0
if [[ -r "$jamfpro_plist" ]]; then
if [[ -z "$jamfpro_url" ]]; then
jamfpro_url=$(defaults read "${jamfpro_plist%.*}" jamfpro_url)
fi
if [[ -z "$jamfpro_user" ]]; then
jamfpro_user=$(defaults read "${jamfpro_plist%.*}" jamfpro_user)
fi
if [[ -z "$jamfpro_password" ]]; then
jamfpro_password=$(defaults read "${jamfpro_plist%.*}" jamfpro_password)
fi
fi
# If the Jamf Pro URL, the account username or the account password aren't available
# otherwise, you will be prompted to enter the requested URL or account credentials.
if [[ -z "$jamfpro_url" ]]; then
read -p "Please enter your Jamf Pro server URL : " jamfpro_url
fi
if [[ -z "$jamfpro_user" ]]; then
read -p "Please enter your Jamf Pro user account : " jamfpro_user
fi
if [[ -z "$jamfpro_password" ]]; then
read -p "Please enter the password for the $jamfpro_user account: " -s jamfpro_password
fi
echo
# Remove the trailing slash from the Jamf Pro URL if needed.
jamfpro_url=${jamfpro_url%%/}
# Verify that the file exists and is readable
if [[ -r $filename ]]; then
# Set IFS to read the .csv file by setting commas as the character
# which separates fields in the .csv file
while IFS=, read jamf_pro_id pin_code || [ -n "$jamf_pro_id" ]; do
echo "Attempting to send MDM lock to Jamf Pro ID $jamf_pro_id with PIN code $pin_code."
# All Jamf Pro IDs should be positive numbers and
# PIN codes should be all positive numbers that are
# exactly six digits, so we check for those conditions
# before proceeding.
if [[ "$jamf_pro_id" =~ ^[0-9]+$ ]]; then
if [[ "$pin_code" =~ ^[0-9]{6} ]]; then
# Due to IFS redefining field separation, the $pin_code
# value has a carriage return included. The next check
# below trims that off before it can cause problems for curl.
pin_code=$(echo $pin_code | tr -d '\r')
# If the previous checks succeeded, the curl command below
# sends the DeviceLock command, which will then be sent out
# by the Jamf Pro server. The curl command uses the "–fail"
# function to enable curl to send out an exit code, which we
# use to test if the API call was successful.
/usr/bin/curl –fail -su ${jamfpro_user}:${jamfpro_password} "$jamfpro_url/JSSResource/computercommands/command/DeviceLock/passcode/$pin_code/id/$jamf_pro_id" -H "Content-Type: application/xml" -X POST
# curl's exit status is checked below. If curl has an exit status of zero,
# the API call was sent and received successfully. If curl has a non-zero
# exit status, a warning message is displayed which indicates that the API call
# has failed.
if [[ $? -eq 0 ]]; then
echo -e "\nSuccessfully locked computer with Jamf Pro ID $jamf_pro_id with PIN code $pin_code."
else
echo -e "\nERROR! MDM lock of computer with Jamf Pro ID $jamf_pro_id failed."
fi
# If the PIN code is not all positive numbers
# and exactly six digits, a warning message is
# displayed that an invalid PIN code has been
# provided.
else
echo -e "\nInvalid PIN code provided: $pin_code"
fi
# If the Jamf Pro ID number is not all positive numbers,
# a warning message is displayed that an invalid Jamf Pro ID number
# has been provided.
else
echo -e "\nInvalid Jamf Pro ID provided: $jamf_pro_id"
fi
echo ""
done < <(tail -n +2 "$filename")
else
# If the provided .csv is not readable, a warning message
# is displayed that the file does not exist or is not readable.
echo "Input file does not exist or is not readable"
exitCode=1
fi
exit "$exitCode"
Viewing all 764 articles
Browse latest View live