Quantcast
Channel: rtrouton – Der Flounder
Viewing all 764 articles
Browse latest View live

Deploying Xerox print drivers on a per-OS basis via Casper’s Self Service

$
0
0

In my shop, we use a Xerox color copier/printer along with a number of Canon ImageRunner printers. Like the Canons, I have the Xerox printer available in Casper’s Self Service so that our users can set this printer up themselves on their Macs. When I recently overhauled my Canon printer setups, I decided to also revisit how Self Service handled setting up the Xerox printer. Unlike our Canon printers, our Xerox printer used LPR already so I figured that getting the right drivers deployed should be straightforward.

Then I looked at Xerox’s driver page and saw three different driver installers available:

For 10.5.x – Xerox Print Driver 2.94.3

For 10.6.x – Xerox Print Driver 2.112.0

For 10.7.x through 10.9.x – Xerox Print Driver 2.113.0

I wanted to maintain roughly the same workflow as I had with the Canon printers, but I also wanted to make sure that the OS-appropriate driver was delivered to each Mac.

For details on how I addressed this, see below the jump.

Here’s the workflow I wanted to use when the Xerox printer setup is requested via Self Service:

A. Casper will check the Mac to see if the needed Xerox drivers are installed.
B. If no Xerox drivers or older Xerox drivers are detected, the appropriate Xerox print drivers will be installed before the requested printer is set up.
C. If the installed drivers are the same version or higher as the print drivers available via Self Service, no drivers are installed and Casper will proceed to set up the printer using the installed drivers.

The first part was figuring out if the needed Xerox drivers were installed. Like the Canon drivers, Xerox’s installer packages didn’t have an easy way I could see to discern the driver version from the installer receipts, so I looked for something else that would have the version number.

After some digging, I was able to confirm that the XeroxFeatures.plugin located in /Library/Printers/Xerox/PDEs had the version number that I was looking for.

Screen Shot 2014-02-10 at 3.48.30 PM

I also confirmed that I could use the defaults command to pull the version information from the CFBundleShortVersionString key value stored in /Library/Printers/Xerox/PDEs/XeroxFeatures.plugin/Contents/Info.plist.

From there, I built the following script:

The script checks /Library/Printers/Xerox/PDEs/XeroxFeatures.plugin/Contents/Info.plist for the CFBundleShortVersionString key value.

Based on the key value, the following actions are taken:

- If the value returned is less than the version of the current drivers, the Xerox print drivers are installed by a Casper policy before the requested printer is set up.
- If the installed drivers are the same version or higher as the print drivers available on the Casper server, this information is logged and the Xerox print drivers are not installed.

The driver version that the script is looking for is then set on the JSS by using parameters five, six or seven in the JSS settings for the script. As of 2-10-2014, the current versions are as follows:

10.5.x: 2.94.3
10.6.x: 2.112.0
10.7.x – 10.9.x: 2.113.0

Screen Shot 2014-02-10 at 1.48.44 PM

The script uses a manual trigger to run a Casper policy that would install the print drivers. The next part was to building policies which used that trigger, one for each driver installer.

Building the individual policy was straightforward, as I just needed it to respond to the manual trigger and install the package specified by the policy. When new Xerox drivers come out, all I should need to do is update the policy with the new installer package.

For 10.5.x Macs:

I built a policy that was triggered by the manual trigger and had the Xerox Print Driver 2.94.3 installer as the package to be installed. I then scoped the policy to a smart group that only had 10.5.x Macs included.

Screen Shot 2014-02-10 at 10.24.14 AM
Screen Shot 2014-02-10 at 10.25.34 AM
Screen Shot 2014-02-10 at 10.29.19 AM

For 10.6.x Macs:

I built a policy that was triggered by the manual trigger and had the Xerox Print Driver 2.112.0 installer as the package to be installed. I then scoped the policy to a smart group that only had 10.6.x Macs included.

Screen Shot 2014-02-10 at 10.25.13 AM

Screen Shot 2014-02-10 at 10.24.47 AM

Screen Shot 2014-02-10 at 10.29.49 AM

For 10.7.x through 10.9.x Macs:

I built a policy that was triggered by the manual trigger and had the Xerox Print Driver 2.113.0 installer as the package to be installed. I then scoped the policy to a smart group that only had 10.7.x – 10.9.x Macs included.

Screen Shot 2014-02-10 at 10.26.03 AM

Screen Shot 2014-02-10 at 10.26.22 AM

Screen Shot 2014-02-10 at 10.30.21 AM

Scoping the policies to smart groups ensured that only one policy could apply when the manual trigger was called by the script. This meant that the same manual trigger could be used with multiple policies, but that the individual Macs would only get the policy that applied to their specific operating system.

Once I had the script and policies in place, I updated my printer setup policy with the new printer settings and added the previously-mentioned script. When added, I set the script to Run Before and set the following values in the parameter blanks:

In the Parameter 5 blank – 2.94.3
In the Parameter 6 blank – 2.112.0
In the Parameter 7 blank – 2.113.0

Screen Shot 2014-02-10 at 1.48.44 PM

When the printer setup is selected, the script will run before the printer setup and do its version check.

Screen Shot 2014-02-10 at 1.49.23 PM

The other printer setup policy options were set as shown below:

Screen Shot 2014-02-10 at 2.02.24 PM
Screen Shot 2014-02-10 at 1.55.06 PM

The result is how it appears at the user’s end. When the printer setup is selected, the script will run before the printer setup and do its version check.

If new drivers are needed, a message will appear to inform the user that the drivers are being installed.

Screen Shot 2014-02-10 at 2.38.22 PM

Once the printer setup has completed, a message will then appear to let the user know that the printer setup has completed.

Screen Shot 2014-02-10 at 2.39.24 PM

I’ve also applied this approach to printer driver policies that are available in Self Service, independent of the printer setups.

Screen Shot 2014-02-10 at 3.16.08 PM

In this case, because I’m not as worried about people reinstalling drivers over and over again using the printer driver install policy, the policy does not have the script that figures out if the drivers are already installed. Instead, the policy just runs the manual trigger for setting up the requested printer drivers.

For our Canon printers, the printer driver install policy is set up like this:

Screen Shot 2014-02-10 at 12.52.08 PM
Screen Shot 2014-02-10 at 12.54.22 PM
Screen Shot 2014-02-10 at 12.53.23 PM

For our Xerox printers, the printer driver install policy is set up like this:

Screen Shot 2014-02-10 at 12.54.48 PM
Screen Shot 2014-02-10 at 12.55.19 PM
Screen Shot 2014-02-10 at 12.55.52 PM


Power Nap, power management settings and FileVault 2

$
0
0

I recently purchased a new MacBook Pro Retina for my own use and encrypted it with FileVault 2. As part of setting it up, I ran the following command to ensure that the laptop hibernated (where the contents of the RAM are written to disk) and also have the FileVault 2 key automatically removed from the saved RAM state when I put the laptop to sleep:

sudo pmset -a destroyfvkeyonstandby 1 hibernatemode 25

I then put my laptop to sleep and shortly thereafter went to sleep myself.

The next morning, I went to wake up my laptop. I expected to see my account icon and a password blank at the FileVault 2 login screen, which would indicate that it had been asleep.

Screen Shot 2014-02-12 at 12.51.27 PM

Instead, I saw the icons for all of the FileVault 2-enabled accounts on my laptop.

Screen Shot 2014-02-12 at 12.51.17 PM

That indicated that my laptop had turned off instead of being asleep. For more details, see below the jump.

I hadn’t had this issue on my previous laptop, which was a 13 inch 2011 MacBook Pro. Then I remembered that my new laptop supported Apple’s new Power Nap technology and the old one had not.

My working theory at that point was that Power Nap woke up my laptop. Because the FileVault 2 key had been removed from memory, the waking process then stopped and waited for the account password to be entered.

In a situation like this, the Mac will shut down within a few minutes as a safety measure. This shutdown happens because the OS isn’t running and there’s no way for the functionality available at the FileVault 2 pre-boot login screen to monitor or control the laptop’s temperature.

That would mean that the sequence of events would go like this:

  1. I put the laptop to sleep
  2. Power Nap would wake up the laptop roughly an hour later
  3. The waking process would be interrupted by the fact that the disk was locked
  4. After a few minutes, the laptop would shut off
  5. I go to wake up my laptop at a later time and find that it was powered off

Working with this theory, I went into the Energy Saver settings in System Preferences and disabled the Power Nap settings for both the power adapter and battery.

Screen Shot 2014-02-12 at 1.02.41 PM

Screen Shot 2014-02-12 at 1.05.12 PM

The Power Nap settings can also be disabled by running the following command in the Terminal:

sudo pmset -a darkwakes 0

Adding -a to the pmset command will disable Power Nap for the Battery, Power Adapter and UPS Energy Saver settings.

Once I’d disabled Power Nap, I thought the problem would be solved. Nothing else should wake it up, right? Then I put my laptop to sleep the next night and tried to wake it the following morning. The laptop was off again, so not fixed.

After doing more research, I ran across this thread in the Apple Discussions forums, where people were discussing how their 2013 Airs and Retinas were waking unexpectedly from sleep and saw this post. In particular, the fact that the problem seemed to stop after pmset‘s standby and standbydelay settings were changed. After verifying the difference between pmset’s autopoweroff and standby settings, I then ran the following commands in Terminal:

sudo pmset -a darkwakes 0
sudo pmset -a standby 0
sudo pmset -a standbydelay 0

I then ran the pmset command again to enable hibernation and and remove the FileVault key from memory:

sudo pmset -a destroyfvkeyonstandby 1 hibernatemode 25

Once I did that, my pmset settings looked like this:

Screen Shot 2014-02-12 at 1.36.41 PM

After making those changes to my power management settings, my encrypted laptop started sleeping and waking like I wanted it to.

To verify that Power Nap was still part of the issue, I re-enabled Power Nap in my Power Adapter settings and put my laptop to sleep for two hours.

Screen Shot 2014-02-12 at 1.53.59 PM

When I tried to wake it, the laptop was off again, so I re-disabled Power Nap. Since then, no problems have been seen.

Screen Shot 2014-02-12 at 1.02.41 PM


Managing the Authorization Database in OS X Mavericks

$
0
0

Prior to OS X Mavericks, the /etc/authorization XML file controlled the rights for many different actions, such as adding a printer, setting up Time Machine or setting DVD region codes. Modifying this file required root access and could be performed with a text editor. The /etc/authorization file could also be modified by using the security command line tool included with OS X, but most chose not to do so because directly editing the file was easier.

With the release of OS X Mavericks, /etc/authorization has been removed in favor of a new authorization database, which is a SQLite database located at /var/db/auth.db. There is also an authorization.plist file located in /System/Library/Security, which is used by the OS as a template for a new /var/db/auth.db database file, in the event that the OS detects on boot that /var/db/auth.db does not exist.

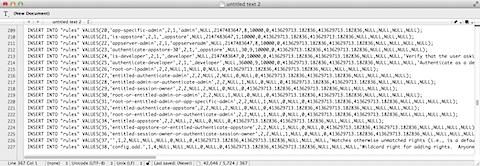
To see what’s in the database, you can export the database to a text file using the following command:

sudo sqlite3 auth.db .dump > /path/to/filename.txt

It’s also possible to open the exported data directly inside text editors that support this option. For example, the following command can be used to export the database and automatically open the exported data in a new TextWrangler document:

sudo sqlite3 auth.db .dump | edit

Figure_1-Authorization_database_exported_to_a_TextWrangler_document

With the move of authorization rights into a database, the old methods of editing authorization rights with a text editor no longer work. Instead, there are now three possible methods for adding, deleting and changing authorization rights:

  1. The security command line tool
  2. Using SQLite commands to modify the database
  3. Modifying the authorization.plist file located at /System/Library/Security, then removing the existing /var/db/auth.db database

Of these three, the Apple-supported method is to use the security command line tool so I will be focusing on that approach.

The security tool has a command called authorizationdb, which allows for edits to the authorization database. The security authorizationdb command has three options:

  • read
  • write
  • remove

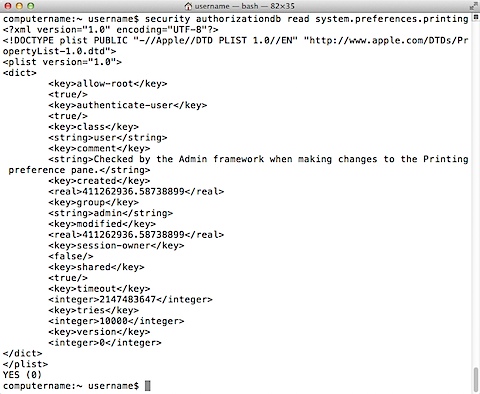
These functions allow for the various rights to be read, added to, changed or deleted. For example, the system.preferences.printing rules can be displayed by running the following command:

security authorizationdb read system.preferences.printing

The rules will be displayed in property list format.

Figure_2-Displaying_rules_using_security_authorizationdb_read

Note: When a security authorizationdb action is successful, it will display a YES status message. If the action is unsuccessful, a NO status message is displayed.

It’s also possible to export the referenced right as a property list file. This export can be performed by running the command below:

security authorizationdb read referenced.rights > /path/to/filename.plist

Figure_3-Exporting_rules_to_a_property_list_file_using_security_authorizationdb_read

Making Changes To Authorization Rules

Editing existing rights, or adding new ones, can be accomplished with security authorizationdb write. In turn, the write command has three options:

  • allow
  • deny
  • specific rulename

For example, running the commands below with root privileges will allow all users on this Mac to be able to modify the Startup Disk settings:

security authorizationdb write system.preferences allow
security authorizationdb write system.preferences.startupdisk allow

The first security authorizationdb write command for system.preferences gives all users access to System Preferences itself, which is needed before granting allow rights to other system.preferences.referenced_settings_here rules.

Figure_4-Modifying_Startup_Disk_authorization_rules_using_security_authorizationdb_write_allow

Once the commands above have been run, Startup Disk should now allow modification by all users on the Mac.

Figure_5-Startup_Disk_set_to_allow_modification_by_all_users

As an example of using specific rulenames, running the command below with root privileges will set changes to preferences to require authentication by a user with admin privileges:

security authorizationdb write system.preferences authenticate-admin

Figure_6-Modifying_rules_by_referencing_specific_rulenames_with_security_authorizationdb_write

However, the best way I’ve found to edit authorization rights is to leverage security authorizationdb‘s ability to export referenced rights to a property list file and import rules from a property list file. This allows granular changes to authorization rules while making sure that the rest of the rule isn’t changed.

A good example of this is the Require an administrator password to access system-wide preferences checkbox found in System Preferences’s Security preferences when the Advanced… button is selected. To set this to be unchecked, you can use the defaults command in combination with the security authorizationdb command together as shown below:

security authorizationdb read system.preferences > /tmp/system.preferences.plist
defaults write /tmp/system.preferences.plist shared -bool true
security authorizationdb write system.preferences < /tmp/system.preferences.plist

Figure_7-Modifying_rules_using_the_defaults_command_to_edit_exported_property_list_files

The first command exports the current system.preferences rules as a property list to /tmp/system.preferences.plist.

The second command uses defaults to change the existing shared key in /tmp/system.preferences.plist to a boolean value of true.

Figure_8-Changing_the_shared_key_value_to_true_using_the_defaults_command

The third command is run with root privileges, reads the contents of the property list file into the authorization database and then updates the system.preferences rules to use the new value.

The result is that the Require an administrator password to access system-wide preferences checkbox is now unchecked.

Figure_9-The_Require_an_administrator_password_to_access_system-wide_preferences_setting_configured_to_not_require_a_password

PlistBuddy can also be used in place of defaults in a workflow where an exported property list file is being edited. An example of this would be using PlistBuddy and the security authorizationdb command together as shown below to enable the Require an administrator password to access system-wide preferences setting:

security authorizationdb read system.preferences > /tmp/system.preferences.plist
/usr/libexec/PlistBuddy -c "Set :shared false" /tmp/system.preferences.plist
security authorizationdb write system.preferences < /tmp/system.preferences.plist

Figure 10 – Modifying rules using the PlistBuddy command to edit exported property list files

The first command exports the current system.preferences rules as a property list to /tmp/system.preferences.plist.

The second command uses PlistBuddy to change the existing shared key in /tmp/system.preferences.plist to a boolean value of false.

Figure_11-Changing_the_shared_key_value_to_false_using_the_PlistBuddy_command

The third command is run with root privileges, reads the contents of the property list into the authorization database and updates the system.preferences rules to use the new value.

The result is that the Require an administrator password to access system-wide preferences checkbox is now checked.

Figure_12-The_Require_an_administrator_password_to_access_system-wide_preferences_setting_configured_to_require_a_password

Testing Authorization Rule Changes

When testing changes to the authorization rules, I strongly recommend using a virtual machine or something other than a production machine. Incorrectly editing the authorization database may result in functions working unpredictably or stop working at all. My additional recommendation would be to use the following workflow to make changes to rules:

  1. Use security authorizationdb read referenced.rights > /path/to/referenced.rights.plist to export a property list file containing the rule.
  2. Modify /path/to/referenced.rights.plist using the property list editor that works best for your needs.
  3. Use security authorizationdb write referenced.rights < /path/to/referenced.rights.plist to write the needed changes back to the database.

That said, Mavericks offers a way to reset the authorization rules that was not available on previous versions of OS X. In the event that problems occur, it is possible to boot the machine to the Mac’s recovery partition and use the command line to remove the auth.db database files that reside in /var/db/ on the Mac’s boot drive. At next reboot, the OS will detect that /var/db/auth.db does not exist and create a new /var/db/auth.db, using /System/Library/Security/authorization.plist as a template.

Figure_13-Removing_the_authorization_database_while_booted_from_the_recovery_partition

As always, change is hard, especially when the changes aren’t well documented by Apple. However, using Apple’s security authorizationdb command to edit the database should help Mac admins in the long run by reducing the possibility of problems due to incorrect formatting or other errors. security authorizationdb‘s ability to both export and import property list files containing rule information also helps Mac admins by allowing granular changes to be made to individual rules without worrying about adversely affecting the other rules’ ability to manage the Mac.

In my opinion, this change by Apple provides short-term pain and long-term gain to Mac admins by making it easier to manage authorization rules both in Mavericks and in future versions of OS X.

For more information on working with the authorization database, I recommend checking out the links below:

Authorization Rights and Mavericks

Authorisation Rights reference

Modifying the OS X Mavericks Authorization Database

Managing the Authorization Database With Munki

security authorizedb man page


Deploying Sophos Anti-Virus for Mac OS X 9.x

$
0
0

For the past few major releases, Sophos used a standard installer package to install both their free and paid antivirus solution. With the release of Sophos Anti-Virus 9.x though, Sophos changed how their antivirus solution for Macs was installed by switching to using an application to install it. For their customers using Sophos Enterprise Console, Sophos will still provide a installer metapackage, but all other customers now need to use the application to install Sophos Anti-Virus 9.x on Macs.

Screen Shot 2014-02-20 at 1.40.31 PM

Curiously, Sophos went to some lengths to make their install application look like a standard installer package.

Screen Shot 2014-02-20 at 1.44.33 PM

Screen Shot 2014-02-20 at 1.46.25 PM

This extended to the point of naming the actual application as Installer, which is the same name as Apple’s Installer.

Screen Shot 2014-02-20 at 1.45.41 PM

Screen Shot 2014-02-20 at 1.47.37 PM

This switch away from using installer packages was a problem for Mac admins who wanted to deploy Sophos 9.x, but did not have Sophos’ enterprise console. After doing some research and reading a very helpful thread on JAMF Nation, it looks like it is possible to repackage Sophos 9.x for deployment. For more details, see below the jump.

Sophos’ application can be run from the command line using the InstallationDeployer tool, which includes both install and remove switches. Here’s how to install and uninstall Sophos 9.x using the free Sophos Home Edition installer application:

Install:

/path/to/Sophos\ Anti-Virus\ Home\ Edition.app/Contents/MacOS/InstallationDeployer --install


Uninstall:

/Library/Application\ Support/Sophos/he/Installer.app/Contents/MacOS/InstallationDeployer --remove


With these commands, it’s possible to add the Sophos install application to an installer package and run the needed command(s) as a postinstall script.

Once I had this information and understood what was going on, here’s how I repackaged Sophos Anti-Virus Home Edition 9.x so that it could be deployed via an installer package.

Prerequisites:

Packages

The Sophos 9.x install application

1. Set up a new Packages project and select Raw Package.

Screen Shot 2014-02-20 at 2.07.07 PM

2. In this case, I’m naming the project Sophos Anti-Virus 9.0.7

Screen Shot 2014-02-20 at 2.07.28 PM

3. Once the Packages project opens, click on the Project tab. You’ll want to make sure that the your information is correctly set here (if you don’t know what to put in, check the Help menu for the Packages User Guide. The information you need is in Chapter 4 – Configuring a project.)

In this example, I’m not changing any of the options from what is set by default.

Screen Shot 2014-02-20 at 2.07.44 PM

4. Next, click on the Settings tab. In the case of my project, I want to install with root privileges and not require a logout, restart or shutdown.

To accomplish this, I’m choosing the following options in the Settings section:

In the Post-Installation Behavior section, set On Success: to Do Nothing

In the Options section, check the box for Require admin password for installation.

Screen Shot 2014-02-20 at 2.08.26 PM

5. Click on the Scripts tab in your Packages project.

Screen Shot 2014-02-20 at 3.13.44 PM

6. Select the Sophos install application and drag it into the Additional Resources section of your Packages project.

Screen Shot 2014-02-20 at 2.19.36 PM

7. The last piece is telling the Sophos install application to run. For this, you’ll need a postinstall script. Here’s the one I’m using:

#!/bin/bash

LOGGER="/usr/bin/logger"
 
# Determine working directory
install_dir=`dirname $0`

# Uninstall existing copy of Sophos 8.x by checking for the
# Sophos Antivirus uninstaller package in /Library/Sophos Anti-Virus.
# If present, the uninstallation process is run.
 
if [ -d "/Library/Sophos Anti-Virus/Remove Sophos Anti-Virus.pkg" ]; then
     ${LOGGER} "Sophos AV present on Mac. Uninstalling before installing new copy."
     /usr/sbin/installer -pkg "/Library/Sophos Anti-Virus/Remove Sophos Anti-Virus.pkg" -target /
elif [ -d "/Library/Application Support/Sophos Anti-Virus/Remove Sophos Anti-Virus.pkg" ]; then
     ${LOGGER} "Sophos AV present on Mac. Uninstalling before installing new copy."
     /usr/sbin/installer -pkg "/Library/Application Support/Sophos Anti-Virus/Remove Sophos Anti-Virus.pkg" -target /    
else
   ${LOGGER} "Sophos Anti-Virus 8.x Uninstaller Not Present"
fi

# Uninstall existing copy of Sophos 9.x by checking for the InstallationDeployer application
# in /Library/Application Support/Sophos/he/Installer.app/Contents/MacOS. If present, the 
# uninstallation process is run.

if [[ -f "/Library/Application Support/Sophos/he/Installer.app/Contents/MacOS/InstallationDeployer" ]]; then
   ${LOGGER} "Sophos AV present on Mac. Uninstalling before installing new copy."
   "/Library/Application Support/Sophos/he/Installer.app/Contents/MacOS/InstallationDeployer" --remove
else
   ${LOGGER} "Sophos Anti-Virus 9.x Uninstaller Not Present"
fi

# Install Sophos Anti-Virus 9.x 

$install_dir/"Sophos Anti-Virus Home Edition.app/Contents/MacOS/InstallationDeployer" --install
 
exit 0

8. Once you’ve got the postinstall script built, run the following command to make the script executable:

sudo chmod a+x /path/to/postinstall

9. Once completed, add the postinstall script to your Packages project.

Screen Shot 2014-02-20 at 2.38.12 PM

10. Last step, go ahead and build the package. (If you don’t know to build, check the Help menu for the Packages User Guide. The information you need is in Chapter 3 – Creating a raw package project and Chapter 10 – Building a project.)

Testing the installer

Once the package has been built, test it by taking it to a test machine that does not have Sophos and install it. The end result should be that Sophos Anti-Virus installs properly.

Note: If you’re installing the free Home Edition, it should be fully configured on installation and set to communicate back to Sophos for antivirus updates. If you’re installing a customized installer that communicates to an internal server for updates, you may need to do some configuration to point it to your internal server. Sophos has a KBase article on how to do this available here.


Payload-Free Package Creator.app

$
0
0

I do a lot of work with payload-free packages and I’ve looked for a while for a tool that would let me easily create them from existing scripts. While I have a process for creating them as needed with pkgbuild, this approach still requires some setup work.

Payload-Free Package Creator logo

After thinking about it and taking a look at various approaches, I’ve developed Payload-Free Package Creator.app, an Automator application that will allow the selection of an existing script and create a payload-free package that runs the selected script. For more details, see below the jump.

Using Payload-Free Package Creator.app

1. If needed, download the Payload-Free_Package_Creator_Application.zip file from the application directory in my GitHub repo.

2. Once downloaded and unzipped, double-click on the Payload-Free Package Creator application.

Screen Shot 2014-03-07 at 5.35.57 PM

3. You’ll be prompted to select the script that you want to create a payload-free package from.

Screen Shot 2014-03-07 at 7.33.43 PM

4. Once you’ve selected the script, you’ll be prompted to name the payload-free package. By default, the name filled in will be Payload-Free Installer Package.

Screen Shot 2014-03-07 at 5.25.04 PM

This name can be changed as desired.

Screen Shot 2014-03-07 at 5.21.36 PM

5. Once you’ve entered a name for the installer package, you’ll be prompted for a package identifier. By default, the name filled in will be com.github.payload_free

Screen Shot 2014-03-07 at 5.21.48 PM

This name should be changed to be something unique.

Screen Shot 2014-03-07 at 5.22.04 PM

6. Once the package name and package identifier have been set, Payload-Free Package Creator.app will prompt for an administrator’s username and password.

Screen Shot 2014-03-07 at 5.22.17 PM

7. Once the admin username and password are provided, Payload-Free Package Creator.app will create the payload-free package and prompt you when it’s finished.

Screen Shot 2014-03-07 at 5.22.25 PM

8. Click OK at the prompt and a new Finder window will open to display the newly-created payload-free package.

Screen Shot 2014-03-07 at 5.24.04 PM

Screen Shot 2014-03-07 at 5.24.16 PM

9. Payload-Free Package Creator.app will automatically exit once finished.

How Payload-Free Package Creator.app works

Payload-Free Package Creator.app is an Automator application that uses AppleScript, shell scripting and pkgbuild behind the scenes to create payload-free packages. When a script is selected, the following process takes place:

1. The script is copied to /tmp and the file is renamed to postinstall, to match the name that pkgbuild is expecting for a post-installation script.

2. After the package name and package identifier are chosen, /tmp is checked to make sure that there is not an existing directory that is named the same as the chosen name. If a matching directory is found, it is removed.

3. A new directory is created in /tmp that matches the chosen name of the package.

4. Next, a scripts directory is created inside of /tmp/package_name_here.

5. The postinstall script is moved to /tmp/package_name_here/scripts.

6. The payload-free package is built by pkgbuild using the postinstall script stored in /tmp/package_name_here/scripts.

7. The finished payload-free package is stored in /tmp/package_name_here and the user is prompted that the process is finished.

8. Once the user is notified and clicks OK, a new Finder window opens for /tmp/package_name_here.

The total workflow looks like this:

Screen Shot 2014-03-07 at 4.32.02 PM

The AppleScript used to create the payload-free package as part of the Automator work is below:

All Payload-Free Package Creator components and scripts are available at my GitHub repo:

https://github.com/rtrouton/Payload-Free-Package-Creator

The Automator workflow files and the AppleScript are also available via the link above if you want to build a customized Payload-Free Package Creator for your own environment.


FileVault 2 session at MacIT 2014

Setting Parameter Labels in Casper

$
0
0

I recently learned about how to use Parameter Labels as part of a JAMF training class. I had read about them in the Casper Administrator’s Guide but managed to fundamentally misunderstand what they did and how they work.

What I thought:

Adding a Parameter Label value to a script in Casper Admin meant that the associated variable value would be pre-set for the script when I added it to a policy.

I didn’t want this behavior, as I wanted to maintain flexibility when setting policies. Consequently, I didn’t set anything in the Parameter Label value for my scripts.

How they actually work:

Setting the Parameter Label value in Casper Admin means that you’re changing the label that shows up in the script parameters in a policy. For example, changing the Parameter Label value for Parameter 4 in Casper Admin to Username means that the parameter name for the script will change from Parameter 4 to Username when you add the script to a policy.

Screen Shot 2014-03-20 at 10.29.02 AM

Screen Shot 2014-03-20 at 10.28.01 AM

Here’s how to set Parameter Labels in Casper Admin:

1. Open Casper Admin

2. Select the script you want.

3. Click the Info button.

Screen Shot 2014-03-20 at 10.30.47 AM

4. Click the Options tab.

Screen Shot 2014-03-20 at 10.32.11 AM

5. Set the parameter you want to change to the desired name.

Screen Shot 2014-03-20 at 10.26.28 AM

6. When you create a policy that uses that script, the parameter will have the name you set instead of the default parameter name.

Screen Shot 2014-03-20 at 10.28.01 AM


Disabling FileVault 2 with fdesetup on Mountain Lion and Mavericks

$
0
0

Recently, I was asked how to disable FileVault 2 without needing to go into System Preferences. The general idea was that an organization may want to provide their users without admin rights a way to turn off FileVault 2 on an as-needed basis.

Most of the work I’ve done has been focused around turning on FileVault 2 and managing it, rather than providing a way for users to turn it off. That said, fdesetup on both Mountain Lion and Mavericks provides a way to disable FileVault 2 with proper authorization.

To disable FileVault 2 on the Mac you’re logged into, run the following command with root privileges:

fdesetup disable

You’ll be prompted for either the password of an enabled user or a personal recovery key.

Screen Shot 2014-03-22 at 5.39.08 PM  

Screen Shot 2014-03-22 at 5.47.15 PM

Note: If a personal recovery key was not set up on a particular Mac, you’ll only be prompted for the password of an enabled user.

Screen Shot 2014-03-22 at 6.14.48 PM

Once the password or personal recovery key has been entered, the Mac will begin to decrypt.

For those who want to automate this procedure, you can do this using an expect script or other means. As an example, I’ve written an expect script which automates running the fdesetup disable process described above.


Removing all recovery keys from a FileVault 2-encrypted Mavericks Mac

$
0
0

One of the functions added to the fdesetup tool on 10.9 is removerecovery. This function removes the current recovery key(s) from a FileVault 2-encrypted Mac and can be used to remove with the personal and/or institutional recovery keys from a Mac.

One interesting aspect of this is that this function can be used to remove all recovery keys from a FileVault 2-encrypted Mac running Mavericks. Once the recovery keys have been removed from your Mac, only FileVault 2-enabled accounts will be able to unlock or decrypt it. For more details, see below the jump.


Note: I do not advocate removing all recovery keys from your system. They’re designed as a fallback way to get into your machine in case of a problem.

To remove an existing personal recovery key, run the command below with root privileges:

fdesetup removerecovery -personal

You’ll be prompted for the password of an existing FileVault 2-enabled user or the existing personal recovery key. Once entered, the personal recovery key will be removed from the system.

Screen Shot 2014-03-24 at 12.26.09 PM

To remove an existing institutional key, run the command below with root privileges:

fdesetup removerecovery -institutional

You’ll be prompted for the password of an existing FileVault 2-enabled user. You can also use an existing personal recovery key if applicable.

Screen Shot 2014-03-24 at 12.25.33 PM

To double-check that the recovery keys have been removed, fdesetup has additional functions to tell you if a personal or institutional key is in use. To verify if the personal recovery key has been removed, run the command below with root privileges:

fdesetup haspersonalrecoverykey

If it returns false, the FileVault 2 encryption on this Mac does not currently have an associated personal recovery key.

Screen Shot 2014-03-24 at 12.27.43 PM

To verify if the institutional recovery key has been removed, run the command below with root privileges:

fdesetup hasinstitutionalrecoverykey

If it returns false, the FileVault 2 encryption on this Mac does not currently have an associated institutional recovery key.

Screen Shot 2014-03-24 at 12.26.18 PM

A FileVault 2-encrypted Mac without any associated recovery keys should return false to both commands.

Screen Shot 2014-03-24 at 12.27.34 PM

Another way to verify that all recovery keys have been removed is to look in the FileVault preference pane in System Preferences. If a personal recovery key is being used on a FileVault 2-encrypted Mac (either by itself, or in combination with the institutional key), the FileVault preference pane should display the following message:

A recovery key has been set.

Screen Shot 2014-03-24 at 1.12.54 AM

If an institutional key is being used as the sole recovery key, the FileVault preference pane should display the following message:

A recovery key has been set by your company, school or institution.

Screen Shot 2014-03-24 at 1.15.07 AM

If all recovery keys have been removed from the encrypted Mac, there should be no message displayed in the FileVault preference pane.

Screen Shot 2014-03-24 at 1.16.26 AM


Slides from the FileVault 2 Session at MacIT 2014

Using /etc/auto_home on Mavericks to mount shares under /home

$
0
0

One of my users at work asked me recently about symlinking his network home folder to /home on his Mac running 10.9.2 and wanted to check to see if it was safe to do so.

In this case, the person in question works on both Fedora Linux, where his network home directory was mounted as /home/username, and on OS X. His network home directory was available via SMB on his Mac as smb://servername/home$/username. He wanted to be able to mount smb://servername/home$/username to /home/username on his Mac, so that it matched the mountpoint of his network home on his Fedora box.

At the time, here’s what I knew about /home:

1. Nothing appears to be stored in it by default

2. It’s listed in /etc/auto_master as a mountpoint

Screen Shot 2014-04-05 at 10.52.02 PM

3. Time Machine does not back it up

After talking with Apple’s enterprise support folks and doing some additional research, the file that controls what’s mounted in /home is the /etc/auto_home auto mount file.

Screen Shot 2014-04-05 at 9.32.29 PM

To do what my user wanted to do, the following entry could be added to /etc/auto_home to have the designated share mount as /home/username:

username	-fstype=smbfs	://'DOMAIN;username':password@servername/home$/username

Screen Shot 2014-04-05 at 9.32.03 PM

Note: If you have a password longer than 8 characters, or if the password has special characters in it (like “! # $ % & ‘ ( ) * + , – . / : ; & < = > ? @ [ \ ] ^ _ { | } ~”), you may receive a “No locks available” error message and the share will not mount under /home. You will also receive a “No locks available” or similar “Host is down” error if the password is wrong or missing.

That said, having an SMB mount entry in /etc/auto_home may not a good idea for the following reasons:

1. The username and password will need to be stored in /etc/auto_home as part of the mount entry. autofs on OS X doesn’t support using Kerberos authentication, so there’s no good way to secure the connection.

2. The first person to access /home/username will have full access to the share as that user on the server. If this is a multi-user system, subsequent users will have no access to /home/username on that Mac.

If NFS is an available option, this may be better because no usernames or passwords will need to be stored in /etc/auto_home in order to mount an NFS share. If the network home is mountable from the server from a home NFS share, the following entry could be added to /etc/auto_home to have the designated share mount as /home/username:

username	servername:/home/username

If you want to have an NFS mount show up under /home for each user that logs in, you can also use wildcards ( * ) and ampersands (&) in /etc/auto_home. For example, the following entry could be added to /etc/auto_home to have appropriate shares mount as /home/username_goes_here:

*	servername:/home/&

For more information on properly formatting entries for /etc/auto_home, including information on using wildcards ( * ) and ampersands (&), I recommend reading the man page for /etc/automaster. The wildcard information is in the Wildcards section, while information about using ampersands is available in the Substituting the map key entry section.


Creating an Office 2011 SP 4 14.4.1 installer

$
0
0

One of the issues I worked on this week was building a new Office 2011 installer after Microsoft released the Office 2011 14.4.1 update. I have an existing process to build a combined Office 2011 installer using Packages, which I’ve used successfully for a while.

This time though, I hit a problem. When I installed the combined Office 2011 installer with DeployStudio, then logged in, I was asked to enter a product key. Since my work has a volume license, this isn’t a screen I should ever see.

Screen Shot 2014-04-09 at 5.38.23 PM

This is a problem that’s been seen with previous Microsoft Office 2011 installers and usually involves the volume license file not being applied when it should be. This behavior may be seen with the 14.4.1 update in the following cases:

1. Office 2011 is installed and then updated to 14.4.1 while nobody is logged in

2. Office 2011 is installed and then updated to 14.4.1 without any Office applications being launched between the initial installation and the update.

These two scenarios will likely apply if you’re building a new machine using an automated deployment tool, but likely will not if you’re a home user.

With luck, this will only be an issue for 14.4.1 and Microsoft will fix this issue in the next 14.4.x update. In the meantime, the easiest fix I’ve found in my testing this week is to get the necessary volume license file from a machine that has Office 14.3.x installed on it and put it back on an as-needed basis.

The needed file is /Library/Preferences/com.microsoft.office.licensing.plist. If you have a volume-licensed version of Office 2011 installed on your Mac, you should have this file.

Screen Shot 2014-04-09 at 4.17.48 PM

To address the issue of installing 14.4.1 without losing your volume license, you can use Packages‘ ability to add resources to a Packages-built package. See below the jump for how you can use an Office 2011 SP 3 installer package, the Office 2011 14.4.1 Update, and the com.microsoft.office.licensing.plist license file to build a unified Office 2011 SP 4 14.4.1 installer package that does not prompt for a product key.

1. Remove the Office 2011 installers’ application quit function.

2. Set up a new Packages project and select Raw Package.

Screen Shot 2014-04-09 at 4.12.25 PM

3. In this case, I’m naming the project Microsoft Office 2011 SP 4 14.4.1


Screen Shot 2014-04-09 at 6.27.44 PM


4. Once the Packages project opens, click on the Project tab. You’ll want to make sure that the your information is correctly set here (if you don’t know what to put in, check the Help menu for the Packages User Guide. The information you need is in Chapter 4 – Configuring a project.)

For this package, I’m not changing any of the options from what is set by default.

Screen Shot 2014-04-09 at 4.12.57 PM

5. Next, click on the Settings tab. In the case of my project, I want to install with root privileges and not require a logout, restart or shutdown.

To accomplish this, I’m choosing the following options in the Settings section:

In the Post-Installation Behavior section, set On Success: to Do Nothing
In the Options section, check the box for Require admin password for installation.

Screen Shot 2014-04-09 at 4.13.15 PM

6. Click on the Scripts tab in your Packages project.

Screen Shot 2014-04-09 at 6.13.29 PM

7. Select your installers and drag them into the Additional Resources section of your Packages project.

In the case of my example, I’m selecting the following installers:

Office 2011 14.3.0 with Service Pack 3 Installer.pkg
Office 2011 14.4.1 Update.pkg

Screen Shot 2014-04-09 at 4.18.42 PM

8. Make a copy of the com.microsoft.office.licensing.plist file and drag it into the Additional Resources section of your Packages project.

Screen Shot 2014-04-09 at 4.19.15 PM

9. The last piece is telling the installers to run and for the com.microsoft.office.licensing.plist file to be fixed as needed. For this, you’ll need a postinstall script. Here’s the one I’m using:

Notice that $install_dir in the postinstall script refers to the path to the package’s working directory. That’s where Packages will be storing the installers along with the com.microsoft.office.licensing.plist file, inside the Package-built installer’s embedded directory where it stores the items defined in the Additional Resources section.

The -target value is defined as “$3″ because some information is passed along by the Packages-built installer to its included scripts when those scripts are run by the installation process. (For more information, see the PackageMaker How-To available here and search on the page for $3)

In this case, -target being defined as “$3″ means that the postinstall script will install the two Office 2011 packages onto the desired drive. The $3 variable will also allow the installer to correctly determine if the com.microsoft.office.licensing.plist license file is in the right place on the target drive and take appropriate action if it isn’t.

The script also governs what order the installers run in, so the main Office 2011 installer runs first and the update runs next after the first job finishes. The -dumplog and -verbose flags are to help you track the progress of installation if you’re looking at the installer log.

10. Once you’ve got the postinstall script built, run the following command to make the script executable:

sudo chmod a+x /path/to/postinstall

11. Once completed, add the postinstall script to your Packages project.

Screen Shot 2014-04-09 at 4.20.29 PM

12. Last step, go ahead and build the package. (If you don’t know to build, check the Help menu for the Packages User Guide. The information you need is in Chapter 3 – Creating a raw package project and Chapter 10 – Building a project.)

Screen Shot 2014-04-09 at 6.39.56 PM

Testing

Once you have the package built, you should be able to test it by installing it on a machine while the machine is logged out. Once installed, Office 2011 should be properly licensed and not prompt you for a product key.

Repackaging the Microsoft Lync 14.0.8 installer

$
0
0

Microsoft has released Microsoft Lync 14.0.8, which included compatibility with Mavericks. Since we have several folks using both Lync and Mavericks, I wanted to get this into our Casper server’s Self Service as soon as possible.

To test installing it, I downloaded the installer on a disk image from Microsoft’s site, then renamed the package from Lync Installer.pkg to Lync 14.0.8 Installer.pkg. After renaming it, I set up an installation policy for Self Service, scoped the policy so that only my test machine could see it, then ran the installation.

Failed.

I go check the logs and see this entry:

/usr/sbin/jamf is version 8.73
Executing Policy Microsoft Lync...
[STEP 1 of 2]
Downloading BOM for Lync 14.0.8 Installer.pkg...
This Apple Package did not have a valid index.bom file. Assuming it is a flat file package.
Downloading http://casper.server.here/repo_name/Packages//Lync 14.0.8 Installer.pkg...
Error: The package could not be found on the server.
[STEP 2 of 2]
Running Recon...
Displaying message to end user...

OK, maybe I did that wrong. Deleted the package and this time uploaded the installer to my Casper server without changing the name from Lync Installer.pkg.

/usr/sbin/jamf is version 8.73
Executing Policy Microsoft Lync...
[STEP 1 of 2]
Downloading BOM for Lync Installer.pkg...
This Apple Package did not have a valid index.bom file. Assuming it is a flat file package.
Downloading http://casper.server.here/repo_name/Packages//Lync Installer.pkg...
Error: The package could not be found on the server.
[STEP 2 of 2]
Running Recon...
Displaying message to end user...

Failed again. Meanwhile, /var/log/install.log on my test Mac only showed that installd was starting and then stopping. In short, Casper’s logs were right; the installation process was starting but couldn’t then find a package.

At that point, I started thinking. How would the developer have installed this package? How did Q&A likely test installing it, however minimally?

Developer – Would have double-clicked on the package to install it, followed by typing in an admin password.

Q&A – Same process as the developer, except they would have tested installing it from the mounted disk image.

When I followed the process of double-clicking and running the installer from the mounted disk image, Lync 14.0.8 installed fine. That’s when I discovered the permissions issue.

The Microsoft Lync 14.0.8 installer installs the following with the file ownership of UID 502 and GID 20.

/Applications/Microsoft Lync.app
/Library/Internet Plug-Ins/MeetingJoinPlugin.plugin

UID 502 is a user that may not exist on all Macs, but GID 20 corresponds to the staff group, which is the group that all local users on the Mac are put into. The correct permissions should have had those files owned by root and the admin group, so that had to be fixed as part of the installation.

I’d run into a similar-seeming issue with National Instruments’ LabVIEW 2013 Pro, so I decided to solve my Lync problem the same way that I solved my LabView problem.

Prerequisites:

Packages
A downloaded Microsoft Lync 14.0.8 disk image

1. Set up a new Packages project and select Raw Package.

Screen Shot 2014-04-09 at 4.12.25 PM

2. In this case, I’m naming the project Microsoft Lync 14.0.8


Screen Shot 2014-04-10 at 1.02.18 PM

3. Once the Packages project opens, click on the Project tab. You’ll want to make sure that the your information is correctly set here (if you don’t know what to put in, check the Help menu for the Packages User Guide. The information you need is in Chapter 4 – Configuring a project.)

In this case, I’m not changing any of the options from what is set by default.

Screen Shot 2014-04-10 at 1.01.47 PM

4. Next, click on the Settings tab. In the case of my project, I want to install with root privileges and not require a logout, restart or shutdown.

To accomplish this, I’m choosing the following options in the Settings section:

In the Post-Installation Behavior section, set On Success: to Do Nothing

In the Options section, check the box for Require admin password for installation.

Screen Shot 2014-04-10 at 1.01.47 PM

5. Click on the Scripts tab in your Packages project.

Screen Shot 2014-04-10 at 1.03.13 PM

6. Select the Microsoft Lync 14.0.8 disk image and drag it into the Additional Resources section of your Packages project.

Screen Shot 2014-04-10 at 1.03.25 PM

7. The last piece is telling the Lync installer to run. For this, you’ll need a postinstall script. Here’s the one I’m using:

The logic of this script is as follows:

Since I was only successful when installing the software from the mounted disk image, mimic the environment that the disk image creates.

A. Mount the disk image
B. Run the installer from the mounted disk image.
C. Since I know the permissions will be wrong following installation, fix them to what they should be.

8. Once you’ve got the postinstall script built, run the following command to make the script executable:

sudo chmod a+x /path/to/postinstall

9. Once completed, add the postinstall script to your Packages project.

Screen Shot 2014-04-10 at 1.03.48 PM

10. Last step, go ahead and build the package. (If you don’t know to build, check the Help menu for the Packages User Guide. The information you need is in Chapter 3 – Creating a raw package project and Chapter 10 – Building a project.)

Screen Shot 2014-04-10 at 2.02.15 PM

Testing the installer

Once the package has been built, test it by taking it to a test machine that does not have Microsoft Lync 14.0.8 and install it. The end result should be that Lync installs along with the corrected permissions.


First Boot Package Install Revisited

$
0
0

As covered previously, Greg Neagle’s createOSXinstallPkg is a useful tool for installing or upgrading Mac OS X in a variety of situations. One of the nicer features is that you can edit the OS X installer to install additional packages.

However, the limitations of the OS X install environment mean that there are a number of installers that won’t install correctly. In particular, packages that rely on pre- or postflight scripts to perform important tasks may fail to run properly in the OS X install environment.

To help work around this limitation, I developed First Boot Package Install.pkg, an installer package that enables other packages to be installed at first boot. It’s designed for use with createOSXinstallPkg with the goal of allowing installer packages that can’t run in the OS X Install environment to be incorporated into a createOSXinstallPkg-using deployment workflow.

The first version of First Boot Package Install.pkg had some limitations though, with the biggest one probably being that you couldn’t tell what it was doing when it was running. Instead, all that was displayed was the gray Apple loading screen.

AppleBootScreen

I tried various approaches of booting into verbose mode and writing log entries to the console, but none of the approaches were good enough to introduce into production. Fortunately, Per Olofsson developed exactly what I was looking for with his LoginLog tool.

login_log

Using LoginLog.app as a way to display updates to the user, I’ve been able to update First Boot Package Install.pkg with improved visual feedback. I’ve also now incorporated another piece of feedback I’ve received, which is to add a network check. This new check makes sure that the Mac has a network address other than 127.0.0.1 or 0.0.0.0 before it proceeds to install any packages. For more details, see below the jump.

To use First Boot Package Install.pkg‘s pre-built installer package:

1. Download the First_Boot_Package_Install.zip file from the installer directory on my GitHub repo:

https://github.com/rtrouton/First-Boot-Package-Install

Screen Shot 2013-05-12 at 5.45.21 PM


2. Once downloaded and unzipped, right-click on the package and choose Show Package Contents.

Screen Shot 2013-05-12 at 5.46.37 PM


3. Go to Contents: Resources: fb_installers


Screen Shot 2013-05-12 at 5.47.22 PM

4. Add one installer package to each numbered directory. The number of the directory indicates the install order, with 00 being the first.

Screen Shot 2013-05-12 at 5.47.42 PM

Screen Shot 2013-05-12 at 5.48.01 PM

As needed, more numbered directories may be added to the fb_installers directory. For numbers 9 or less, make sure to label the directory with a leading zero (For example, 06).

NOTE: createOSXinstallPkg has an upper limit of 350 MBs of available space for added packages. This is sufficient space for basic configuration, payload-free or bootstrapping packages, but it’s not a good idea to add Microsoft Office or similar large installers to this installer.

5. Once finished adding installers to the numbered directories, First Boot Package Install.pkg is ready to be added to a deployment workflow.


What’s supposed to happen

The installer package is designed to install packages in the desired order, then remove all traces. All actions occur while access to the OS X login window is blocked.


What the end-user sees

After the OS X install completes, it restarts and the LoginLog window appears over the login window. The LoginLog window will then display progress updates for as long as it takes for the packages to install. Once the install completes, the Mac automatically restarts and boots up normally to the login window.

Screen Shot 2014-04-17 at 5.23.37 PM

How First Boot Package Install.pkg works


When First Boot Package Install.pkg is installed via createOSXinstallPkg, it does the following:


1. Copies First Boot Package Install.pkg/Contents/Resources/fb_installers to /Users/Shared/fb_installers

2. The following files are installed:


/Library/LaunchDaemons/com.company.firstbootpackageinstall.plist

/Library/LaunchAgents/com.company.LoginLog.plist

/Library/PrivilegedHelperTools/LoginLog.app

/var/firstbootpackageinstall.sh


After OS X is installed by createOSXinstallPkg and reboots, the following process occurs:


1. The com.company.firstbootpackageinstall LaunchDaemon triggers /var/firstbootpackageinstall.sh to run.

2. /var/firstbootpackageinstall.sh stops the login window from loading and checks for the existence of /Users/Shared/fb_installers.


If /Users/Shared/fb_installers is not found, the following actions take place:


A. The login window is allowed to load.

B. The following files are deleted by /var/firstbootpackageinstall.sh:


/Library/LaunchDaemons/com.company.firstbootpackageinstall.plist

/Library/LaunchAgents/com.company.LoginLog.plist

/Library/PrivilegedHelperTools/LoginLog.app


C. /var/firstbootpackageinstall.sh checks for an existing /var/log/firstbootpackageinstall.log logfile and renames the existing logfile to include the current date and time.

D. /var/firstbootpackageinstall.sh deletes itself.


If /Users/Shared/fb_installers is found, the following actions take place:


A. If /Users/Shared/fb_installers exists, the login window is allowed to load

B. A log is created to record the actions taken by /var/firstbootpackageinstall.sh. By default, this logfile named firstbootpackageinstall.log and is stored in /var/log.

C. /Library/LaunchAgents/com.company.LoginLog.plist loads and launches /Library/PrivilegedHelperTools/LoginLog.app

D. /Library/PrivilegedHelperTools/LoginLog.app opens a window over the Mac’s login window and displays the logfile

E. A network check is run, to ensure that the Mac has a network address other than 127.0.0.1 or 0.0.0.0 (which are otherwise known as loopback addresses.) This network check will check every five seconds for the next 60 minutes for a working network connection.


Network check fails – If only loopback addresses are detected within 60 minutes, the script will take the following actions:

  • Log a failure message to the log
  • Delete /Users/Shared/fb_installers
  • Restart
  • On restart, the “if /Users/Shared/fb_installers is not found” actions occur

Network check succeeds – If a non-loopback address is detected, the script will take the following actions:

  • Log a success message to the log
  • Proceed with the rest of the script


F. The packages are installed, using the numbered subdirectories to set the order of installation

G. Once installation has finished, /Users/Shared/fb_installers is deleted

H. The Mac is restarted

I. On restart, the “if /Users/Shared/fb_installers is not found” actions occur.


All First Boot Package Install.pkg components and scripts are available at my GitHub repo:

https://github.com/rtrouton/First-Boot-Package-Install

The Iceberg project files are also available via the link above if you want to build a customized First Boot Package Install.pkg for your own environment.


CasperCheck – an auto-repair process for Casper agents

$
0
0

One of the issues that I occasionally run into in my shop is that sometimes the Casper agent on individual Macs stops working properly. They stop checking in with the Casper server, or check in but can’t run policies anymore. I’ve set up smart groups on my Casper server to help me identify these machines, but actually fixing them has not been an automated process.

While at the JAMF Nation User Conference in October 2013, I was fortunate enough to hear Mike Dodge and Ajay Chand talk about the challenges they faced at Facebook with keeping Casper agents working in an environment where users are encouraged to break down any obstacle that gets in their way (sometimes, the obstacles in question were perceived to include the Casper agent.) As part of their talk, they mentioned they had a scripted way to verify that the Casper agent was running properly and automatically fix it if it wasn’t. This was a capability that I wanted to include in my own environment, so I asked them if this was going to be available at some point. They said it would be, so I waited to see what would be released.

At this point, the story fast forwards to March 2014, where the Facebook team was able to release their code to GitHub and I was able to take a look and see what they had done. I saw that I could adapt some of their work, but I would need to do additional work on my end to develop a solution that not only worked in my environment, but would be relatively straightforward to adapt to work in others’.

After a lot of work and testing, I’m happy to announce the release of CasperCheck. This is a script-driven solution that will do the following:

A. Check to see if a Casper-managed Mac’s network connection is live

B. If the network is working, check to see if the machine is on a network where the Mac’s Casper JSS is accessible.

C. If both of the conditions above are true, check to see if the Casper agent on the machine can contact the JSS and run a policy.

D. If the Casper agent on the machine cannot run a policy, the appropriate functions run and repair the Casper agent on the machine.

For more details, see below the jump.

As written currently, CasperCheck has several components that work together:

1. A Casper policy that runs when called by a manual trigger.

2. A zipped Casper QuickAdd installer package, available for download from a web server.

3. A LaunchDaemon, which triggers the CasperCheck script to run

4. The CasperCheck script

Here’s how the various parts are set up:

Casper policy

The Casper policy check which is written into the script needs to be set up as follows:

  • Name: Casper Online
  • Scope: All Computers
  • Trigger: Manually triggered by “iscasperup” (no quotes)
  • Frequency: Ongoing
  • Plan: Run Script iscasperonline.sh
  •  
    Screen Shot 2014-04-12 at 3.39.30 PM

    Screen Shot 2014-04-12 at 3.39.57 PM

    Screen Shot 2014-04-12 at 3.40.33 PM

    The iscasperonline.sh script contains the following:

    #!/bin/sh
    
    echo "up"
    
    exit 0
    

    Screen Shot 2014-04-12 at 3.42.46 PM

    When run, the policy will return “Script result: up” among other output. The CasperCheck script verifies if it’s received the “Script result: up” output and will use that as the indicator that policies can be successfully run by the Casper agent.

    Zipped QuickAdd installer posted to web server

    For the QuickAdd installer, I generated a QuickAdd installer using Casper Recon. This is because QuickAdds made by Recon include an unlimited enrollment invitation, which means that the same package can be used to enroll multiple machines with the JSS in question.

    Screen Shot 2014-04-12 at 4.01.23 PM

    Once the QuickAdd package was created by Recon, I then used OS X’s built-in compression app to generate a zip archive of the QuickAdd installer.

    Once I had the zip file ready, I copied it to a location on my Casper server where it would be accessible for download via the Apache web service already running on my Casper server. The zipped QuickAdd could have been posted to any web server; it was just convenient for me to host the QuickAdd zip on the same server that hosted my JSS.

    LaunchDaemon

    As currently written, I have CasperCheck set to run on startup and then once every week. To facilitate this, I’m using a LaunchDaemon similar to the one below.

    <?xml version="1.0" encoding="UTF-8"?>
    <!DOCTYPE plist PUBLIC "-//Apple//DTD PLIST 1.0//EN" "http://www.apple.com/DTDs/PropertyList-1.0.dtd">
    <plist version="1.0">
    <dict>
    	<key>Label</key>
    	<string>com.company.caspercheck</string>
    	<key>ProgramArguments</key>
    	<array>
    		<string>sh</string>
    		<string>/Library/Scripts/caspercheck.sh</string>
    	</array>
    	<key>RunAtLoad</key>
    	<true/>
    	<key>StartInterval</key>
    	<integer>604800</integer>
    </dict>
    </plist>
    

    The LaunchDaemon will run on the following command on startup. After startup, the script will then run every seven days:

    sh /Library/Scripts/caspercheck.sh

    CasperCheck script

    The CasperCheck script includes functions to do the following:

    1. Check to verify that the Mac has a network connection that does not use a loopback address (like 127.0.0.1 or 0.0.0.0)

    2. Verify that it can resolve the JSS’s server address and that the appropriate network port is accepting connections.

    3. As needed, download and store new QuickAdd installers from the web server where the zipped QuickAdds are posted to.

    4. Check to see if the JAMF binary is present. If not, reinstall using the QuickAdd installer stored on the Mac.

    5. If the JAMF binary is present, verify that it has the proper permissions and automatically fix any permissions that are incorrect.

    6. Check to see if the Mac can communicate with the JSS server using the “jamf checkJSSConnection” command. If not, reinstall using the QuickAdd installer stored on the Mac.

    7. Check to see if the Mac can run a specified policy using a manual trigger. If not, reinstall using the QuickAdd installer stored on the Mac.

    Assuming that you have set up the Casper Online policy described above on your JSS, you will need to edit the CasperCheck script to set the following variables before using it in your environment:

  • fileURL – put the complete address of the zipped Casper QuickAdd installer package
  • jss_server_address – put the complete fully qualified domain name address of your Casper server
  • jss_server_port – put the appropriate port number for your Casper server. This is usually 8443 or 443; change as appropriate.
  • log_location – put the preferred location of the log file for this script. If you don’t have a preference, using the default setting of /var/log/caspercheck.log should be fine.
  •  
    NOTE: Use caution when editing the functions or variables below the User-editable variables section of the script.

    CasperCheck in operation

    There’s a number of checks built into the CasperCheck script. Here’s how the script works in operation:

    1. The script will run a check to see if it has a network address that is not a loopback address (like 127.0.0.1 or 0.0.0.0). If needed, the script will wait up to 60 minutes for a network connection to become available which doesn’t use a loopback address.

    The network connection check will occur every 5 seconds until the 60 minute limit is reached. If no network connection is found within 60 minutes, the script will exit at that point.

    2. Once a network connection is established that passes the initial connection check, the script then pauses for two minutes to allow WiFi connections and DNS to come online and begin working.

    3. A check is then run to ensure that the Mac is on the correct network by verifying that it can resolve the fully qualified domain name of the Casper server. If the verification check fails, the script will exit at that point.

    4. Once the “correct network” check is passed, a check is then run to verify that the JSS’s Tomcat service is responding via its port number.

    5. Once the Tomcat service check is passed, a check is then run to verify that the latest available QuickAdd installer has been downloaded to the Mac. If not, a new QuickAdd installer is downloaded as a .zip file from the web server which hosts the zipped QuickAdd.

    Once downloaded, the zip file is then checked to see if it is a valid zip archive. If the zip file check fails, the script will exit at that point.

    If all of the above checks described above are passed, the CasperCheck script has verified the following:

    A. It’s got a network connection
    B. It can actually see the Casper server
    C. The Tomcat web service used by the JSS for communication between the server and the Casper agent on the Mac is up and running.
    D. The current version of the QuickAdd installer is stored on the Mac

    At this point, the script will proceed with verifying whether the Casper agent on the Mac is working properly.

    6. A check is run to ensure that the JAMF binary used by the Casper agent is present. If not, the CasperCheck script will reinstall the Casper agent using the QuickAdd installer stored on the Mac.

    7. If the JAMF binary is present, the CasperCheck script runs commands to verify that it has the proper permissions and automatically fix any permissions that are incorrect.

    8. A check is run using the “jamf checkJSSConnection” command to make sure that the Casper agent can communicate with the JSS service. This check should usually succeed, but may fail in the following circumstances:

    A. The Casper agent on the machine was originally talking to the JSS at a different DNS address – In the event that the Casper server has moved to a different DNS address from the one that the Casper agent is expecting, this check will fail.

    B. The Casper agent is present but so broken that it cannot contact the JSS service using the checkJSSConnection function.

    If the check fails, the CasperCheck script will reinstall the Casper agent using the QuickAdd installer stored on the Mac.

    9. The final check verifies if the Mac can run the specified policy. If the check fails, the CasperCheck script will reinstall the Casper agent using the QuickAdd installer stored on the Mac.

    Assuming all of the checks are passed successfully, the script exits until the next weekly check.

    Logging

    Here’s what some of the various log statuses should look like:

    If the check for a network connection with non-loopback address fails:

    Screen Shot 2014-04-12 at 5.26.20 PM

    If the check for the network with the appropriate Casper server fails:

    Screen Shot 2014-04-12 at 5.23.53 PM

    If the Tomcat service check fails:

    Screen Shot 2014-04-13 at 1.25.33 PM

    If the zip file check fails:

    Screen Shot 2014-04-13 at 1.30.56 PM

    If the check for the jamf binary finds it missing:

    Screen Shot 2014-04-12 at 7.08.41 PM

    If the check for the jamf binary finds it missing and a new QuickAdd needs to be downloaded:

    Screen Shot 2014-04-12 at 5.53.14 PM

    If the JSS service communication check fails:

    Screen Shot 2014-04-12 at 6.04.16 PM

    If the JSS service communication check fails and a new QuickAdd needs to be downloaded:

    Screen Shot 2014-04-12 at 6.21.52 PM

    If the JSS policy check fails:

    Screen Shot 2014-04-12 at 5.40.07 PM

    If the JSS policy check fails and a new QuickAdd needs to be downloaded:

    Screen Shot 2014-04-12 at 6.30.44 PM

    If all the checks succeed and there’s nothing to fix:

    Screen Shot 2014-04-12 at 6.19.30 PM

    If all the checks succeed and there’s nothing to fix, but a new QuickAdd needs to be downloaded:

    Screen Shot 2014-04-12 at 6.37.38 PM

    The script and an example LaunchDaemon are available here on my GitHub repo:
    https://github.com/rtrouton/rtrouton_scripts/tree/master/rtrouton_scripts/Casper_Scripts/CasperCheck

     
    A Casper Extension Attribute for detecting if CasperCheck is installed is available here:
    https://github.com/rtrouton/rtrouton_scripts/tree/master/rtrouton_scripts/Casper_Extension_Attributes/CasperCheck

     
    The CasperCheck script is also available below:


    Unlocking or decrypting a FileVault 2-encrypted Fusion Drive from the command line

    $
    0
    0

    Unlocking or decrypting a FileVault 2-encrypted Fusion drive from the command line can be a little different from how you would handle a non-Fusion drive. This is because Apple has created Fusion drives by using the Core Storage volume manager that they first introduced in OS X 10.7.x. Normally when you enable FileVault 2, there is not an existing Core Storage volume on the drive being encrypted and the FileVault 2 process creates it. When a drive is decrypted using the diskutil cs revert command, that CoreStorage volume is then removed as part of the process.

    However, with Fusion drives, not only is there an existing CoreStorage volume present before encryption, you want to make sure it’s not being removed as part of the decryption process. Doing so would destroy the Fusion drive setup and potentially result in the loss of all data stored on the Fusion drive.

    There’s two tools that you can use to safely decrypt a Fusion drive on OS X Mavericks:

    fdesetup

    diskutil

    fdesetup

    fdesetup includes the disable verb, which turns off FileVault 2 encryption on a FileVault 2-encrypted Mac. To decrypt using fdesetup, run the following command with root privileges:

    fdesetup disable
    

    Screen Shot 2014-04-25 at 3.13.47 PM

    You’ll be prompted for the password of an account that’s authorized to unlock the encryption, or the personal recovery key if available. Once provided, decryption of the encrypted volume will begin. One limitation of using fdesetup to decrypt is that you’ll need to be booted from the same boot drive that you want to decrypt, as you can’t specify a different drive with fdesetup.

    diskutil

    diskutil is able to decrypt FileVault 2-encrypted drives other than the one you’re booted from, but you’ll need to identify the Logical Volume UUID of the encrypted drive using the following command:

    diskutil cs list
    

    Running that command will give you a listing of all Core Storage volumes. To help identify what you’re looking for, I’ve highlighted the UUID of the encrypted drive in this example:

    Screen Shot 2014-04-25 at 5.29.50 PM

    Once you have the UUID, you can then either unlock or decrypt the encrypted volume using the following commands. If the goal is to decrypt, be aware that you’ll need to unlock the drive first.

    Using the password of an authorized account on the command line

    To unlock, run the following command:

    diskutil cs unlockVolume UUID -stdinpassphrase
    

    The -stdinpassphrase flag will cause the command to prompt you for the password of an account that’s authorized to unlock the encryption. If successful, the drive will unlock and mount. You should see output similar to that shown below.

    Screen Shot 2014-04-25 at 5.23.26 PM

    Once you’ve unlocked the disk, you can then decrypt it and return it to being an unencrypted Core Storage volume.

    To decrypt, run the following command:

    diskutil cs decryptVolume UUID -stdinpassphrase
    

    You’ll be prompted for the password of an account that’s authorized to unlock the encryption. Once provided, decryption of the encrypted volume will begin.

    Screen Shot 2014-04-25 at 5.24.06 PM

    Using the personal recovery key on the command line


    If you don’t have the password of any of the authorized accounts and the Mac has a personal recovery key associated with it, you can use the personal recovery key to authorize. The commands are mostly the same, but instead of using the -stdinpassphrase flag, you instead use -passphrase and enter the recovery key.

    To unlock, run the following command:

    diskutil cs unlockVolume UUID -passphrase recoverykey
    

    If successful, the drive will unlock and mount. You should see output similar to that shown below.

    Screen Shot 2014-04-25 at 4.47.33 PM

    Once you’ve unlocked the drive, you should also be able to decrypt it using this command:

    diskutil cs decryptVolume UUID -passphrase recoverykey
    

    Screen Shot 2014-04-25 at 4.48.53 PM

    Using the institutional recovery key on the command line

    Assuming that the FileVault 2 encryption on your Fusion drive is using an institutional key, you can unlock or decrypt the encryption using a FileVaultMaster keychain that contains both the public and private key of your institutional recovery key. One requirement is that you will need to be booted from a Recovery HD partition or from Internet Recovery. Here’s how to do this:

    1. Copy the FileVaultMaster keychain that contains both the public and private key of your institutional recovery key to a drive that you can access from Recovery HD.

    2. Boot to Recovery HD.

    3. Get the Logical Volume UUID of the encrypted drive by running the following command:

    diskutil cs list
    

    4. With the UUID information acquired, run the following command to unlock the FileVaultMaster.keychain:

    security unlock-keychain /path/to/FileVaultMaster.keychain
    

    Screen Shot 2014-04-25 at 5.07.45 PM

    Once this command is run, you’ll need to enter the keychain’s password when prompted. If the password is accepted, you’ll be taken to the next prompt.

    5. Run the following command to unlock the encrypted Core Storage volume on the encrypted Mac:

    diskutil cs unlockVolume UUID -recoveryKeychain /path/to/FileVaultMaster.keychain
    

    6. You should then see output similar to the following:

    Screen Shot 2014-04-25 at 5.10.20 PM

    Once you’ve unlocked the disk, you can then decrypt the encrypted Core Storage volume by running the following command:

    diskutil cs decryptVolume UUID -recoveryKeychain /path/to/FileVaultMaster.keychain
    

    Screen Shot 2014-04-25 at 5.10.46 PM

    Verifying decryption
    Once the Fusion drive has been completely decrypted, it should still be listed as a Core Storage volume when diskutil cs list is run. The relevant values to check if a Fusion drive is encrypted or not are these:

    Encryption Type:
    Conversion Status:
    Conversion Direction:
    Has Encrypted Extents:

    On an encrypted Fusion drive, these values should be like the ones shown below:

    Encryption Type: AES-XTS
    Conversion Status: Complete
    Conversion Direction: -none-
    Has Encrypted Extents: Yes

    Screen Shot 2014-04-27 at 2.35.30 PM

    On an decrypting Fusion drive, these values should be like the ones shown below:

    Encryption Type: AES-XTS
    Conversion Status: Converting
    Conversion Direction: backward
    Has Encrypted Extents: Yes

    Screen Shot 2014-04-25 at 5.42.18 PM

    On a Fusion drive that has just been decrypted, these values should be like the ones shown below:

    Encryption Type: AES-XTS
    Conversion Status: NoConversion
    Conversion Direction: -none-
    Has Encrypted Extents: No

    Screen Shot 2014-04-25 at 5.49.39 PM

    On a Fusion drive that has never been encrypted, or been decrypted then restarted at least once since the decryption finished, these values should be like the ones shown below:

    Encryption Type: None
    Conversion Status: NoConversion
    Conversion Direction: -none-
    Has Encrypted Extents: No

    Screen Shot 2014-04-27 at 2.14.29 PM


    Simple Package Creator.app

    $
    0
    0

    One task that has always seemed to me to take more time than it should is the process of packaging applications like Firefox, Google Chrome or other applications which are self-contained and can be copied as-is into /Applications. While tools like AutoPkg have helped a good deal by automating the download and packaging of various self-contained applications, this approach still requires some setup work and requires a recipe to be written to handle the application.

    Screen Shot 2014-04-28 at 3.06.33 PM

    To help make this task easier, I’ve developed Simple Package Creator.app, an Automator application that will allow the selection of a self-contained application and creates an installer package that enables the installation of the application with pre-set permissions into /Applications. For more details, see below the jump.

    Using Simple Package Creator.app

    1. If needed, download the Simple_Package_Creator_Installer zip file from the installer directory in my GitHub repo.

    2. Once downloaded and installed, double-click on the Simple Package Creator application in /Applications.

    Screen Shot 2014-04-28 at 5.01.30 PM

    3. You’ll be prompted to select the self-contained application that you want to create an installer package from.

    Screen Shot 2014-04-28 at 5.00.02 PM

    4. Once you’ve selected the self-contained application, the application will be copied to a temporary build location and a dialog window will appear to let you know that this may take a little while.

    Screen Shot 2014-04-28 at 4.52.09 PM

    5. Once the application has been copied, you’ll be prompted to name the installer package.

    Screen Shot 2014-04-28 at 4.52.29 PM

    By default, the name filled in will be My Great Application Installer Package, but this name can be changed as desired.

    Screen Shot 2014-04-28 at 4.52.36 PM

    6. Once you’ve entered a name for the installer package, you’ll be prompted for a package identifier.

    Screen Shot 2014-04-28 at 4.52.42 PM

    By default, the name filled in will be com.github.simple_package, but this name should be changed to be something unique.

    Screen Shot 2014-04-28 at 4.52.52 PM

    7. Once you’ve entered a name for the installer package, you’ll be prompted for a version number.

    Screen Shot 2014-04-28 at 4.53.10 PM

    By default, the value filled in will be 1.0, but this value should be changed to be something unique (preferably related to the application’s version number.)

    Screen Shot 2014-04-28 at 4.53.16 PM

    8. Once the package name, package identifier and package version have been set, Simple Package Creator.app will prompt for an administrator’s username and password.

    Screen Shot 2014-04-28 at 4.53.23 PM

    9. Once the admin username and password are provided, Simple Package Creator.app will create the installer package and prompt you when it’s finished.

    Screen Shot 2014-04-28 at 4.53.41 PM

    10. Click OK at the prompt and a new Finder window will open and display the newly-created installer package.

    Screen Shot 2014-04-28 at 4.53.57 PM

    11. Simple Package Creator.app will automatically exit.

    Once installed, the self-contained application will be stored in /Applications and will have the following permissions:

    Owner: root (read-write)

    Group: wheel (read-only)

    Everyone: (read-only)

    Screen Shot 2014-04-28 at 5.03.43 PM

    Screen Shot 2014-04-28 at 5.03.51 PM

    How Simple Package Creator.app works

    Simple Package Creator.app is an Automator application that uses AppleScript, shell scripting and pkgbuild behind the scenes to create installer packages. When a script is selected, the following process takes place:

    1. The self-contained application is copied to /tmp as a zip archive named simple_package_creator_tempfile.zip, to give the package-building script a consistent value to work with.

    2. After the package name, package identifier and package version are set, /tmp is checked to make sure that there is not an existing directory that is named the same as the chosen name. If a matching directory is found, it is removed.

    3. A new directory is created in /tmp that matches the chosen name of the package.

    4. Next, a Payload directory is created inside of /tmp/package_name_here

    5. The application zip archive’s contents are extracted to /tmp/package_name_here/Payload.

    6. The installer package is built by pkgbuild using the application now stored in /tmp/package_name_here/Payload

    7. The simple_package_creator_tempfile.zip file is removed from /tmp

    8. The finished installer package is stored in /tmp/package_name_here and the user is prompted that the process is finished.

    9. Once the user is notified and clicks OK, a new Finder window opens for /tmp/package_name_here


    The total workflow looks like this:

    Screen Shot 2014-04-28 at 4.39.59 PM

    All Simple Package Creator components and scripts are available at my GitHub repo:

    https://github.com/rtrouton/Simple-Package-Creator


    Building Simple Packages With Packages

    $
    0
    0

    One of the responses I got to my post on Simple Package Creator.app was this one from my colleague Per Olofsson.

    Screen Shot 2014-05-02 at 4.44.38 PM

    I’ve used Packages for a while now, but I had no idea it could do this. Not only does it do a similar job to my tool, it’s more automated. To show how this works, I’ve made a video showing the process with Firefox 29.

    The package produced at the end installs to /Applications and will have the following permissions:

    Owner: root (read-write)

    Group: admin (read-only)

    Everyone: (read-only)

    Screen Shot 2014-05-02 at 4.41.22 PM

    Screen Shot 2014-05-02 at 4.41.30 PM

    Thanks to Per for pointing this out and to Stéphane Sudre for building this handy capability into Packages.


    Converting video files to play on both Macs and PCs with Handbrake

    $
    0
    0

    Telestream’s recent conversion of Flip4Mac from a free app to a paid one has left many Mac admins without a free vendor-supported solution to display Windows Media files in. One particular niche that Flip4Mac has filled for me over the years has been with groups collaborating across platforms on shared presentations. Flip4Mac allowed embedded .avi and .wmv movies created on Windows to work without many issues in PowerPoint presentations that were ultimately given on a Mac.

    In situations like this, if paying for the Flip4Mac plug-in isn’t an option, the best fix is going to be converting the video files from a platform-specific format to one that is supported on multiple platforms. A good candidate here is going to be the MP4 format using the H.264 video codec and fortunately, there’s free tools like Handbrake available to help with this conversion. See below the jump for how to convert a Windows Media File to MP4 format using Handbrake.

    The conversion process is essentially the same on all platforms, but here’s how to convert a single Windows Media file to MP4 on both OS X and Windows.

    OS X

    1. Launch Handbrake

    2. Click the Source button

    Screen Shot 2014-05-12 at 5.07.13 PM

    3. Select the video you want to convert and click the Open button.

    Screen Shot 2014-05-12 at 5.07.19 PM

    4. In the Destination blank, click the Browse button.

    Screen Shot 2014-05-12 at 5.07.43 PM

    5. Select the place where you want to save the video file’s converted copy, then name the new video file if needed.

    Screen Shot 2014-05-12 at 5.07.42 PM

    6. In Output Settings, verify that Format is set to MP4.

    Screen Shot 2014-05-12 at 5.07.49 PM

    7. Click on the Video tab if needed and make sure the video codec is set to H.264

    Screen Shot 2014-05-12 at 5.07.54 PM

    8. Click Start to begin the encoding process.

    Screen Shot 2014-05-12 at 5.07.55 PM

    You can monitor the progress of the conversion process via the progress bar that appears at the bottom of the screen.

    Screen Shot 2014-05-12 at 5.08.07 PM

    Once finished, it should report Encode Finished.

    Screen Shot 2014-05-12 at 5.08.17 PM

    9. Locate the file in the destination directory.

    Screen Shot 2014-05-12 at 5.08.54 PM

    Windows

    1. Launch Handbrake

    2. In Output Settings, set Container to MP4.

    Capture1 (2)

    3. Click the Source button

    Capture1

    4. Select the video you want to convert and click the Open button.

    Capture2

    5. In the Destination blank, click the Browse button.

    Capture3

    6. Select the place where you want to save the video file’s converted copy, then name the new video file if needed.

    Capture4

    7. Click on the Video tab and make sure the video codec is set to H.264

    Capture6

    8. Click Start to begin the encoding process.

    Capture6a

    You can monitor the progress of the conversion process in the lower left corner.

    Capture7

    Once finished, it should report Queue Finished.

    Capture8

    9. Locate the file in the destination directory.

    Capture9

    Once the conversion is completed, open the converted video file on both a Mac and PC to ensure that the converted copy performs as expected.

    Mac:

    Screen Shot 2014-05-12 at 2.13.40 PM

    Windows:

    Capture10


    Users folder being hidden with iTunes 11.2 installed and Find My Mac enabled

    $
    0
    0

    One side effect of the iTunes 11.2 update on Thursday, May 15th 2014 has been that some but not all Macs were seeing the /Users and /Users/Shared folders disappear.

    Screen Shot 2014-05-16 at 1.01.52 PM

    The permissions on the /Users folder were also changed to be world-writable, so that anyone could read and write to the /Users folder.


    Update – 5-16-2014: Apple has released iTunes 11.2.1 to fix this issue. It’s available via Apple’s Software Update or from the main iTunes download site.

    After installing iTunes 11.2.1, I’ve verified that I can re-enable Find My Mac and not have /Users or /Users/Shared vanish. The permissions on /Users were also still correct following the installation. To verify that the fix sticks, I rebooted several times and observed that the visibility and permissions for /Users and /Users/Shared stayed what they should be.


    After considerable investigation by the folks in the ##osx-server IRC room, it looks like the issue has been tied to two causes:

    1. iTunes 11.2 being installed

    2. iCloud’s Find My Mac being enabled.

    The 10.9.3 update does not seem to be the root cause, as the behavior has also been reproduced on 10.9.2 with iTunes 11.2 and Find My Mac enabled.

    To fix this issue if you’re seeing it:

    1. Open System Preferences

    2. Open the iCloud preference pane

    Screen Shot 2014-05-16 at 1.42.32 PM

    3. Check if Find My Mac is enabled.

    Screen Shot 2014-05-16 at 1.41.53 PM

    4. If Find My Mac is enabled, uncheck it to disable it.

    Screen Shot 2014-05-16 at 1.40.56 PM

    5. Run the script below

    What this script does is look for the /Users and /Users/Shared directory. If found, the directories are unhidden. A permissions repair is then run using the diskutil command to fix the world-writable permission issue for the /Users directory.

    Note: The permissions repair may take up to 10 minutes to run.

    Once the script is run, the /Users folder should be visible again.

    Screen Shot 2014-05-16 at 1.38.40 PM

    It is important that Find My Mac be disabled before the permissions fix is run and also that Find My Mac remain disabled. If Find My Mac is re-enabled, the /Users and /Users/Shared folder will disappear again and /Users will revert to being world-writable.

    My understanding is that Apple is aware of the issue and working on it. Hopefully a fix appears quickly.

    The script is also available on my GitHub repo:

    https://github.com/rtrouton/rtrouton_scripts/tree/master/rtrouton_scripts/unhide_users_and_fix_permissions

    A payload-free package containing the script is also available there, to help automate running this script.


    Viewing all 764 articles
    Browse latest View live