Quantcast
Channel: rtrouton – Der Flounder
Viewing all 764 articles
Browse latest View live

Listing and downloading available macOS installers using Apple’s softwareupdate tool

$
0
0

As of macOS Catalina and Big Sur, Apple added some useful functionality to the softwareupdate tool which allows you to list the macOS installers (starting on macOS Big Sur) available to a particular Mac and then to download them (starting on macOS Catalina.)

I’ve used both functions frequently when I needed to identify and download new macOS installers, so I decided to write a script which makes the task easier. For more details, please see below the jump.

The script uses the softwareupdate tool to list all macOS installers that are available to the Mac you’re running the script on, along with the version number information you would need to provide to the softwareupdate tool in order to download that macOS version’s installer. 

Screen Shot 2023 06 30 at 4 43 04 PM

If you enter version information when prompted, the script will download the specified macOS installer and install the corresponding macOS installer application into /Applications.

Screen Shot 2023 06 30 at 4 56 57 PM


Screen Shot 2023 06 30 at 4 35 48 PM


This script is available below and also from GitHub at the following location:

https://github.com/rtrouton/rtrouton_scripts/tree/main/rtrouton_scripts/download_macos_installers


This file contains bidirectional Unicode text that may be interpreted or compiled differently than what appears below. To review, open the file in an editor that reveals hidden Unicode characters.
Learn more about bidirectional Unicode characters


#!/bin/bash
# This script uses the softwareupdate command to display available macOS installers
# for a particular Mac and then offers the option to download them.
available_os_installers=$(mktemp)
# Set exit status
error=0
#Check for available macOS installers
/usr/sbin/softwareupdate –list-full-installers > "$available_os_installers"
clear
echo "The following macOS installers are available for this Mac:"
echo ""
cat "$available_os_installers" | tail -n +3 | awk -F ': |, |KiB' '($1 == "* Title") { print $2" "$4" Build "$9 ": "(int(($6 / 1000 / 1000) * 10 + 0.5) / 10) " GB" }'
echo ""
echo "Version numbers:"
grep -oE '\d+\.(\d|\.)*\d' "$available_os_installers"
echo ""
read -p "Please enter the version number of the macOS installer you wish to download: " macos_version
# Verify that data entered contains only numbers and periods by extracting all the numbers and
# periods and seeing if there's anything left over. If there is, not a valid version number.
macos_version_check=$(echo "$macos_version" | sed 's/[0-9]//g' | tr -d '.')
# If the version check returns no data, a version number containing only numbers and periods was entered.
if [[ -z "$macos_version_check" ]]; then
echo "Downloading installer…"
/usr/sbin/softwareupdate –fetch-full-installer –full-installer-version ${macos_version}
else
echo "$macos_version is not a valid version number. Exiting…"
error=1
fi
exit $error


Thanks to the folks in the #bash channel in the Mac Admins Slack for helping improve various parts of this script.


Slides from the “Introduction to Declarative MDM” session at Penn State MacAdmins 2023

Disabling in-app review requests for apps installed from the macOS App Store

$
0
0

I was recently asked to look into how to disable in-app review requests for apps being deployed from the macOS App Store or VPP.

Screenshot 2023 07 17 at 08 10 29

After some digging, I was able to find what preference domain and key controlled this. In the macOS App Store app’s Settings, it is the In-Apps Ratings & Reviews setting.

Screenshot 2023 07 20 at 4 04 52 PM

The relevant preference domain and key are below:

  • Domain: com.apple.appstore
  • Key: InAppReviewEnabled

This setting can be managed via the following defaults command run as the logged-in user:

  • To enable the In-Apps Ratings & Reviews setting in the App Store app:


This file contains bidirectional Unicode text that may be interpreted or compiled differently than what appears below. To review, open the file in an editor that reveals hidden Unicode characters.
Learn more about bidirectional Unicode characters


/usr/bin/defaults write com.apple.appstore InAppReviewEnabled -bool true
view raw

gistfile1.txt

hosted with ❤ by GitHub
  • To disable the In-Apps Ratings & Reviews setting in the App Store app:


This file contains bidirectional Unicode text that may be interpreted or compiled differently than what appears below. To review, open the file in an editor that reveals hidden Unicode characters.
Learn more about bidirectional Unicode characters


/usr/bin/defaults write com.apple.appstore InAppReviewEnabled -bool false
view raw

gistfile1.txt

hosted with ❤ by GitHub

At this time, this setting does not appear to be manageable using a configuration profile. I’ve filed a bug report with Apple about this. For this who want to also report this and want a reference, it is Feedback ID FB12691822.

Session videos now available from Penn State MacAdmins Conference 2023

$
0
0

The good folks at Penn State have posted the session videos from Penn State MacAdmins Conference 2023. The sessions slides are all accessible from the Penn State MacAdmins’ Resources page at the link below:

http://macadmins.psu.edu/conference/resources/

All session videos are available via the link below:

https://www.youtube.com/playlist?list=PLRUboZUQxbyWzc2LtGvCHpWz1dcoSSR5s


I’ve linked my Introduction to Declarative MDM session here:


The The Mac Admins Foundation panel I co-hosted with Chris Dawe, Jennifer Unger, Tom Bridge and Emily Kausalik is linked here:


The Mac Admins Open Source Panel panel I participated in along with Nate Walck, Greg Neagle, Elliot Jordan and Emily Kausalik is linked here:

Removing Oracle Java from macOS

$
0
0

As of January 23, 2023, Oracle made a change to how they’ve licensed Oracle’s Java (which is a separate license from the ones used for open source Java distributions like OpenJDK.) The new license terms are described here in Oracle’s FAQ, but to summarize the main difference between the old licensing and the current licensing is that Oracle introduced a new employee-based metric.

  • Old license: License costs were based on how many employees your company has which used Oracle’s Java.
  • Current license: License costs are based on how many employees your company has.

See the difference? Previously, if your company had 1000 employees and 2 used Oracle’s Java for purposes which required payment under the old license, the company paid for 2 licenses. Under the current license, if your company has 1000 employees and 2 use Oracle’s Java, Oracle may say that now the company needs to pay for 1000 licenses.

There’s more to it and I am not the person to turn to when needing explanation of complex legal and financial questions, but the operational consequence for Mac admins is that companies which had previously been OK with Oracle Java being installed on their Macs may now be coming to their Mac admins, asking how Oracle Java can be removed and kept off.

To assist with this, I’ve written a script which should remove Oracle Java JREs and JDKs on macOS. For more details, please see below the jump.

The script will check the following directories for Oracle Java JREs and JDKs:

  • JRE: /Library/Internet Plug-Ins
  • JDK: /Library/Java/JavaVirtualMachines

The script will check those directories for the following conditions:

  1. Is the directory in question empty? If yes, nothing to do and the script moves on.
  2. If the directory is not empty, it checks to see if there are JRE or JDKs installed.
  3. If there are JREs or JDKs installed, check if the JRE or JDK in question is from Oracle.
  4. If a JRE or JDK is from Oracle, remove the Oracle Java JRE or JDK installation.

This script should leave all non-Oracle Java installs that you may have on the Mac intact and untouched. However, I strongly recommend testing in your own environment before any deployment to make sure it is not removing anything you don’t want to have removed.

The script is available below and also from GitHub at the following location:

https://github.com/rtrouton/rtrouton_scripts/tree/main/rtrouton_scripts/uninstallers/oracle_java_uninstall


This file contains bidirectional Unicode text that may be interpreted or compiled differently than what appears below. To review, open the file in an editor that reveals hidden Unicode characters.
Learn more about bidirectional Unicode characters


#!/bin/bash
# Checks for Oracle Java JRE and JDK installs and removes all
# identified installations.
installedJREs="/Library/Internet Plug-Ins"
installedJDKs="/Library/Java/JavaVirtualMachines"
# Check to see if /Library/Internet Plug-Ins is empty.
if [[ -n $(ls -A "$installedJREs") ]]; then
# If it's not empty, check for installed JREs. If an installed JRE
# is detected, check to see if it's from Oracle.
if [[ -x "${installedJREs}/JavaAppletPlugin.plugin" ]]; then
jreVendor=$(/usr/bin/defaults read "${installedJREs}/JavaAppletPlugin.plugin/Contents/Enabled.plist" CFBundleIdentifier | /usr/bin/grep -Eo "oracle")
# If it's from Oracle, remove the Java installation.
if [[ "$jreVendor" = "oracle" ]]; then
rm -rf "${installedJREs}/JavaAppletPlugin.plugin"
fi
fi
fi
# Check to see if /Library/Java/JavaVirtualMachines is empty.
if [[ -n $(ls -A "$installedJDKs") ]]; then
# If it's not empty, check for installed JDKs.
for aJDKPath in ${installedJDKs}/*; do
# If an installed JDK is detected, check to see if it's from Oracle
jdkVendor=$(/usr/bin/defaults read "${aJDKPath}/Contents/Info.plist" CFBundleIdentifier | /usr/bin/grep -Eo "oracle")
# If it's from Oracle, remove the Java installation.
if [[ "$jdkVendor" = "oracle" ]]; then
rm -rf "${aJDKPath}"
fi
done
fi
exit 0
view raw

gistfile1.txt

hosted with ❤ by GitHub

Blocking Oracle Java

$
0
0

As a follow-up to my previous post on removing Oracle Java, it’s possible that Mac admins may be requested to block Oracle Java in place of removing it. This may be challenging, but possible with the right information and tools. For more details, please see below the jump.

Normally, there’s three approaches on macOS that you can take when needing to block an app:

  1. Block by process name
  2. Block by code signature
  3. Block with parental controls

Block by process name

Blocking by process name may be problematic in this case, since the process names for Oracle’s Java and any other non-Oracle Java are almost certainly going to be identical (for example, java as the process name.) Blocking Oracle’s Java by process name will mean that the non-Oracle Java you may be installing to replace Oracle’s Java will be caught by the same process-based block. 

This is to say nothing of apps which may have embedded Java runtimes you’re not aware of; blocking Oracle’s Java by process may inadvertently also block the processes run by an app’s embedded Java runtime.


Block by code signature

This may be the best approach, as you may be able to use Oracle Java’s code signing signature and bundle identifier to block Oracle Java. Solutions which can do this include the following:

These solutions should be able to block by the code signature’s Team Identifier and the java binaries’ bundle identifier(s). You can find these by running the following command:


This file contains bidirectional Unicode text that may be interpreted or compiled differently than what appears below. To review, open the file in an editor that reveals hidden Unicode characters.
Learn more about bidirectional Unicode characters


codesign -dv /path/to/java/binary
view raw

gistfile1.txt

hosted with ❤ by GitHub

Here’s an example of using the codesign command to get the code signature’s Team Identifier and the bundle identifier for the java binary in Oracle’s Java JDK 11.0.20:

  • Bundle identifier: Identifier
  • Team Identifier: TeamIdentifier


This file contains bidirectional Unicode text that may be interpreted or compiled differently than what appears below. To review, open the file in an editor that reveals hidden Unicode characters.
Learn more about bidirectional Unicode characters


username@computername ~ % codesign -dv /Library/Java/JavaVirtualMachines/jdk-11.jdk/Contents/Home/bin/java
Executable=/Library/Java/JavaVirtualMachines/jdk-11.jdk/Contents/Home/bin/java
Identifier=com.oracle.java.11.0.20.java
Format=Mach-O thin (arm64)
CodeDirectory v=20500 size=936 flags=0x10000(runtime) hashes=18+7 location=embedded
Signature size=9010
Timestamp=Jun 14, 2023 at 5:32:54 AM
Info.plist entries=5
TeamIdentifier=VB5E2TV963
Runtime Version=11.1.0
Sealed Resources=none
Internal requirements count=1 size=188
username@computername ~ %
view raw

gistfile1.txt

hosted with ❤ by GitHub

Note: The bundle identifier may be different for each version of Oracle’s Java. You may be able to block using only the Team Identifier, but the drawback of this is that you may also block other Oracle apps which use that same code signing Team Identifier, like Oracle’s VirtualBox hypervisor software:


This file contains bidirectional Unicode text that may be interpreted or compiled differently than what appears below. To review, open the file in an editor that reveals hidden Unicode characters.
Learn more about bidirectional Unicode characters


username@computername ~ % codesign -dv /Applications/VirtualBox.app
Executable=/Applications/VirtualBox.app/Contents/MacOS/VirtualBox
Identifier=org.virtualbox.app.VirtualBox
Format=app bundle with Mach-O thin (x86_64)
CodeDirectory v=20500 size=19145 flags=0x10000(runtime) hashes=587+7 location=embedded
Signature size=9009
Timestamp=Jul 27, 2023 at 11:49:35 AM
Info.plist entries=17
TeamIdentifier=VB5E2TV963
Runtime Version=10.15.6
Sealed Resources version=2 rules=13 files=224
Internal requirements count=1 size=192
username@computername ~ %
view raw

gistfile1.txt

hosted with ❤ by GitHub


Block with parental controls:

You can use a macOS configuration profile to set all binaries in a particular directory path to be blocked from running. While this functionality has been deprecated by Apple as of macOS Catalina, it continues to work as of macOS Ventura.

In this case, you can set the enclosing directory paths of Oracle’s Java binaries to the block list and thus prevent Oracle’s Java binaries from running:


This file contains bidirectional Unicode text that may be interpreted or compiled differently than what appears below. To review, open the file in an editor that reveals hidden Unicode characters.
Learn more about bidirectional Unicode characters


username@computername ~ % java -version
exec failed: Error Domain=NSPOSIXErrorDomain Code=13 "Permission denied" UserInfo={NSLocalizedFailureReason=Failed to execute /Library/Java/JavaVirtualMachines/jdk-1.8.jdk/Contents/Home/bin/java: Permission denied}
username@computername ~ %
view raw

gistfile1.txt

hosted with ❤ by GitHub

When setting a blocklist using a profile, one thing to be aware of is that the blocklist can be overridden by an administrator account. If an administrator chooses, they can set the application block to be overridden once or permanently.

Screenshot 2023 08 10 at 3 38 21 PM

For those who want to block Oracle’s Java binaries using a macOS configuration profile, I’ve created an example profile and posted it here on GitHub:

https://github.com/rtrouton/profiles/tree/main/BlockOracleJavaBinariesFromRunning

Updating management status in Jamf Pro computer inventory records on Jamf Pro 10.49.0 and later

$
0
0

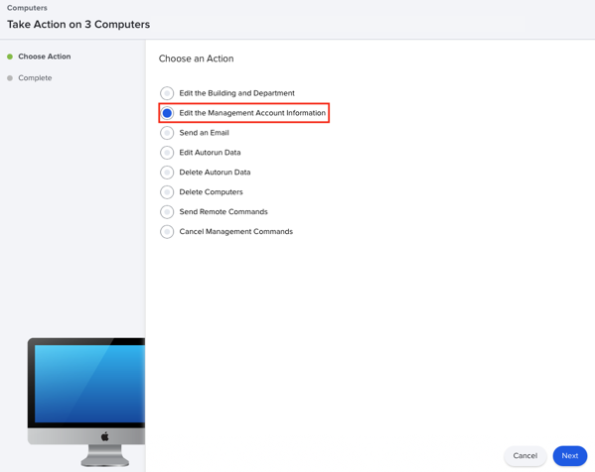
As of Jamf Pro 10.49.0, the following mass action has been removed:

  •  Edit the Management Account Information

Screen Shot 2021 09 28 at 10 39 53 AM

I had been using this to update the status of unmanaged Macs to now be managed Macs, by editing the username and password assigned to the computer inventory record. As part of this, the remote management status of the computer inventory record would change from Unmanaged to Managed.

As of Jamf Pro 10.49.0, the management account information has been removed from the computer inventory record, with the resulting removal of the mass-action to edit the management account information. However, this has left me without a mass-action to change unmanaged Macs to managed Macs.

Fortunately, there’s a way to change this via the Jamf Pro Classic API. The relevant API command to change the management status in a Jamf Pro computer inventory record should look like this:


This file contains bidirectional Unicode text that may be interpreted or compiled differently than what appears below. To review, open the file in an editor that reveals hidden Unicode characters.
Learn more about bidirectional Unicode characters


/usr/bin/curl -H "content-type: text/xml" "https://jamf.pro.server.here/JSSResource/computers/id/jamf_pro_computer_ID_goes_here&quot; –header "Authorization: Bearer api_token_goes_here" -X PUT -d "<computer><general><remote_management><managed>true</managed></remote_management></general></computer>"
view raw

gistfile1.txt

hosted with ❤ by GitHub

It’s sending the following XML block to update the relevant computer inventory record and make the management change:


This file contains bidirectional Unicode text that may be interpreted or compiled differently than what appears below. To review, open the file in an editor that reveals hidden Unicode characters.
Learn more about bidirectional Unicode characters


<computer>
<general>
<remote_management>
<managed>true</managed>
</remote_management>
</general>
</computer>
view raw

gistfile1.txt

hosted with ❤ by GitHub

Previously, you also needed to send along the management username and management password, but since those have been removed as of Jamf Pro 10.49.0, those are no longer needed.

I have filed a feature request with Jamf to get back an equivalent mass-action to update the management status. For those interested, it is the following:

JN-I-27551: https://ideas.jamf.com/ideas/JN-I-27551

While I wait to see what Jamf does with the feature request, I was able to use the API information discussed above to create a script which a) updates the management status in specified computer inventory records and b) generates a report of the Macs whose computer inventory records were updated. For more details, please see below the jump.

The script is named Set_Jamf_Pro_Computers_To_Managed_Status.sh and is available via the link below:

https://github.com/rtrouton/rtrouton_scripts/tree/main/rtrouton_scripts/Casper_Scripts/Set_Jamf_Pro_Computers_To_Managed

The script is designed to take in a set of Jamf Pro ID numbers in a plaintext file, where the Jamf Pro ID numbers correspond the Macs where you want to change the management status in their Jamf Pro computer inventory records. The plaintext file should look similar to this:


This file contains bidirectional Unicode text that may be interpreted or compiled differently than what appears below. To review, open the file in an editor that reveals hidden Unicode characters.
Learn more about bidirectional Unicode characters


416462
842736
434703
338517
481915
596669
view raw

gistfile1.txt

hosted with ❤ by GitHub

Five items are required to use this script:

  • Jamf Pro 10.49.0 or later
  • A text file containing the Jamf Pro IDs of the computer(s) you wish to delete.
  • The URL of the appropriate Jamf Pro server.
  • The username of an account on the Jamf Pro server with sufficient privileges to delete computers from the Jamf Pro server.
  • The password for the relevant account on the Jamf Pro server.

Jamf Pro account privileges required by the Jamf Pro server account referenced above:

Jamf Pro Server Objects:

Computers: Read, Update

Users: Update

Once the five specified items are available, the script can be run using the following command:


This file contains bidirectional Unicode text that may be interpreted or compiled differently than what appears below. To review, open the file in an editor that reveals hidden Unicode characters.
Learn more about bidirectional Unicode characters


/path/to/Set_Jamf_Pro_Computers_To_Managed_Status.sh /path/to/plaintext_filename_here.txt
view raw

gistfile1.txt

hosted with ❤ by GitHub

You should see output like this:


This file contains bidirectional Unicode text that may be interpreted or compiled differently than what appears below. To review, open the file in an editor that reveals hidden Unicode characters.
Learn more about bidirectional Unicode characters


username@computername ~ % /Users/Shared/Set_Jamf_Pro_Computers_To_Managed/Set_Jamf_Pro_Computers_To_Managed_Status.sh /Users/Shared/jamfpro_computer_ids.txt
Please enter your Jamf Pro server URL : https://jamf.pro.server.here
Please enter your Jamf Pro user account : username_goes_here
Please enter the password for the username_goes_here account:
Report being generated. File location will appear below once ready.
<?xml version="1.0" encoding="UTF-8"?><computer><id>416462</id></computer>
Updated management status in the computer inventory record for https://jamf.pro.server.here/computers.html?id=416462 from unmanaged to managed.
<?xml version="1.0" encoding="UTF-8"?><computer><id>842736</id></computer>
Updated management status in the computer inventory record for https://jamf.pro.server.here/computers.html?id=842736 from unmanaged to managed.
<?xml version="1.0" encoding="UTF-8"?><computer><id>434703</id></computer>
Updated management status in the computer inventory record for https://jamf.pro.server.here/computers.html?id=434703 from unmanaged to managed.
<?xml version="1.0" encoding="UTF-8"?><computer><id>338517</id></computer>
Updated management status in the computer inventory record for https://jamf.pro.server.here/computers.html?id=338517 from unmanaged to managed.
<?xml version="1.0" encoding="UTF-8"?><computer><id>481915</id></computer>
Updated management status in the computer inventory record for https://jamf.pro.server.here/computers.html?id=481915 from unmanaged to managed.
<?xml version="1.0" encoding="UTF-8"?><computer><id>596669</id></computer>
Updated management status in the computer inventory record for https://jamf.pro.server.here/computers.html?id=596669 from unmanaged to managed.
Report on Macs available here: /var/folders/vd/c27hl4p53j1_5cnv9ynpxp6m0000gn/T/tmp.iJDgJwhq.tsv
username@computername ~ %
view raw

gistfile1.txt

hosted with ❤ by GitHub

As part of the script’s run, a report will be generated and you’ll be notified of where it is stored. The report will be in TSV format and appear similar to what’s shown below:


Jamf Pro ID Number Make Model Serial Number UDID Computer Management Status Jamf Pro URL
416462 Apple MacBook Pro (16-inch, 2019) WD8JB8F49YS4 4D8CD419-1892-4CFE-8D18-D1DD53CC7970 Managed https://jamf.pro.server.here/computers.html?id=416462
842736 Apple MacBook Pro (16-inch, 2019) R6JG7GYVNORW 904418F7-3695-44BF-9A00-74F5CF617377 Managed https://jamf.pro.server.here/computers.html?id=842736
434703 Apple MacBook Pro (16-inch, 2019) FWPATJHWC92O 5CF418CE-3E46-481C-A171-7ACC9E1E2E7A Managed https://jamf.pro.server.here/computers.html?id=434703
338517 Apple MacBook Pro (16-inch, 2019) CVZVJ8R55467 E82C6C63-5F49-4DD3-90A0-E01EC11F6954 Managed https://jamf.pro.server.here/computers.html?id=338517
481915 Apple MacBook Pro (13-inch, M1, 2020) QL6ROPPB1SK5 CBC87B4C-28DA-417F-8790-411AF9F105AD Managed https://jamf.pro.server.here/computers.html?id=481915
596669 Apple MacBook Pro (16-inch, 2021) CNA11CBMJSNI 72811617-8C97-4EB6-BC4B-B9FA9C87B259 Managed https://jamf.pro.server.here/computers.html?id=596669

Starting a sole proprietorship business to get a DUNS number for Apple Business Manager

$
0
0

One of the requirements for getting an Apple Business Manager (ABM) instance (which also provides Automated Device Enrollment and Volume Purchase Program access) is a Data Universal Numbering System (DUNS) number, which are issued to businesses by Dun & Bradstreet (D&B). This is usually seen as an obstacle for the individual Mac admin who wants to set up an ABM instance, but it doesn’t need to be for the following reasons:

  1. Setting up a business does not need to cost anything in terms of money.
  2. Getting a DUNS number does not need to cost anything in terms of money.
  3. Getting an ABM instance does not cost anything in terms of money.

All three will take time and some effort, and your time always has a money value, but overall you shouldn’t get charged for anything.

Note: What I’m about to discuss applies solely to states which are part of the United States of America. If you are outside the United States, please check your own nation’s laws as what I’m about to discuss may have zero applicability to you. For more details, please see below the jump.

What makes all of this work is a business type called the sole proprietorship. For those not familiar with this type of business, it works like this:

When an individual (or married couple) starts a business, it is, by default, considered a sole proprietorship. In a sole proprietorship, the owner and the business are considered the same legal and tax-paying entity. Owners of a sole proprietorship are taxed at the applicable individual income tax rates on profits that the business makes.

Operating as a sole proprietorship in the United States (usually) requires no business formation paperwork with the state you live in. (Check your own state’s laws to verify this before proceeding.)

Because there is (usually) no paperwork or registration involved with setting up a sole proprietorship business, sole proprietorships are generally less expensive to establish and easier to maintain administratively. They also do not include any of the legal protections that other company types, like limited liability companies (LLCs), provide to separate the company’s liabilities from your personal liabilities, but this should be fine in the scenario where you’re setting up the sole proprietorship business for the sole purpose of getting a DUNS number in order to get an ABM instance.

Obtaining a DUNS number

Once you’ve decided to go this route, you will need to apply to D&B for a DUNS number and provide the following information:

  • Your business name.
  • Your business’s legal entity structure. (In this case, a sole proprietorship.)
  • The year you started the business.
  • Name(s) of the business owner(s).
  • The business address, business number, and email address.
  • Industry.
  • The number of employees.

Note: If you are applying for a DUNS number as a sole proprietorship, your legal business name is your full legal given name (i.e. John A. Doe or Jane A. Doe). This is the name that your DUNS number will be issued to.

I would also recommend using a domain name which corresponds to the business name somehow and also getting a couple of email addresses associated with that domain for your business contact information. This may cost some money and thus invalidate the “setting up a business shouldn’t cost money” statement I made earlier, but you may also already have these.

For the business phone number, setting up a free Google Voice number or similar service should be fine; it’ll just need to be a valid way to contact you via phone.

To get started with the DUNS number application process, use the D&B link below to get started:

I recommend selecting the I have a US-based business option over the I am an Apple developer option.

Screenshot 2023 09 04 at 3 37 25 PM

The reason I recommend this is that the I have a US-based business option will start the actual process of applying for a DUNS number, while the I am an Apple developer option will only send you to Apple’s documentation on how to sign up for a DUNS number and won’t actually start the DUNS application process.

Screenshot 2023 09 04 at 3 37 26 PM

The first thing D&B will do is request you search your business name and zip code to verify that you don’t already have a DUNS number. If the search is unsuccessful (as it should be), you should see a I don’t see my business link. Click that link to proceed.

Screenshot 2023 09 04 at 3 37 56 PM

When asked to select the DUNS number package, select the free option.

Screenshot 2023 09 04 at 3 38 09 PM

When asked to set up a D&B account, set it up using the business’s contact information (email, phone number if requested, etc.) and not your personal contact information.

Screenshot 2023 09 04 at 3 38 36 PM

After that, you should be taken to the application page to request a DUNS number.

Screenshot 2023 09 04 at 3 39 48 PM

Screenshot 2023 09 04 at 3 40 36 PM

You will be requested at the end of the application to provide business verification documentation which can expedite your application, where the business’s name and mailing address are included as part of the document. As far as I can tell from my research, these documents are not required; they’re an aid to D&B to help make the verification process easier.

Screenshot 2023 09 04 at 3 41 02 PM

If you choose to provide documentation, the following are examples of acceptable documentation:

  • Secretary of State Articles of Incorporation
  • Secretary of State receipt of Filing
  • Taxpayer Identification Number (TIN) Confirmation Letter
  • Employer Identification Number (EIN) Confirmation Letter
  • DBA / Assumed Name Certificate Filing
  • Lease Agreement
  • Mortgage
  • Phone or Internet Bill
  • Utility Bill
  • Homeowners or Renters Insurance
  • City or State Tax Permit
  • Invoice from a third party
  • Proof of Insurance

They must contain the legal business name and mailing address of the business. That said, if you are applying for a DUNS number as a sole proprietorship, your legal business name is your full legal given name (i.e. John A. Doe or Jane A. Doe.) Any document which has your full legal name on it would likely work for D&B’s verification process.

In my case, I decided to apply for an Employer Identification Number (EIN) for a sole proprietorship from the Internal Revenue Service (IRS) and submitted the resulting confirmation letter from the IRS as my sole supporting documentation.

If you also decide to go the same route of getting an EIN for a sole proprietorship, make sure to report when you do your taxes that you have a sole proprietorship business, that you have an EIN for it, what the EIN is, and all income you made from the business (if any). Also, please keep in mind that I am not a CPA or otherwise a licensed tax professional. I firmly recommend checking with a CPA or other licensed tax professional before applying for an EIN to make sure that what I’m saying is accurate for your situation.

Applying for an EIN for a sole proprietorship is free and information on how to do this is available via the links below:

Once you’ve completed the DUNS number application process, the next step is waiting. D&B may take up to 30 business days to process the application using the free application package and issue a DUNS number. (D&B will process the application faster, for a fee.)

Applying for an Apple Business Manager instance

Once you have received your DUNS number, you can apply for an ABM instance. Apple has instructions on how to do so available via the link below:

One thing to know about is Apple is going to request verification contact information as part of the ABM application process. Apple will call this verification contact to independently verify that your organization actually exists by talking to a real live person who can attest to it.


Slides from the “Installer Package Scripting” session at Jamf Nation User Conference 2023

Managing the “Click wallpaper to reveal desktop” setting in macOS Sonoma

$
0
0

Every so often, something gets added to macOS and enabled by default where I wish it was off by default. In macOS Sonoma, that’s the new Click wallpaper to reveal desktop option, which works like this by default.

  1. Click on an empty spot on the desktop.
  2. Watch your open windows disappear off-screen.

Click wallpaper to reveal desktop default behavior

Apple does include a one-time message which explains the behavior, but if you click away from the message it won’t re-appear when you click again on an empty spot on the desktop.

Screenshot 2023 09 20 at 8 41 02 PM

This behavior is managed in System Settings: Desktop & Dock and is listed as the Click wallpaper to reveal desktop setting. This has two settings:

  • Always
  • Only in Stage Manager

The default behavior is Always. To stop making your windows disappear whenever you click on the desktop, select Only in Stage Manager.

Screenshot 2023 09 20 at 8 07 35 PM

Fortunately for my preferences, I was able to figure out that the Click wallpaper to reveal desktop behavior was controlled via the following setting:

  • Domain: com.apple.WindowManager
  • Key: EnableStandardClickToShowDesktop
  • Value: Boolean

To set the Click wallpaper to reveal desktop setting to Always, run the following command as the logged-in user:


This file contains bidirectional Unicode text that may be interpreted or compiled differently than what appears below. To review, open the file in an editor that reveals hidden Unicode characters.
Learn more about bidirectional Unicode characters


/usr/bin/defaults write com.apple.WindowManager EnableStandardClickToShowDesktop -bool true
view raw

gistfile1.txt

hosted with ❤ by GitHub

To set the Click wallpaper to reveal desktop setting to Only in Stage Manager, run the following command as the logged-in user:


This file contains bidirectional Unicode text that may be interpreted or compiled differently than what appears below. To review, open the file in an editor that reveals hidden Unicode characters.
Learn more about bidirectional Unicode characters


/usr/bin/defaults write com.apple.WindowManager EnableStandardClickToShowDesktop -bool false
view raw

gistfile1.txt

hosted with ❤ by GitHub

In my case, I wanted this setting permanently set to Only in Stage Manager so I’ve also written a profile which can enforce this. It’s available via the link below:

https://github.com/rtrouton/profiles/blob/main/ManageClickWallpaperToShowDesktopItems

Suppressing undesired local account password policy notifications on macOS Sonoma

$
0
0

As part of the release of macOS Sonoma 14.0.0, there is a bug which may be triggered if you have deployed a configuration profile which sets password rules for local accounts. An example profile is shown below:


This file contains bidirectional Unicode text that may be interpreted or compiled differently than what appears below. To review, open the file in an editor that reveals hidden Unicode characters.
Learn more about bidirectional Unicode characters


<?xml version="1.0" encoding="UTF-8"?>
<!DOCTYPE plist PUBLIC "-//Apple//DTD PLIST 1.0//EN" "http://www.apple.com/DTDs/PropertyList-1.0.dtd"&gt;
<plist version="1.0">
<dict>
<key>PayloadContent</key>
<array>
<dict>
<key>PayloadDisplayName</key>
<string>Passcode</string>
<key>PayloadIdentifier</key>
<string>com.apple.mobiledevice.passwordpolicy.3BCA8E01-3CB9-4D6B-8338-518C51B80AAF</string>
<key>PayloadType</key>
<string>com.apple.mobiledevice.passwordpolicy</string>
<key>PayloadUUID</key>
<string>F0B7EB5D-5DF1-4DDC-8A80-01CA458E6157</string>
<key>PayloadVersion</key>
<integer>1</integer>
<key>allowSimple</key>
<false/>
<key>forcePIN</key>
<true/>
<key>maxFailedAttempts</key>
<integer>10</integer>
<key>minLength</key>
<integer>15</integer>
<key>minutesUntilFailedLoginReset</key>
<integer>15</integer>
<key>requireAlphanumeric</key>
<true/>
</dict>
</array>
<key>PayloadDescription</key>
<string>Sets password rules for local accounts on this Mac.</string>
<key>PayloadDisplayName</key>
<string>Local Account Password Rules</string>
<key>PayloadIdentifier</key>
<string>com.company.9EF1E03A-5DEB-4D1F-9E14-D76AFF153C35</string>
<key>PayloadOrganization</key>
<string>Company Name</string>
<key>PayloadType</key>
<string>Configuration</string>
<key>PayloadUUID</key>
<string>40829036-5EAF-42C9-9678-D27F0C28654B</string>
<key>PayloadVersion</key>
<integer>1</integer>
</dict>
</plist>


In those cases, you may see one or the other following notifications when you log into macOS Sonoma for the first time.

IMG 3879

IMG 3880

These notifications don’t actually indicate a problem and clicking on them does nothing but make the messages disappear. However, for shops which are using profiles which set local account password rules, these messages will almost certainly cause tickets asking “What is this and what does it mean?” from your user community.

I have filed feedback with Apple regarding this issue. For those wishing to reference it, it is Feedback # FB12845634.

For the initial release of Sonoma, the best solution identified so far is to suppress the notifications for local password management, to make sure that these notifications don’t appear until Apple releases an update to macOS Sonoma which addresses this problem. To assist with this, I have an example profile available from the link below:

https://github.com/rtrouton/profiles/tree/main/DisableAppleLocalUserAccountPasswordNotifications

Note: The example profile linked above will suppress all local account password policy notifications. If you are using local account password policy notifications for other purposes, this solution may not work for you.

The component in macOS which generates the local account password notifications also exists on macOS Ventura, so you should be able to deploy a profile like the one linked above to macOS Ventura. This should ensure that Macs upgrading to macOS Sonoma also have these notifications suppressed from the start on macOS Sonoma 14.0.0.


Slides from the “Introduction to Declarative MDM” session at MacSysAdmin 2023

Enabling Touch ID authentication for sudo on macOS Sonoma

$
0
0

Since the release of macOS High Sierra, it has been possible to enable Touch ID authentication for the sudo tool. However, the necessary modifications needed to be re-applied after every update to macOS because the modified file would get overwritten with the OS’s default values each time macOS was updated.

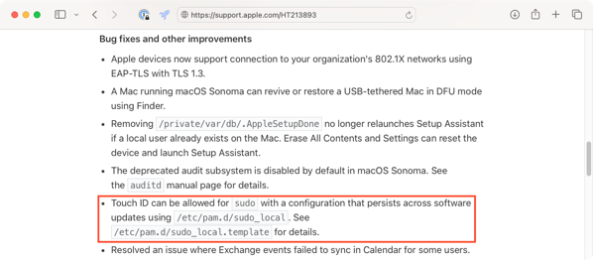
As of macOS Sonoma though, this modification can now be persistent. Apple included the following note as part of the the What’s new for enterprise in macOS Sonoma KBase article:

Touch ID can be allowed for sudo with a configuration that persists across software updates using /etc/pam.d/sudo_local. See /etc/pam.d/sudo_local.template for details.

Screenshot 2023 10 14 at 1 43 01 PM

When examined on macOS Sonoma 14.0.0, the contents of the /etc/pam.d/sudo_local.template file are as shown below:


This file contains bidirectional Unicode text that may be interpreted or compiled differently than what appears below. To review, open the file in an editor that reveals hidden Unicode characters.
Learn more about bidirectional Unicode characters


# sudo_local: local config file which survives system update and is included for sudo
# uncomment following line to enable Touch ID for sudo
#auth sufficient pam_tid.so
view raw

gistfile1.txt

hosted with ❤ by GitHub

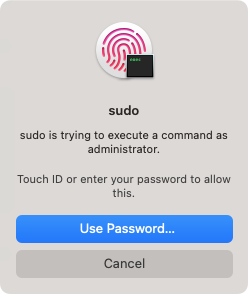
Copying the /etc/pam.d/sudo_local.template file to /etc/pam.d/sudo_local and uncommenting the indicated line allows Touch ID to work for authentication to the sudo tool.

Screenshot 2023 10 14 at 1 40

To assist with the process of enabling and disabling Touch ID authentication for the sudo tool, I’ve written a couple of scripts. For more details, please see below the jump.

The scripts are available via the link below:

https://github.com/rtrouton/rtrouton_scripts/tree/main/rtrouton_scripts/enable_and_disable_touch_id_for_sudo

There are two scripts available at the above location:

Both scripts are set to check if they are being run on macOS Sonoma or later, and will exit with a message if they are run on an earlier version of macOS.

Session videos and slides available from MacSysAdmin 2023

Re-enabling OpenBSM auditing on macOS Sonoma

$
0
0

Apple deprecated its OpenBSM audit system beginning with macOS Big Sur, but the audit system itself stayed enabled until the release of macOS Sonoma. As of macOS Sonoma, it is now disabled and does not run by default. The man page includes this deprecation notice section:


This file contains bidirectional Unicode text that may be interpreted or compiled differently than what appears below. To review, open the file in an editor that reveals hidden Unicode characters.
Learn more about bidirectional Unicode characters


DEPRECATION NOTICE
The audit(4) subsystem has been deprecated since macOS 11.0, disabled since macOS 14.0, and WILL BE REMOVED in a future version of macOS. Applications that
require a security event stream should use the EndpointSecurity(7) API instead.
On this version of macOS, you can re-enable audit(4) by renaming or copying /etc/security/audit_control.example to /etc/security/audit_control, re-enabling the
system/com.apple.auditd service by running launchctl enable system/com.apple.auditd as root, and rebooting.
view raw

gistfile1.txt

hosted with ❤ by GitHub

Screenshot 2023 10 18 at 11 00

If you still need to have the OpenBSM audit system running on macOS Sonoma, it’s possible to re-enable it using the procedure described in the man page. For more information, please see below the jump.

Check if it’s already running

Before enabling, I recommend verifying that it’s not already running. For example, I know that Jamf Pro 10.50 and later will re-enable the OpenBSM auditing system on macOS Sonoma Macs. Please use the procedure below to check and see if something else has already enabled the OpenBSM audit system.

1. Run the following command with root privileges:


This file contains bidirectional Unicode text that may be interpreted or compiled differently than what appears below. To review, open the file in an editor that reveals hidden Unicode characters.
Learn more about bidirectional Unicode characters


/bin/launchctl list | grep auditd
view raw

gistfile1.txt

hosted with ❤ by GitHub

If it’s already enabled and running, you should see output similar to what’s shown below:


This file contains bidirectional Unicode text that may be interpreted or compiled differently than what appears below. To review, open the file in an editor that reveals hidden Unicode characters.
Learn more about bidirectional Unicode characters


username@computername ~ % sudo /bin/launchctl list | grep auditd
375 0 com.apple.auditd
username@computername ~ %
view raw

gistfile1.txt

hosted with ❤ by GitHub

If it’s not running you should see output similar to what’s shown below:


This file contains bidirectional Unicode text that may be interpreted or compiled differently than what appears below. To review, open the file in an editor that reveals hidden Unicode characters.
Learn more about bidirectional Unicode characters


username@computername ~ % sudo /bin/launchctl list | grep auditd
username@computername ~ %
view raw

gistfile1.txt

hosted with ❤ by GitHub

If the OpenBSM audit system is not running and you want to enable it, please use the procedure described below:

1. Run the following command with root privileges:


This file contains bidirectional Unicode text that may be interpreted or compiled differently than what appears below. To review, open the file in an editor that reveals hidden Unicode characters.
Learn more about bidirectional Unicode characters


cp /etc/security/audit_control.example /etc/security/audit_control
view raw

gistfile1.txt

hosted with ❤ by GitHub

2. Run the following command with root privileges:


This file contains bidirectional Unicode text that may be interpreted or compiled differently than what appears below. To review, open the file in an editor that reveals hidden Unicode characters.
Learn more about bidirectional Unicode characters


/bin/launchctl enable system/com.apple.auditd
view raw

gistfile1.txt

hosted with ❤ by GitHub

3. Restart the Mac.

4. Following the restart, verify that the auditd service is enabled by running the following command with root privileges:


This file contains bidirectional Unicode text that may be interpreted or compiled differently than what appears below. To review, open the file in an editor that reveals hidden Unicode characters.
Learn more about bidirectional Unicode characters


/bin/launchctl list | grep auditd
view raw

gistfile1.txt

hosted with ❤ by GitHub

You should see output similar to what’s shown below:


This file contains bidirectional Unicode text that may be interpreted or compiled differently than what appears below. To review, open the file in an editor that reveals hidden Unicode characters.
Learn more about bidirectional Unicode characters


username@computername ~ % sudo /bin/launchctl list | grep auditd
375 0 com.apple.auditd
username@computername ~ %
view raw

gistfile1.txt

hosted with ❤ by GitHub

Note: If you have a custom configuration for OpenBSM auditing, you’ll need to add those configuration settings to the following file:

/etc/security/audit_control

For more information on configuration of OpenBSM auditing, please see the audit_control man page or my earlier post on OpenBSM auditing.


Preparing installer packages for installation using MDM commands

$
0
0

An issue that some Mac admins have had to deal with is that their system management tool is using MDM commands to install installer packages. This usually applies if the system management tool does not have an agent installed on the managed Macs and instead is using only MDM for management.

In those cases, installer packages must have the following attributes for a successful installation via MDM command:

  1. Signed with an Apple Developer ID Installer certificate
  2. Be a distribution installer package

For criteria #2, this references the fact that there are two kinds of modern installer packages for macOS:

  • Component packages: these are the standard type of installer package, which contain an archive of files to install and the information on where the files should be installed.
  • Distribution packages: These packages can contain one or more component packages, and may also include additional resources to customize and control the user interface shown in the Installer application.

Both component and distribution packages use the same icon by default, so you can’t tell the difference by visually looking at an installer package. However, you can use the xar command line tool to check inside an installer package and list the files stored inside. The reason why this helps is that all distribution packages will have a file inside named Distribution and component packages will not.

To check an installer package to see if it is a distribution package, use the command shown below:


This file contains bidirectional Unicode text that may be interpreted or compiled differently than what appears below. To review, open the file in an editor that reveals hidden Unicode characters.
Learn more about bidirectional Unicode characters


xar -tf /path/to/pkg_name_goes_here.pkg | grep -o Distribution
view raw

gistfile1.txt

hosted with ❤ by GitHub

If it’s a distribution package, you should get output similar to this:


This file contains bidirectional Unicode text that may be interpreted or compiled differently than what appears below. To review, open the file in an editor that reveals hidden Unicode characters.
Learn more about bidirectional Unicode characters


username@computername ~ % xar -tf /path/to/pkg_name_goes_here.pkg | grep -o Distribution
Distribution
username@computername ~ %
view raw

gistfile1.txt

hosted with ❤ by GitHub

If it’s not a distribution package, you should get output similar to this:


This file contains bidirectional Unicode text that may be interpreted or compiled differently than what appears below. To review, open the file in an editor that reveals hidden Unicode characters.
Learn more about bidirectional Unicode characters


username@computername ~ % xar -tf /path/to/pkg_name_goes_here.pkg | grep -o Distribution
username@computername ~ %
view raw

gistfile1.txt

hosted with ❤ by GitHub

If it is not a distribution package, you can use the productbuild command line tool to convert the installer package into a distribution package. To convert a component installer package to a distribution installer package, use the command shown below:


This file contains bidirectional Unicode text that may be interpreted or compiled differently than what appears below. To review, open the file in an editor that reveals hidden Unicode characters.
Learn more about bidirectional Unicode characters


/usr/bin/productbuild –package /path/to/package_being_converted_to_distribution.pkg /path/to/new_distribution_package.pkg
view raw

gistfile1.txt

hosted with ❤ by GitHub

In this case, package_being_converted_to_distribution.pkg is the name of the package that you want to convert to a distribution package and new_distribution_package.pkg is the name you want to give to the newly-created distribution package.

Note: If converting a signed installer package, the new distribution package will not be signed. If needed, you will need to sign the distribution package following its creation.

Thanks to the folks in the #packaging channel of the Mac Admins Slack who assisted with providing information for this post.

Resolving “Signing Certificate issued by SSO Identity Provider is expiring in 30 days” notifications in Jamf Pro after rotating Entra ID SAML signing certificate

$
0
0

I have a Jamf Pro server which is connected to Microsoft’s Entra ID for its directory service. Recently, I received an email from Microsoft letting me know that the SAML signing certificate for the Entra ID app I was using to provide a connection between Jamf Pro and Entra ID was coming up for expiration in about 30 days.

IMG_4134_1 copy

This certificate is used by Entra ID to sign the SAML tokens being issued to the Entra ID app and by default, this certificate is good for three years. For those interested, Microsoft has a KBase article available with more information about this topic:

Tutorial: Manage certificates for federated single sign-on: https://learn.microsoft.com/en-us/entra/identity/enterprise-apps/tutorial-manage-certificates-for-federated-single-sign-on

The instructions for rotation of this certificate are pretty straightforward and were provided in the email sent to me by Microsoft.

IMG_4135_1 copy

I scheduled the rotation during a planned maintenance downtime and everything appeared fine once the new SAML signing certificate was in place and active.

Screenshot 2023-11-04 at 6.41.27 AM copy

However, when I logged into Jamf Pro following the certificate rotation, I noticed I had a new notification appearing:

Signing Certificate issued by SSO Identity Provider is expiring in 30 days

Since I had just rotated the SAML signing certificate and had verified that the new one (which does not expire in 30 days) was the active one, this message was concerning. After some research, I ran across a Jamf Nation discussion which provided an explanation for the message:

Even though the old SAML signing certificate was now marked as inactive, Jamf Pro was still detecting its presence and reporting (correctly) that it would expire in 30 days.

From there, the solution was straightforward: Delete the inactive SAML signing certificate from Entra ID.

This left only the active SAML signing certificate listed in Entra ID. This certificate has an expiration date greater than 30 days.

Screenshot 2023-11-04 at 7.41.29 AM copy

Once the inactive SAML signing certificate was deleted, Jamf Pro took about twenty minutes to register that fact. After that, the notification message disappeared from Jamf Pro without additional actions needed on my part

Automating setup of a Jamf Pro server on Ubuntu LTS

$
0
0

I recently had a need to set up an on-premise Jamf Pro server for some quick testing. In this case, I needed to set up a Jamf Pro server with the following characteristics:

  1. MySQL 8.x installed on the same server as the Jamf Pro Tomcat software
  2. Jamf Pro set up as a single instance and not clustered. 

To help simplify the process, I went back to some previous work. I had previously written a script for AWS’s Lightsail service which does the following on Ubuntu LTS:

  1. Downloads a Jamf Pro installer from a defined download URL
  2. Installs OpenJDK 11, MySQL 8.x Community Server and other tools
  3. Creates a new MySQL database for Jamf Pro’s use
  4. Installs Jamf Pro
  5. Configures Jamf Pro to use the new MySQL database

I’ve now updated it to do the following on Ubuntu 22.04 LTS:

  1. Downloads the Jamf Pro 11.x installer from a defined download URL
  2. Installs OpenJDK 11, MySQL 8.x Community Server and other tools
  3. Creates a new MySQL database for Jamf Pro’s use
  4. Installs Jamf Pro 11.x
  5. Configures Jamf Pro 11.x to use the new MySQL database

Even though it was written for use with Lightsail, the script should work on any Ubuntu 22.04 LTS install. It’s available via the link below:

https://github.com/rtrouton/aws_lightsail/tree/master/lightsail_jamf_pro_setup/lightsail_jamf_pro_setup_with_mysql_8

How many NTP time servers does macOS support? One

$
0
0

The subject of the blog post reveals the main discussion point of this post, which is that macOS since macOS 10.13.x High Sierra has only supported setting one NTP (Network Time Protocol) server as a way to set the system time in macOS. For more on this, please see below the jump.

Before macOS High Sierra 10.13.x, Apple was using NTP for its network time service via the ntpd service and NTP did support setting multiple time servers on macOS Sierra and earlier. In fact, if you look at Apple’s example profile in YAML format for managing the time server settings, there’s even a comment that you should use commas to separate multiple time servers:

https://github.com/apple/device-management/blob/release/mdm/profiles/com.apple.MCX(TimeServer).yaml#L21

However, the key thing to look at there is when the example profile was first introduced, which was macOS Sierra 10.12.4. At the time of macOS Sierra 10.12.x, the comment was correct because Apple was using NTP to set the system clock via the ntpd service at that point. It became incorrect when Apple introduced the timed service in macOS 10.13.x. So what is timed and how does it relate to why you can only set one NTP time server address?

The timed service is Apple’s own system time service, which among other things addressed Apple’s concerns about the known vulnerabilities in NTP. If we look at the timed man page, it says that it uses technologies like NTP to set the time.

The mention of multiple technologies implies the truth for this matter, that it’s drawing on NTP but it doesn’t only use NTP to set the system clock. The undocumented part at this point is that while you can set multiple NTP servers, the timed service will use the first server set in the list of NTP servers and ignore any others. Because this is undocumented, I can’t point to an authoritative source for this, but there is a way to verify:

1. Set multiple NTP servers on a test Mac.

2. Set time manually to an incorrect time.

3. On the test Mac, block network access to the first server and/or make it impossible to resolve the first server’s DNS address.

4. Reboot the test Mac.

5. Set time from being manually set to automatically set.

6. See if the time sets itself to the correct time.

Expected result: It should not set itself to the correct time.

7. Set time to being manually set.

8. Unblock access to first server

9. Repeat steps 4 through 6 listed above.

Expected result: The time should set itself to the correct time.

Session videos from Jamf Nation User Conference 2023 now available

Viewing all 764 articles
Browse latest View live