Quantcast
Channel: rtrouton – Der Flounder
Viewing all 764 articles
Browse latest View live

Using the macOS High Sierra OS installer’s startosinstall tool to avoid APFS conversion

$
0
0

As part of the upgrade process to macOS High Sierra, Apple has stated that certain drives will be converted from using the HFS+ filesystem to Apple’s new default filesystem, APFS. The conversion criteria is shown below:

Screen shot 2017 09 07 at 5 00 58 pm

For those Mac admins who don’t necessarily want to convert yet, there is a way to configure the macOS High Sierra OS installer to skip the APFS conversion. For more details, please see below the jump.

Apple includes a command line tool named startosinstall as part of the macOS High Sierra OS installer application, inside Install macOS High Sierra.app/Contents/Resources.

Screen Shot 2017 09 26 at 1 19 31 PM

This tool has several options, including a –converttoapfs option which allows control over the APFS conversion process.

To run an automated upgrade to macOS High Sierra, where the APFS conversion is skipped, please run the command shown below with root privileges:

/Applications/Install\ macOS\ High\ Sierra.app/Contents/Resources/startosinstall --applicationpath /Applications/Install\ macOS\ High\ Sierra.app --agreetolicense --converttoapfs NO --nointeraction

Note: The –nointeraction flag is an undocumented option to automate the installation process from the command line without additional requiring actions by the logged-in user.

To show what the process looks like when upgrading from macOS Sierra, please see below for a video.

Note: This video has been edited to artificially reduce the amount of time the upgrade process takes to run. Run time of the pre-edited video was 19 minutes 38 seconds.


Using the macOS High Sierra OS installer’s startosinstall tool to install additional packages as post-upgrade tasks

$
0
0

Starting with macOS 10.12.4, Apple locked down the macOS installer to make it impossible to add non-Apple installer packages directly to the macOS Install .app without using NetInstall. However, there is a way to configure the macOS High Sierra OS installer to install additional packages as a post-upgrade task. For more details, please see below the jump.

Apple includes a command line tool named as part of the macOS High Sierra OS installer application, inside Install macOS High Sierra.app/Contents/Resources.

 Screen Shot 2017 09 26 at 1 19 31 PM

This tool has several options, including a –installpackage option which allows one or more packages stored on the Mac in question to be installed following the upgrade.

Something to be aware of is that if you want to add any additional packages, they must all be signed or unsigned distribution-style flat packages. This is a requirement that Apple first introduced for the OS X Yosemite installer and it still applies to macOS High Sierra. You can convert a component flat package to be a distribution-style flat packages by running the command below:

productbuild –package /path/to/component.pkg /path/to/distribution.pkg

To run an automated upgrade to macOS High Sierra, where two distribution-style flat packages stored in /Users/Shared are installed following the upgrade, please run the command shown below with root privileges:

/Applications/Install\ macOS\ High\ Sierra.app/Contents/Resources/startosinstall --applicationpath /Applications/Install\ macOS\ High\ Sierra.app --agreetolicense --installpackage /Users/Shared/installer_one.pkg --installpackage /Users/Shared/installer_two.pkg --nointeraction

Note: The –nointeraction flag is an undocumented option to automate the installation process from the command line without additional requiring actions by the logged-in user.

To show what the process looks like when upgrading from macOS Sierra, please see below for a video. In this example, I’m installing the latest Office 2016 installer following the upgrade.

Note: The video has been edited to artificially reduce the amount of time the upgrade and post-upgrade installation process takes to run. Run time of the pre-edited video was 32 minutes 57 seconds.


Unlocking or decrypting using an institutional recovery key does not work with encrypted APFS boot drives on macOS High Sierra 10.13.0

$
0
0

As part of Apple’s FileVault 2 encryption, Apple has provided for the use of recovery keys. These keys are a backup method to unlock FileVault 2’s encryption in the event that the usual method of logging using a user’s account password is not available.

There are two main types of recovery keys available:

1. Personal recovery keys (PRK) – These are recovery keys that are automatically generated at the time of encryption. These keys are generated as an alphanumeric string and are unique to the machine being encrypted. In the event that an encrypted Mac is decrypted and then re-encrypted, the existing personal recovery key would be invalidated and a new personal recovery key would be created as part of the encryption process.

Screen Shot 2017 10 10 at 5 24 11 PM

2. Institutional recovery keys (IRK) – These are pre-made recovery keys that can be installed on a system prior to encryption and most often used by a company, school or institution to have one common recovery key that can unlock their managed encrypted systems.

Screen Shot 2017 10 10 at 12 48 16 PM

This recovery key model has continued to be used on Apple File System (APFS), starting with macOS High Sierra 10.13.0, with one important difference:

  • You can encrypt an APFS boot drive using an IRK. 
  • You cannot unlock or decrypt an encrypted APFS boot drive using an IRK.

For more details, see below the jump.

The issue appears to be that a necessary function has not been added to the diskutil command line tool. For FileVault 2 on macOS Sierra and earlier, the command to unlock using an IRK is shown below:

diskutil cs unlockVolume -recoverykeychain /path/to/filename_goes_here.keychain

This command uses diskutil‘s CoreStorage functions, which do not apply to Apple File System. Meanwhile, there is not an equivalent command available for diskutil’s Apple File System’s functions. If there was, it should look something like this:

diskutil apfs unlockVolume -recoverykeychain /path/to/filename_goes_here.keychain

An encrypted volume must be unlocked before it can be decrypted, so without the ability to unlock using an IRK, you cannot decrypt using an IRK.

I’ve opened a ticket with Apple Enterprise support for this issue; hopefully a fix is available in a future OS update.


Resizing a macOS VM’s APFS boot drive to use all available disk space

$
0
0

A while back, I wrote a post on how to resize the boot drive of an existing virtual machine. However, that guidance only applies to a boot drive that uses HFS+ for its filesystem.

Now that Apple File System (APFS) is available and the default file system on macOS High Sierra, a different procedure must be used in order to resize the APFS-formatted boot drive of an existing virtual machine. For more details, see below the jump.

For an APFS boot drive, you need to do two things:

1. Identify the appropriate APFS container:

APFS containers act as storage pools for APFS volumes. APFS volumes are what act as the mounted filesystem, where you store your files, directories, metadata, etc. When you grow the APFS container, the APFS volumes will likewise get additional space.

To identify the container for the boot volume, use the diskutil command shown below:

/usr/sbin/diskutil info / | awk '/Part of Whole/ {print $4}'

Screen Shot 2017 10 18 at 4 42 53 PM

2. Once the appropriate APFS container has been identified, use the diskutil command shown below to resize the container with all available disk space.

Note: You can specify a size of zero (0) to grow the targeted container using all unallocated drive space.

/usr/sbin/diskutil apfs resizeContainer /dev/apfs_container_id_goes_here 0

Screen Shot 2017 10 18 at 5 05 59 PM

In this example, I have a VM where my APFS-formatted boot drive is using 42.7 GBs of space, but the VM disk has 85.9 GBs of available space.

Screen Shot 2017 10 18 at 4 46 55 PM

Screen Shot 2017 10 18 at 4 47 01 PM

Assuming that the command above gave us disk1 as a result, the command shown below can be used to resize the boot drive’s APFS container with all available disk space.

/usr/sbin/diskutil apfs resizeContainer /dev/disk1 0

Screen Shot 2017 10 18 at 4 44 44 PM

Once the container resizing has completed, the OS should now recognize and be able to use the newly-allocated space.

Screen Shot 2017 10 18 at 4 45 32 PM

Screen Shot 2017 10 18 at 4 45 11 PM

I’ve updated an existing script to identify if a boot drive is running HFS+ or APFS, then run the appropriate diskutil commands for that filesystem. It is available below and on my GitHub repo:

https://github.com/rtrouton/rtrouton_scripts/tree/master/rtrouton_scripts/resize_vm_boot_partition

This script is also available as a payload-free package on my GitHub repo, available for download from the payload_free_package directory available from the link above.


Slides from the “APFS and the Jamf Admin” session at Jamf Nation Conference 2017

Decrypting an APFS encrypted volume using diskutil on macOS 10.13.2

$
0
0

Apple has made changes as of macOS 10.13.2 to the way you can turn off APFS encryption when using the diskutil apfs decryptVolume command.

On macOS 10.13.0 and 10.13.1, an APFS encrypted volume could be decrypted using the following procedure:

  1. Identify the relevant encrypted APFS volume
  2. Unlock the encrypted APFS volume
  3. Decrypt the encrypted APFS volume

Once the drive has been unlocked, you could then decrypt the APFS volume using the command shown below:

diskutil apfs decryptVolume /dev/apfs_volume_id_here

As long as you were using root or admin privileges to run the command, no additional authentication was required to decrypt an unlocked encrypted volume.

Screen Shot 2017 11 03 at 11 02 23 PM

However, the diskutil apfs decryptVolume command has been updated on macOS 10.13.2 to require additional authentication:

In order to decrypt using a user account’s password or personal recovery key (PRK), it is necessary to specify the following:

  1. The relevant user UUID
  2. The relevant account password or the PRK.

Note: As of macOS 10.13.2, it is not possible to decrypt an encrypted APFS volume using an institutional recovery key (IRK). You can unlock an encrypted APFS volume using an IRK, but diskutil apfs decryptVolume does not include functionality for using an IRK to authenticate the decryption of an encrypted APFS volume.

For more details, please see below the jump.

If you are planning to use a user account’s password to decrypt, you will first need to correctly identify the relevant encrypted APFS volume and which UUID you want to use.

In this case, we’ll be using the following APFS volume identifier:

/dev/disk1s1

Screen Shot 2017 10 16 at 4 34 25 PM


The other assumption is that the encrypted APFS volume has been unlocked and is ready for decryption.

If you are booted from the encrypted drive, you can get the UUID of a user account by running the command shown below and matching which UUID belongs to the account you want to use.

fdesetup list

Fdesetup list apfs


If you are not booted from the encrypted drive, there is another way to get the UUID by running the command shown below and looking at the entries listed as Local Open Directory User. However, this method will not display the account name and may require some guesswork if there is more than one FileVault enabled account enabled.

diskutil apfs listcryptousers /dev/apfs_volume_id_goes_here

Diskutil apfs listcryptousers dev disk1s1


Once you have access to the UUID and password of one of the enabled accounts on the encrypted APFS volume, you can unlock using the command below. You will be prompted to provide the password:

diskutil apfs decryptVolume /dev/apfs_volume_id_goes_here -user uuid_goes_here

Diskutil apfs decryptVolume dev disk1s1 user account UUID decrypting

If you want to use the PRK, the PRK has its own UUID which only appears if you run the following command:

diskutil apfs listcryptousers /dev/apfs_volume_id_goes_here

In this case, use the UUID associated with the Personal Recovery User entry.

Diskutil apfs listcryptousers dev disk1s1 personal recovery key UUID

If you have access to the PRK associated with the encrypted APFS volume, you can decrypt using the command below. You will need to provide the relevant UUID and the alphanumeric personal recovery key as part of the command.

diskutil apfs decryptVolume /dev/apfs_volume_id_goes_here -user uuid_goes_here -passphrase personal_recovery_key_goes_here

Diskutil apfs decryptVolume dev disk1s1 personal recovery key UUID and passphrase decrypting


To show the process of decrypting an unlocked encrypted APFS volume while using a personal recovery key, please see below for a video:

Setting your Mac to receive macOS beta updates using seedutil

$
0
0

As part of a discussion of how to build test VMs, a colleague mentioned how they were using the seedutil tool to help configure Macs to access Apple’s beta updates. I hadn’t run across this tool before, so I decided to do some research and see if I could make it work for my own testing needs. For more details, see below the jump.

seedutil is available at the following location in macOS 10.13.2:

/System/Library/PrivateFrameworks/Seeding.framework/Versions/A/Resources/seedutil

There is no manpage for it, but if you call the seedutil tool by itself it will display the following options:

Here’s how the following seedutil options work on macOS 10.13.2:

seedutil enroll: Sets up the Mac to use one of three beta update feeds from Apple’s Software Update servers.

CustomerSeedAppleSeed beta OS releases
DeveloperSeedApple Developer Connection beta OS releases
PublicSeedmacOS public beta OS releases

Screen Shot 2018 01 05 at 9 38 22 PM

These feeds are referenced from the following file:

/System/Library/PrivateFrameworks/Seeding.framework/Versions/A/Resources/SeedCatalogs.plist

seedutil unenroll: Removes the current beta feed from the Mac and sets it to use the regular macOS updates.

Screen Shot 2018 01 05 at 10 36 34 PM

seedutil current: Displays information about the beta feed which the Mac is using.

Screen Shot 2018 01 05 at 10 25 10 PM

seedutil fixup: Repairs problems with the currently-enrolled beta feed.

Screen Shot 2018 01 05 at 10 34 36 PM

I was not able to discover what seedutil‘s migrate function does. If any readers know, please let me know in the comments.

If you run seedutil enroll and specify a beta update feed, the next time you run Software Update you should see the latest beta update appear as an available update option.

Screen Shot 2018 01 05 at 10 38 28 PM

Screen Shot 2018 01 05 at 9 36 22 PM

One reason why this tool is particularly interesting to me is that it can be used to install the latest macOS beta software onto an otherwise-unconfigured test Mac or test macOS VM. As an example of this, I’ve written the following script:

I’ve created a payload-free package from the script and then added it to a DeployStudio workflow. This workflow does the following:

1. Allows you to select a drive

Screen Shot 2018 01 05 at 9 34 49 PM

2. Installs the payload-free package, which uses seedutil to configure the Mac to use the selected beta OS feed.

Screen Shot 2018 01 05 at 9 35 27 PM

3. Runs Software Update.

Screen Shot 2018 01 05 at 9 35 35 PM

Once the workflow has completed its run and rebooted, the following actions take place at first boot:

A. The Mac is configured to use the selected beta feed
B. Apple’s softwareupdate tool checks for, downloads and installs all relevant updates, including the latest beta OS updates.
C. Following the installation of all available updates, the Mac restarts.

Screen Shot 2018 01 05 at 9 58 52 PM

At the end of the process, you should have a factory-fresh test Mac or VM which already has the latest macOS beta software installed.

Note: This workflow is not dependent on DeployStudio, the general idea should also be replicable using other tools such as Imagr.

Secure Enclave, Mac SSD hardware encryption and the future of FileVault

$
0
0

The iMac Pro introduced a number of new features, but one that may have been little noticed is the introduction of hardware encryption for the iMac Pro’s SSD storage. Apple references the hardware encryption on the iMac Pro page this way:

T2 also makes iMac Pro even more secure, thanks to a Secure Enclave coprocessor that provides the foundation for new encrypted storage and secure boot capabilities. The data on your SSD is encrypted using dedicated AES hardware with no effect on the SSD’s performance, while keeping the Intel Xeon processor free for your compute tasks.

Screen Shot 2018 01 07 at 9 32 21 PM

This hardware encryption means that, even if FileVault is not enabled, the data stored on the iMac Pro’s SSD storage is encrypted. What’s more, the key to unlock the encryption is stored in the iMac Pro’s Secure Enclave and never leaves the machine. Physically remove the SSD storage from the iMac Pro and you won’t be able to access any data stored on the SSD, even if you have an otherwise identical iMac Pro available.

For those with knowledge of how Apple protects data stored on iOS devices, this should sound familiar. The main difference between the iOS and macOS implementation at this point appears to be that macOS does not have the equivalent passcode lock screen.

Iphone7 ios11 passcode lock screen

Instead, the needed encryption key to unlock the hardware encryption is automatically provided by the Secure Enclave when the iMac Pro boots. This behavior is just like that seen on an iOS device where a passcode has not been enabled.

This is referenced when you run the following command on an iMac Pro:

diskutil apfs list

On an iMac Pro where FileVault is not enabled, FileVault is shown with the following status:

FileVault: No (Encrypted at rest)

Screen Shot 2018 01 07 at 9 28 23 PM

This recognizes that encryption is available, but that the encryption only provides protection when the data is at rest. “Data at rest” in this context should be understood to mean when the Secure Enclave has not provided the needed encryption unlock key, which would be the case in either of the following scenarios:

  1. The iMac Pro is off.
  2. The SSD storage has been removed from the iMac Pro.

For more, please see below the jump.

So what does this hardware encryption mean for FileVault on Apple File System? Is it no longer needed? Will Apple be implementing a passcode lock, like they have on iOS? Will hardware encryption allow FileVault to be enabled in seconds, rather than hours?

I don’t have any inside knowledge, so treat what I’m about to say with the appropriate skepticism. It’s speculation, pure and simple.

That said, I don’t think that Apple will be mapping the iOS passcode experience directly onto macOS. The reason I say that is iOS’s encryption model incorporates an assumption that iOS is not a multi-user OS. That’s where FileVault encryption on Apple File System comes in. It provides the following:

  1. The ability to support multiple user accounts.
  2. An additional encryption layer, providing even more protection for the data stored on the iMac Pro’s SSD storage.

Because of this, I see FileVault on Apple File System staying around for at least the next version of macOS while Apple works out the necessary support for providing an instant-on encryption solution like on iOS, while being able to provide the multiple-user support needed on macOS.

That said, I believe that this transition will be a short one of only one to two years. FileVault on Apple File System will then become a feature needed mostly on Mac hardware which lacks a Secure Enclave. Encryption on Macs equipped with Secure Enclave will change, from something that Mac admins will need to enable and monitor, to something which is Just On and which Just Works.

Hat tip to Tim Perfitt for providing technical assistance with the content in this post. If you’re interested in the iMac Pro’s other changes, please check out Tim’s post on Secure Boot and the iMac Pro.


FileVault recovery key redirection profile changes in macOS High Sierra

$
0
0

For macOS Sierra and earlier, Apple had a dedicated FileVault Recovery Key Redirection profile payload for FileVault recovery key redirection. This profile was designed to work with a mobile device management (MDM) server, to allow the MDM server to act as a recovery key escrow service and store FileVault personal recovery keys.

Screen Shot 2018 01 15 at 12 40 23 PM

Note: Jamf Pro will be used as the example MDM server in this post. However, similar functionality is available in other MDM services.

On macOS High Sierra, this FileVault Recovery Key Redirection profile payload no longer works. In its place, Apple has added new Enable Escrow Personal Recovery Key settings to the FileVault section of the existing Security profile payload.

Screen Shot 2018 01 15 at 12 44 56 PM

Adding the recovery key redirection to the Security payload may cause issues in some environments, as the Security profile payload has other settings which those environments may prefer to manage separately, or not manage at all.

For those who prefer to manage FileVault recovery key redirection separately from the other settings managed by the Security payload, it is possible to create a profile (with some manual editing) which only manages FileVault recovery key redirection. For more details, see below the jump.

The first thing to do is to create a new profile (which should not be assigned to any Macs) and configure the Security profile payload with the desired recovery settings on your MDM server.

Screen Shot 2018 01 15 at 12 44 57 PM

Once the profile is configured as desired, download a copy of the profile to your workstation. After downloading, the profile can be edited to include only those settings which manage the FileVault recovery key redirection. To help with figuring out the appropriate settings, I have a sample profile available below.

Note: As currently set up, the sample profile doesn’t redirect recovery keys. It needs the relevant payload content (specifically the FileVault2Comm.cer certificate payload) from the Security profile created by your own MDM server:

Once the profile has been edited and all settings have been verified:

  1. Upload the profile to your MDM server
  2. Deploy the profile to a test Mac
  3. Rotate the FileVault personal recovery key on the test Mac to verify that redirection is working as desired.

Screen Shot 2018 01 15 at 1 15 58 PM

Screen Shot 2018 01 15 at 1 18 26 PM

To make sure that the MDM server does not try to alter the edited FileVault recovery key redirection profile, I recommend signing the profile.

Screen Shot 2018 01 15 at 1 15 59 PM

Signing the profile encrypts it, which prevents the MDM from changing the profile’s contents. The MDM server can now serve out the redirection profile, but will not be able to edit it or change it in any way.

Oracle Java 9 JDK and JRE installation scripts for macOS

$
0
0

Oracle has started to release Java 9 for macOS, so I’m posting a couple of scripts to download and install the following:

Oracle Java 9 JRE
Oracle Java 9 JDK

Oracle has been releasing two separate versions of Java 8 simultaneously and may do the same for Java 9, so these Java 9-focused scripts are designed to allow the user to set which version they want to install: the CPU release or the PSU release.

The difference between CPU and PSU releases is as follows:

  • Critical Patch Update (CPU): contains both fixes to security vulnerabilities and critical bug fixes.
  • Patch Set Update (PSU): contains all the fixes in the corresponding CPU, plus additional fixes to non-critical problems.

For more details on the differences between CPU and PSU updates, please see the link below:

http://www.oracle.com/technetwork/java/javase/cpu-psu-explained-2331472.html

For more information, please see below the jump.

The scripts are available on GitHub via the links below:

Oracle Java 9 JDK: https://github.com/rtrouton/rtrouton_scripts/tree/master/rtrouton_scripts/install_latest_oracle_java_jdk_9
Oracle Java 9 JRE: https://github.com/rtrouton/rtrouton_scripts/tree/master/rtrouton_scripts/install_latest_oracle_java_jre_9

The scripts are also available as payload-free packages, compressed and stored as .zip files in the payload_free_package directory available via the links above.

Oracle Java 9 JDK script:

The script below will download a disk image containing the latest version of the Java 9 JDK from Oracle and install the JDK using the installer package stored inside the downloaded disk image.

How the script works:

  1. Verifies that the Mac is running a Java 9-compatible operating system
  2. Uses curl to download a disk image containing the latest Java 9 JDK installer from Oracle’s web site
  3. Renames the downloaded disk image to java_nine_jdk.dmg and stores it in the /tmp directory.
  4. Mounts the disk image silently in the /tmp directory. The mounted disk image will not be visible to any logged-in user.
  5. Installs the latest Java 9 JDK using the installer package stored inside the disk image.
  6. After installation, unmounts the disk image and removes it from the Mac in question.

Oracle Java 9 JRE script:

The script below will download a disk image containing the latest version of the Java 9 JRE from Oracle and install the JRE using the installer package stored inside the downloaded disk image.

How the script works:

  1. Verifies that the Mac is running a Java 9-compatible operating system
  2. Uses curl to download a disk image containing the latest Java 9 JRE installer from Oracle’s web site
  3. Renames the downloaded disk image to java_nine_jre.dmg and stores it in the /tmp directory.
  4. Mounts the disk image silently in the /tmp directory. The mounted disk image will not be visible to any logged-in user.
  5. Installs the latest Java 9 JRE using the installer package stored inside the disk image.
  6. After installation, unmounts the disk image and removes it from the Mac in question.

Secure Token and FileVault on Apple File System

$
0
0

As part of Apple File System’s FileVault encryption on mac OS High Sierra, Apple introduced Secure Token. This is a new and undocumented account attribute, which is now required to be added to a user account before that account can be enabled for FileVault on an encrypted Apple File System (APFS) volume. To help make sure that at least one account has a Secure Token attribute associated with it, a Secure Token attribute is automatically added to the first account to log into the OS loginwindow on a particular Mac.

Users and groups preference pane only user gets secure token automatically

Once an account has a Secure Token associated with it, it can then create other accounts which will in turn automatically be granted their own Secure Token.

For the consumer user, this usually takes the following form:

  1. Secure Token is automatically enabled for the user account created by Apple’s Setup Assistant.
  2. The Setup Assistant-created user account with Secure Token then creates other users via the Users & Groups preference pane in System Preferences. Those accounts get their own Secure Token automatically.

However, Active Directory mobile accounts and user accounts created using command line tools do not automatically get Secure Token attributes associated with these accounts. Without the Secure Token attribute, those accounts are not able to be enabled for FileVault.

Filevault preference pane account without secure token cannot manage filevault


Update 1-20-2018: @mikeymikey has pointed out an exception to the rule:


Instead, the sysadminctl utility must be used to grant Secure Token to these accounts as a post-account creation action. In that case, the sysadminctl utility must be run by a user account with the following pre-requisites:

  1. Administrative rights
  2. Secure Token

For more details, please see below the jump.

There are a couple of ways to check from the command line if a particular account has the Secure Token attribute associated with it:

sysadminctl -secureTokenStatus username_goes_here

Note: The sysadminctl utility has multiple ways to provide the needed admin authorization to run. Please see this post for details.

Sysadminctl interactive secureTokenStatus otheruser

Sysadminctl interactive secureTokenStatus username

dscl . -read /Users/username_goes_here AuthenticationAuthority

Dscl authentication authority username account showing secure token

Dscl authentication authority username account showing secure token using grep

You can also check in Directory Utility to see if a Secure Token entry appears under the account’s Authentication Authority attribute.

Directory utility username account showing secure token

Once it’s been verified if an account needs Secure Token, sysadminctl‘s SecureToken functions can be used to add it.

The command shown below should add Secure Token to a specified account

sysadminctl -secureTokenOn username_which_needs_secure_token_goes_here -password password_goes_here

If you want to be prompted for the account’s password, use the command shown below:

 sysadminctl -secureTokenOn username_which_needs_secure_token_goes_here -password -

To see how the process of adding Secure Token to an account which doesn’t have it works, please see the video below. It will go through the following process:

  1. Using sysadminctl to check an account for its Secure Token status
  2. Using sysadminctl to check the logged-in account for its Secure Token status
  3. Using sysadminctl to grant Secure Token to the first account, using the logged-in account’s credentials and Secure Token.
  4. Using sysadminctl to check the first account to verify that Secure Token has been added.

To see how user accounts created in System Preferences’ Users & Groups preference pane automatically get Secure Token when created by an account with Secure Token, please see the video below. It will go through the following process:

1. Creating a new user account in the Users & Groups preference pane
2. Verifying via sysadminctl that the new user account has Secure Token

FileVault management on macOS High Sierra session at Mac Admin & Developer Conference UK 2018

Backing up the contents of an AWS-hosted Jamf Pro cloud distribution point to a local directory

$
0
0

As part of removing unused packages from a Jamf Pro cloud distribution point using @shea_craig‘s Spruce tool, I needed to first make a backup of the contents of the cloud distribution point to a local directory on my Mac. That way, in case I had made an error and deleted the wrong installer package, I had a copy of the package readily available and could re-add the package back to my Jamf Pro server.

The cloud distribution point in question is hosted out in Amazon Web Services’ (AWS) S3 service, so I decided to use AWS’s awscli command line tool‘s S3 functions to run a one-way synchronization process between the cloud distribution point in S3 and my local directory. For more details, please see below the jump.

My first step was installing and configuring the awscli tool. Once I had the awscli tool installed and configured with the appropriate AWS access key, AWS secret key and AWS region, I ran the following command:

aws s3 ls --summarize --human-readable --recursive s3://S3-bucket-name-goes-here/

The aws s3 ls command shown above allows me to do the following:

  1. Verify that I could access the S3 bucket which my Jamf Pro server is using as a cloud distribution point.
  2. List the contents of the bucket
  3. Summarize the total number of objects and total size of all objects in the bucket.

To run the backup, I’m using the following aws s3 sync command:

aws s3 sync --delete s3://S3-bucket-name-goes-here/ /path/to/backup/directory

To help automate the sync process, I’ve written a script which does the following:

  1. If necessary, creates a log file named dp_sync.log and stores it in /var/log/
  2. If necessary, creates the local directory to store the files downloaded from the cloud distribution point.
  3. Performs a one-way synchronization of the cloud distribution point with the local directory, so that the local backup directory only contains the contents of the specified S3 bucket.
  4. Sets all downloaded files to be world-readable.
  5.  Logs all actions to /var/log/dp_sync.log.

The script is also available on GitHub via the link below:

https://github.com/rtrouton/aws_scripts/tree/master/s3_bucket_backup_to_local_directory

Slides from the “Managing FileVault 2 on macOS High Sierra” Session at MacAD UK 2018 Conference

$
0
0

For those who wanted a copy of my FileVault 2 management talk at MacAD UK 2018, here are links to the slides in PDF and Keynote format.

PDF – http://tinyurl.com/MacADUK2018pdf

Keynote – http://tinyurl.com/MacADUK2018key

Hat tip to the attendee who brought to my attention that fdesetup sync is not supported on encrypted APFS boot drives. I’ve now updated the slides to reflect that it works on macOS High Sierra for HFS+ drives only.

HFS+

Screen Shot 2018 02 21 at 12 54 13 PM

APFS

Screen Shot 2018 02 21 at 1 04 16 PM

Using installinstallmacos.py to download macOS High Sierra installers

$
0
0

Starting with macOS Sierra, Apple moved the macOS Installer applications from being exclusively an App Store download to now being included in the regular Software Update catalogs. This means that it’s possible to download macOS installers, including those for macOS betas or hardware-specific macOS builds, using the command-line softwareupdate tool.

To assist with this task, Greg Neagle has written a Python script named installinstallmacos.py. installinstallmacos.py is designed to do the following:

1. Parse a specified Software Update feed.
2. Identify the listed products which appear to be macOS installers.
3. Display a menu of the available choices.

Once you’ve selected from the available options, the script does the following:

4. Creates a disk image and names it with the appropriate information for the specified macOS installer.
5. Mounts the disk image.
6. Downloads all the relevant packages from the Software Update feed for the specified macOS installer.
7. Installs the packages onto the disk image.
8. Unmounts the disk image.
9. Stores the disk image in the current working directory (this is likely going to be the logged-in user’s home folder.)

For more details, please see below the jump.

The script is available from the following location:

https://github.com/munki/macadmin-scripts/blob/master/installinstallmacos.py

Once you have it downloaded, please run the following command with root privileges to display the available options:

/path/to/installinstallmacos.py -h

Screen Shot 2018 02 27 at 4 01 14 PM

You have the ability to use no options, one option, or combine multiple options when running the script. To run the script without any options selected, please run the command shown below with root privileges:

/path/to/installinstallmacos.py

By default, this will use the Software Update catalog specified in the script. As of February 27, 2018, the following macOS installer choices are displayed:

Screen Shot 2018 02 27 at 4 08 26 PM

In this example, I’m selecting option 1 to download the standard macOS Installer application for macOS 10.13.3. Once an option has been selected, the script then runs through the rest of the actions described above and creates a disk image with the macOS Installer application stored in the Applications directory of the disk image.

Screen Shot 2018 02 27 at 4 14 04 PM

Screen Shot 2018 02 27 at 4 14 38 PM

Screen Shot 2018 02 27 at 4 15 13 PM

Note: A content folder owned by root is also created, which was used by the script to store the various downloaded components. If desired, this folder may be discarded once the disk image has been created.

Screen Shot 2018 02 27 at 4 17 53 PM

Screen Shot 2018 02 27 at 4 18 12 PM

Using compression

If it’s desirable to save space, the script includes a –compress option. This option will create a compressed read-only disk image, with only the macOS Installer application stored on the disk image.


Update – 2-27-2018: Greg reached out to let me know that the –compress option’s primary function is to produce a disk image which is compatible with Munki and Imagr.

Both tools expect to find the macOS Installer application at the root level of a read-only disk image. Using the –compress option will allow installinstallmacos.py to generate a compatible disk image.


To use this option, please run the command shown below with root privileges:

/path/to/installinstallmacos.py --compress

In this example, I’m also selecting option 1 to download the standard macOS Installer application for macOS 10.13.3. The script then runs through its actions and creates a compressed disk image with only the macOS Installer application stored inside.

Screen Shot 2018 02 27 at 4 38 59 PM

Screen Shot 2018 02 27 at 4 39 29 PM

Screen Shot 2018 02 27 at 4 40 07 PM

Using a different Software Update catalog

If it’s desirable to use a different Software Update catalog than the one specified in the script, the script includes a –catalogurl option. For example, you can specify the standard software catalog for macOS High Sierra using the URL shown below:

https://swscan.apple.com/content/catalogs/others/index-10.13-10.12-10.11-10.10-10.9-mountainlion-lion-snowleopard-leopard.merged-1.sucatalog

To specify that you wanted to use the Software Update catalog above in place of the one specified in the script, you would run the command shown below with root privileges:

/path/to/installinstallmacos.py --catalogurl https://swscan.apple.com/content/catalogs/others/index-10.13-10.12-10.11-10.10-10.9-mountainlion-lion-snowleopard-leopard.merged-1.sucatalog

Screen Shot 2018 02 27 at 4 43 55 PM

Using a different working directory

If it’s desirable to store the disk image in a specific directory, the script includes a –workdir option. To run the script with a directory specified, please run the command shown below with root privileges:

/path/to/installinstallmacos.py --workdir /path/to/directory_name_goes_here

That will store both the disk image and the content directory in the directory specified in the command.

Screen Shot 2018 02 27 at 4 54 13 PM

Screen Shot 2018 02 27 at 4 55 18 PM


Cancelling an unwanted FileVault deferred enablement

$
0
0

There are sometimes occasions when FileVault deferred encryption has been enabled for a particular Mac and then needs to be turned off. Since FileVault is not yet turned on at this point, there is no obvious way to turn off this deferred enablement.

However, it is possible to turn off a deferred enablement if needed. For more details, please see below the jump.

Detecting if a deferred enablement is active

A. Using the fdesetup command line tool

To check for a deferred enablement using the fdesetup command line tool, run the following command:

fdesetup status

If a deferred enablement is active, it should report this along with identifying the enabled user (if one has been selected.)

Screen Shot 2018 03 11 at 9 18 50 PM

B. Checking for /Library/Preferences/com.apple.fdesetup.plist

When a deferred enablement is active, a com.apple.fdesetup.plist file should be present in /Library/Preferences. This file will identify the path of the plist file which will store the the recovery key information, along with identifying the enabled user (if one has been selected.)


Screen Shot 2018 03 11 at 8 57 15 PM

The contents of the file should appear similar to what is shown below:


Turning off a deferred enablement

To turn off an active deferred enablement, please use the following procedure:

1. Run the following command with root privileges.

fdesetup disable

Note: The fdesetup output will report that FileVault is already off and not mention anything about the deferred enablement.

Screen Shot 2018 03 11 at 9 10 00 PM


2. Reboot the Mac.

3. After the reboot, run the following command:

fdesetup status

It should report the FileVault is off and not include information about a deferred enablement.

Screen Shot 2018 03 11 at 9 18 15 PM

This procedure should also remove the /Library/Preferences/com.apple.fdesetup.plist file. If the com.apple.fdesetup.plist file is still present following the reboot, remove the /Library/Preferences/com.apple.fdesetup.plist file and reboot again.

Screen Shot 2018 03 11 at 8 57 15 PM

Session videos available from MacAD UK Conference 2018

New automated restart option added to macOS 10.13.4’s softwareupdate command line tool

$
0
0

With the release of macOS 10.13.4, Apple has added a new option to the softwareupdate command line tool. As part of the installation options, softwareupdate now includes the option to automatically restart or shutdown (as appropriate) following the installation of updates that need a restart or shutdown to complete properly.

-R | --restart		Automatically restart (or shut down) if required to complete installation.

Screen Shot 2018 03 09 at 4 24 17 PM


As an example, to use the new option to restart if needed after installing all available updates, please run the command shown below with root privileges:

softwareupdate --install --all --restart

In the event that no updates require a restart or shutdown, the Mac is not restarted.

Screen Shot 2018 03 09 at 4 18 59 PM

Detecting user approved MDM using the profiles command line tool on macOS 10.13.4

$
0
0

Starting in macOS 10.13.2, Apple introduced the concept of User Approved MDM Enrollment (UAMDM). UAMDM grants mobile device management (MDM) additional management privileges, beyond what is allowed for macOS MDM enrollments which have not been “user approved”. As of macOS 10.13.4, the only additional management privilege associated with UAMDM is that it allows you to deploy a profile which provides a white list for third-party kernel extensions. However, I would anticipate that this list will grow over time.

Starting in macOS 10.13.4, you can use the profiles command line tool to determine if a machine is enrolled into a MDM, and if user-approved MDM is enabled. To do this, run the command shown below:

profiles status -type enrollment

Depending on your MDM enrollment status, you may see one of the following statuses shown below:

No MDM enrollment

computername:~ username$ profiles status -type enrollment
Enrolled via DEP: No
MDM enrollment: No
computername:~ username$

MDM enrolled, without user-approved MDM enabled

computername:~ username$ profiles status -type enrollment
Enrolled via DEP: No
MDM enrollment: Yes
computername:~ username$

MDM enrolled, with user-approved MDM enabled

computername:~ username$ profiles status -type enrollment
Enrolled via DEP: No
MDM enrollment: Yes (User Approved)
computername:~ username$

DEP Enrolled

computername:~ username$ profiles status -type enrollment
Enrolled via DEP: Yes
MDM enrollment: Yes (User Approved)
computername:~ username$

Note: If your Mac is enrolled in Apple’s Device Enrollment Program (DEP), it automatically gets user-approved MDM.

To help detect if a particular Mac has user-approved MDM enabled, I’ve written a script. For more details, please see below the jump.

The script first checks the OS on a particular Mac and verifies that it is running macOS 10.13.4 or later. If the Mac is running an earlier OS, the script reports the following:

Unable To Detect User-Approved MDM On, followed by the OS version.

If the script verifies that the Mac is running macOS 10.13.4 or later, the script continues on to determine if the Mac has user-approved MDM enabled.

If the Mac has user-approved MDM enabled, the script reports the following:

Yes

If the Mac does not have user-approved MDM enabled, the script reports the following:

No

The script is available below, and at the following address on GitHub:

https://github.com/rtrouton/rtrouton_scripts/tree/master/rtrouton_scripts/detect_user-approved_mdm

A complementary Jamf Pro Extension Attribute is available at the following address on GitHub:

https://github.com/rtrouton/rtrouton_scripts/tree/master/rtrouton_scripts/Casper_Extension_Attributes/detect_user-approved_mdm

User-initiated computer enrollment now using MDM profile enrollment in Jamf Pro 10.3

$
0
0

One of the changes introduced in Jamf Pro 10.3 is that user-initiated computer enrollment now has two modes:

  • macOS High Sierra: Uses an MDM profile to enroll the Mac, with the Jamf Pro agent being installed once MDM enrollment is complete.
  • macOS Sierra and earlier: Uses a QuickAdd installer package to enroll the Mac, with MDM enrollment and installation of the Jamf Pro agent being handled by the QuickAdd package.

Why the difference?

Using the MDM enrollment method on macOS High Sierra will automatically enable User Approved MDM, which is necessary for full management privileges on the Mac in question. The reason is that since the user is installing the MDM profile, the user is also logically approving the MDM management and satisfying Apple’s conditions for enabling User Approved MDM.

For more details, please see below the jump.

The installation of the MDM profile can be configured two ways:

  1. The installation of a CA certificate, followed by an MDM profile
  2. The installation of the MDM profile only.

The difference between the two depends on if your Jamf Pro server is using a trusted third-party SSL certificate, either directly on your Jamf Pro server or on a load balancer which is handling SSL termination for the Jamf Pro server.

If one of the two conditions mentioned above applies, where your Jamf Pro server is using a trusted third-party SSL certificate, you can set the CA certificate installation to be skipped using the following procedure:

1. Log into your Jamf Pro server using an account with administrator privileges.
2. Go to the management settings
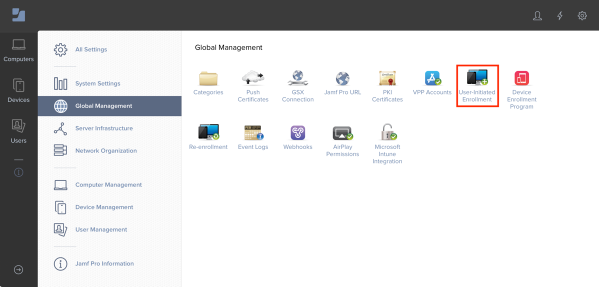
3. Click on Global Management
4. Select User-Initiated Enrollment

Screen Shot 2018 03 29 at 6 56 42 PM

5. Check the Skip certificate installation during enrollment checkbox.

Screen Shot 2018 03 29 at 6 57 45 PM

If you’re not sure, leave the Skip certificate installation during enrollment checkbox unchecked. This will allow the installation of the CA certificate before the installation of the MDM profile.

Screen Shot 2018 03 29 at 6 57 42 PM

Enrolling by installing a CA certificate, followed by an MDM profile

Pre-requisites

  • macOS 10.13.0 or later

1. Go to https://server.name.here:8443/enroll
2. Enter your username and password, then click the Login button.

Screen Shot 2018 03 29 at 7 08 11 PM

3. Click the Enroll button.

Screen Shot 2018 03 29 at 7 09 15 PM

4. When notified that you’ll need to install the CA certificate, click the Continue button.

Screen Shot 2018 03 29 at 7 09 50 PM

5. When prompted to install the CA certificate, click the Continue button.

Screen Shot 2018 03 29 at 7 10 28 PM

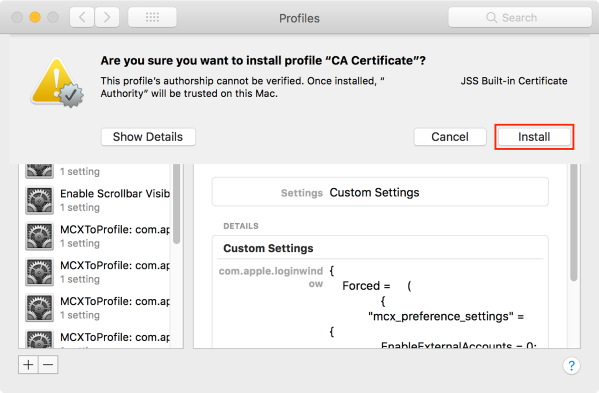
6. When asked to verify that you want to install the CA certificate, click the Install button.

Screen Shot 2018 03 29 at 7 12 18 PM

A new CA Certificate profile should now appear in the User Profiles section of the Profiles preference pane.

Screen Shot 2018 03 29 at 7 12 35 PM

7. When prompted to enroll the MDM profile, click the Continue button.

Screen Shot 2018 03 29 at 7 12 49 PM

8. When prompted to install the Profile Service Enrollment profile, click the Install button.

Screen Shot 2018 03 29 at 7 13 08 PM

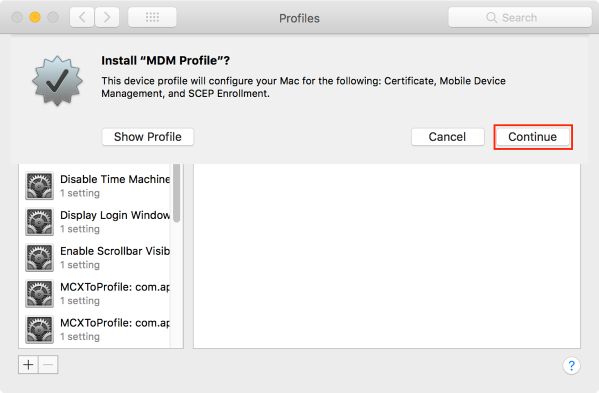
9. When prompted to configure your Mac using a certificate, mobile device management and SCEP enrollment, click the Continue button.

Screen Shot 2018 03 29 at 7 13 26 PM

10. When prompted to enroll the MDM profile, click the Install button.

Screen Shot 2018 03 29 at 7 13 41 PM

11. When prompted for admin credentials, provide the username and password of a user with admin credentials.

Screen Shot 2018 03 29 at 7 14 05 PM

The profile will install and should appear as verified.

Screen Shot 2018 03 29 at 7 14 06 PM

Screen Shot 2018 03 29 at 7 14 07 PM

The enrollment page should report that enrollment is complete.

Screen Shot 2018 03 29 at 7 14 08 PM

Enrolling by installing an MDM profile

Pre-requisites

  • macOS 10.13.0 or later

1. Go to https://server.name.here:8443/enroll
2. Enter your username and password, then click the Login button.

Screen Shot 2018 03 29 at 7 08 11 PM

3. Click the Enroll button.

Screen Shot 2018 03 29 at 7 09 15 PM

4. When prompted to enroll the MDM profile, click the Continue button.

Screen Shot 2018 03 31 at 4 53 29 PM

5. When prompted to install the Profile Service Enrollment profile, click the Install button.

Screen Shot 2018 03 31 at 4 53 37 PM

6. When prompted to configure your Mac using a certificate, mobile device management and SCEP enrollment, click the Continue button.

Screen Shot 2018 03 31 at 4 53 55 PM

7. When prompted to enroll the MDM profile, click the Install button.

Screen Shot 2018 03 31 at 4 54 21 PM

8. When prompted for admin credentials, provide the username and password of a user with admin credentials.

Screen Shot 2018 03 29 at 7 14 05 PM

The profile will install and should appear as verified.

Screen Shot 2018 03 29 at 7 14 06 PM

Screen Shot 2018 03 29 at 7 14 07 PM

The enrollment page should report that enrollment is complete.

Screen Shot 2018 03 29 at 7 14 08 PM

Viewing all 764 articles
Browse latest View live