Quantcast
Channel: rtrouton – Der Flounder
Viewing all 764 articles
Browse latest View live

Mac Admin & Developer Conference UK


Mining OS X for Apple’s artwork

$
0
0

When building a presentation in Keynote, I often use Apple’s icons and other images included in OS X to illustrate my slides. This is because Apple’s already done a lot of work creating high-res images for OS X and it’s often helpful to use Apple’s own artwork when illustrating how something works. However, this artwork can also be hard to find as it can be buried deep within applications and other resource files. To help me get this artwork all together in one place, I’ve developed a script to search OS X for icons and other relevant images in various file formats, copy them when found, then organize the copied artwork. For more information, see below the jump.

The artwork I’m looking for is usually stored in the following two locations:

/Applications
/System/Library

It’s also usually in the following file formats:

icns
pdf
png

With this in mind, I’ve developed the following script to search /Applications and /System/Library for icns, pdf and png files and copy them to a folder in /tmp.

Since it’s designed to dig around inside the /System directory, I recommend running this script without root privileges to avoid any potential issues. The vast majority of Apple’s artwork is available in locations where all user accounts have at least read-only access, so it should be able to do its work without needing root privileges.

Once the script has completed its run, it will notify you and display the location of the folder in /tmp with the copied artwork.

Screen Shot 2015 07 28 at 5 09 19 PM

The folder in /tmp will have the files sorted by file type, then by the location (Applications or System) from which the images were copied.

Screen Shot 2015 07 28 at 5 11 38 PM

Screen Shot 2015 07 28 at 5 12 22 PM

For those interested, the script is available on my GitHub repo:

https://github.com/rtrouton/rtrouton_scripts/tree/master/rtrouton_scripts/artwork_copy


Updated CasperCheck now available

$
0
0

JAMF announced today that, due to changes that are coming in OS X 10.11, Casper’s jamf binary will be moving its location in a future release of Casper. For those not familiar with Casper, the jamf binary is the agent software which Casper installs on Macs in order to manage them.

Current location:

/usr/sbin/jamf

Future location:

/usr/local/jamf

From today’s announcement, it also appears that the jamf binary will not be moving on all versions of OS X:

Mac OS X 10.5.x – 10.6: The jamf binary will be staying in /usr/sbin/
Mac OS X 10.7.x and later: The jamf binary will be moving to /usr/local

Now that this information is public, I’m releasing an update to CasperCheck that should be able to handle checking for the Casper agent in both its current and its future locations. For more information, see below the jump.

The change is a new function in CasperCheck named CheckBinary, which will first try to locate the current location of the jamf binary by running the following command:

/usr/bin/which jamf

If the jamf binary can’t be located that way, both /usr/sbin and /usr/local are checked to see if the jamf binary is located in either of those directories.

The updated script is available below. It is also available on CasperCheck’s GitHub repo:

https://github.com/rtrouton/CasperCheck


Gatekeeper automatically re-enables after 30 days on Yosemite and later

$
0
0

On OS X 10.10.x and later, disabling Gatekeeper does not mean it is permanently off. After a set amount of time (currently 30 days), Gatekeeper will automatically re-enable itself with the Allow apps downloaded from: Mac App Store and identified developers setting.

Screen Shot 2015 07 31 at 4 49 06 AM

I was able to track down which part of the OS this was coming from and it looks like it’s defined as part of syspolicyd:

https://github.com/aosm/security_systemkeychain/blob/master/syspolicyd/syspolicyd.cpp#L295-L310

Screen Shot 2015 07 31 at 7 00 01 AM


After doing some research, it looks like Gatekeeper’s automatic re-enablement function can be disabled by running the following command with root privileges:

defaults write /Library/Preferences/com.apple.security GKAutoRearm -bool false

This would allow Gatekeeper to be set to Allow apps downloaded from: Anywhere and have it stay that way.

Screen Shot 2015 07 31 at 4 48 58 AM


For those who want to set this with a management profile, I’ve created a .mobileconfig file and posted it here on Github:

https://github.com/rtrouton/profiles/tree/master/DisableGatekeeperAutomaticReenablement


Update – 7-31-2015: My colleague Tom Burgin points out that this may not be manageable via a profile after all, due to the way Apple has set the value that it’s reading:

If a management profile isn’t being respected, the defaults command listed above is the way to apply this to machines.

I’ve filed a bug report about this. For those interested in duping this bug, the bug report ID is 22094327. I’ve also cross-posted it to OpenRadar:

https://openradar.appspot.com/22094327


Recovering Automator workflows from Automator applications

$
0
0

Every so often, source code for an application gets lost, mislaid or not given to a customer. In that case, the application’s user may need to do a lot of work to decompile the application and see if the source code can be recovered from the application itself.

I recently had a colleague ask about a similar situation with an Automator application, where they had the Automator application itself but didn’t have access to the Automator workflow that created it.

After some testing, here’s how we were able to access the workflow using only the compiled application.

1. Save a copy of the Automator application to a convenient location.

Screen Shot 2015 08 01 at 8 16 21 AM

2. Right-click on the application and select Show Package Contents.

Screen Shot 2015 08 01 at 8 16 47 AM

3. Save a copy of Contents/document.wflow to a convenient location.

Screen Shot 2015 08 01 at 8 17 00 AM

4. Rename document.wflow to preferred_file_name_here.workflow.

5. When prompted, confirm that you want to change the extension from .wkflow to .workflow.

Screen Shot 2015 08 01 at 8 17 28 AM

At this point, you should be able to open the newly-renamed .workflow document in Automator and examine the workflow.

Screen Shot 2015 08 01 at 8 17 42 AM


Screen Shot 2015 08 01 at 8 17 56 AM

Update 8-1-2015: Steve Hayman pointed out that there’s an even easier way. For details, see below the jump.

Anthony Reimer concurred:


Creating an Office 2016 15.12.3 installer

$
0
0

One of the issues I worked on this week was building a new Office 2016 installer after Microsoft began making Office 2016 available to its volume license customers. I have an existing process to build a combined Office 2011 installer using Packages, which I’ve used successfully for a while, so I decided to see if I could apply the same process to building an Office 2016 installer.

However, when I installed the combined Office 2016 installer with DeployStudio, then logged in, I was asked to sign into an account and activate Office. Since my work has a volume license, this isn’t a screen I should be seeing.

Screen Shot 2015 08 05 at 2 50 18 PM

This is a problem that I’ve seen before with previous Microsoft Office 2011 installers and usually involves the license file not being applied when it should be. This behavior is seen on Macs in the following cases:

  1. Office 2016 is installed and then updated to 15.12.3 while nobody is logged in
  2. Office 2016 is installed and then updated to 15.12.3 without any Office applications being launched between the initial installation and the update.

These two scenarios will likely apply if you’re building a new machine using an automated deployment tool, but likely will not if you’re a home user.

The easiest fix I’ve found in my testing is to get the necessary volume license file from a machine that has Office 2016 installed on it and put it back on an as-needed basis.

The needed file is /Library/Preferences/com.microsoft.office.licensingV2.plist. If you have a volume-licensed version of Office 2016 installed on your Mac, you should have this file.

Screen Shot 2015 08 05 at 2 49 40 PM

To address this issue, you can use Packages‘ ability to add resources to a Packages-built package. See below the jump for an example using an Office 2016 volume licensed installer package, the Office 2016 15.12.3 updates for Excel, OneNote, Outlook, PowerPoint, and Word, as well the com.microsoft.office.licensingV2.plist license file to build a unified Office 2016 15.12.3 installer package that does not prompt for a product key.

1. Set up a new Packages project and select Raw Package.

Screen Shot 2015 08 05 at 2 35 33 PM

2. In this case, I’m naming the project Microsoft Office 2016 15.12.3

Screen Shot 2015 08 05 at 2 35 45 PM

3. Once the Packages project opens, click on the Project tab. You’ll want to make sure that the your information is correctly set here (if you don’t know what to put in, check the Help menu for the Packages User Guide. The information you need is in Chapter 4Configuring a project.)

In this example, I’m not changing any of the options from what is set by default.

Screen Shot 2015 08 05 at 2 35 57 PM

4. Next, click on the Settings tab. In the case of my project, I want to install with root privileges and not require a logout, restart or shutdown.

To accomplish this, I’m choosing the following options in the Settings section:

  • In the Post-Installation Behavior section, set On Success: to Do Nothing
  • In the Options section, check the box for Require admin password for installation

Screen Shot 2015 08 05 at 2 36 04 PM

5. Click on the Scripts tab in your Packages project.

Screen Shot 2015 08 05 at 3 25 38 PM

6. Select your installers and drag them into the Additional Resources section of your Packages project.

In the case of my example, I’m selecting the following installers:

  • Microsoft_Office_2016_15_11_2_Volume_Installer.pkg
  • Microsoft_Excel_15.12.3_Updater.pkg
  • Microsoft_OneNote_15.12.3_Updater.pkg
  • Microsoft_Outlook_15.12.3_Updater.pkg
  • Microsoft_PowerPoint_15.12.3_Updater.pkg
  • Microsoft_Word_15.12.3_Updater.pkg

Screen Shot 2015 08 05 at 2 52 51 PM

7. Select the com.microsoft.office.licensingV2.plist file and drag it into the Additional Resources section of your Packages project.

Screen Shot 2015 08 05 at 2 53 26 PM

8. The last piece is telling the installers to run and for the com.microsoft.office.licensingV2.plist file to be fixed as needed. For this, you’ll need a postinstall script. Here’s the one I’m using:

Notice that $install_dir in the postinstall script refers to the path to the package’s working directory. That’s where Packages will be storing the installers along with the com.microsoft.office.licensingV2.plist file, inside the Package-built installer’s embedded directory where it stores the items defined in the Additional Resources section.

The -target value is defined as “$3″ because some information is passed along by the Packages-built installer to its included scripts when those scripts are run by the installation process. (For more information, see the PackageMaker How-To available here and search on the page for $3)

In this case, -target being defined as “$3″ means that the postinstall script will install the two Office 2016 packages onto the desired drive. The $3 variable will also allow the installer to correctly determine if the com.microsoft.office.licensingV2.plist license file is in the right place on the target drive and take appropriate action if it isn’t.

The script also governs what order the installers run in, so the main Office 2016 installer runs first and the updates run next after the first job finishes. The -dumplog and -verbose flags are to help you track the progress of installation if you’re looking at the installer log.

9. Once you’ve got the postinstall script built, run the following command to make the script executable:

sudo chmod a+x /path/to/postinstall

10. Once completed, add the postinstall script to your Packages project.

Screen Shot 2015 08 05 at 2 53 26 PM

11. Last step, go ahead and build the package. (If you don’t know to build, check the Help menu for the Packages User Guide. The information you need is in Chapter 3Creating a raw package project and Chapter 10Building a project.)


Testing

Once you have the package built, you should be able to test it by installing it on a machine while the machine is logged out. Once installed, Office 2016 15.12.3 should be properly licensed and not prompt you for a product key.


Modifying Oracle’s Java SDK to run Java applications on OS X

$
0
0

As part of releasing the developer betas for OS X 10.11, Apple announced that El Capitan would be the end of the line for the Java 6 runtime and tools provided by Apple, with the clear statement that developers should be moving on to Oracle’s Java tools.

To completely replace Apple’s Java 6 tools, Oracle’s Java JDK (Java SE Development Kit) will need to be installed. This is because the Oracle Java JRE (Java Runtime Environment) on OS X is a browser plug-in for running Java via a web browser and does not include capabilities for running Java desktop apps or command line tools.

By default though, the Oracle JDK does not set several options to advertise the capabilities provided by the JDK to Java apps, which may cause applications that need those capabilities to fail to launch. The capabilities are actually present in the JDK, but those options need to be set before applications will recognize them as available.

To fix this, we need to add the following options to Oracle’s Java JDK:

  • BundledApp
  • JNI

 In turn, enabling these options means they need to be added to the list of JVMCapabilities stored in the following plist file:

/Library/Java/JavaVirtualMachines/jdk_version_info_goes_here.jdk/Contents/Info.plist

Screen Shot 2015 08 08 at 7 39 19 AM

For more details, see below the jump.

Michael Lynn has developed a Python script for adding the necessary BundledApp and JNI options to the Info.plist file referenced above.

When this script is run, it will update all of the Java JDKs stored in /Library/Java/JavaVirtualMachines with the required options.

Before

Screen Shot 2015 08 08 at 7 40 33 AM


After

Screen Shot 2015 08 08 at 7 42 57 AM


Once the BundledApp and JNI options are added, Java applications should be able to start using the JDK’s capabilities in order to launch and run. In my own case, I verified this by running ImageJ, an open-source Java-based image processing program, on a machine where Oracle’s Java 1.8.0_51 (also known as Java 8 Update 51) JDK has been installed and updated with the BundledApp and JNI options referenced above.

Screen Shot 2015 08 08 at 7 50 09 AM


Screen Shot 2015 08 08 at 7 50 31 AM

I’ve posted Michael’s script to my GitHub repo at the following address:

https://github.com/rtrouton/rtrouton_scripts/tree/master/rtrouton_scripts/update_oracle_java_jdk_jvmcapabilities

This script is also available as a payload-free installer package, stored as a .zip file in the payload_free_installer directory.


FileVault 2 on Yosemite is now FIPS 140-2 Compliant

$
0
0

Apple announced on Saturday, August 8th that the FIPS 140-2 validations for the cryptographic modules used by iOS 8 and OS X 10.10.x have now been completed. This is significant news for folks who want to use FileVault 2 in government and regulated industries (such as financial and health-care institutions.)

For folks who haven’t heard of it before, FIPS 140-2 is an information technology security accreditation program run jointly by the US and Canadian governments. This program is used by private sector vendors to have their cryptographic modules certified for use in US and Canadian government departments and private industries with regulatory requirements for security.

As part of the announcement, Apple has released KBase articles and guidance for security offices who deal with encryption:

OS X Yosemite: Apple FIPS Cryptographic Modules v5.0http://support.apple.com/kb/HT205017

Crypto Officer Role Guide for FIPS 140-2 Compliance OS X Yosemite v10.10https://support.apple.com/library/APPLE/APPLECARE_ALLGEOS/HT205017/APPLEFIPS_GUIDE_CO_OSX10.10.pdf

According to Apple, the OS X Yosemite Cryptographic Modules, Apple OS X CoreCrypto Module v5.0 and Apple OS X CoreCrypto Kernel Module v5.0, require no setup or configuration to be in “FIPS Mode” for FIPS 140-2 compliance on devices running OS X Yosemite v10.10.

FileVault 2 is listed as being FIPS 140-2 Compliant as part of the Crypto Officer Role Guide for FIPS 140-2 Compliance OS X Yosemite v10.10 documentation, in the Compliant Applications and Services section.

Screen Shot 2015 08 11 at 11 13 21 AM

For more information about the validation certification, please see below the jump.

iOS 8

Module Name: Apple iOS CoreCrypto Module, v5.0
Certificate #2396: http://csrc.nist.gov/groups/STM/cmvp/documents/140-1/1401val2015.htm#2396
Security Policy: http://csrc.nist.gov/groups/STM/cmvp/documents/140-1/140sp/140sp2396.pdf

Module Name: Apple iOS CoreCrypto Kernel Module, v5.0
Certificate #2407: http://csrc.nist.gov/groups/STM/cmvp/documents/140-1/1401val2015.htm#2407
Security Policy: http://csrc.nist.gov/groups/STM/cmvp/documents/140-1/140sp/140sp2407.pdf


OS X Yosemite v10.10

Module Name: Apple OS X CoreCrypto Module, v5.0
Certificate #2408: http://csrc.nist.gov/groups/STM/cmvp/documents/140-1/1401val2015.htm#2408
Security Policy: http://csrc.nist.gov/groups/STM/cmvp/documents/140-1/140sp/140sp2408.pdf

Module Name: Apple OS X CoreCrypto Kernel Module, v5.0
Certificate #2411: http://csrc.nist.gov/groups/STM/cmvp/documents/140-1/1401val2015.htm#2411
Security Policy: http://csrc.nist.gov/groups/STM/cmvp/documents/140-1/140sp/140sp2411.pdf


Session videos now available from Penn State MacAdmins Conference 2015

$
0
0

The good folks at Penn State have begun posting the session videos from the Penn State MacAdmins Conference 2015. The sessions slides and currently available videos are all accessible from the Penn State MacAdmins’ Resources page at the link below:

http://macadmins.psu.edu/conference/resources/

As the session videos are being posted to YouTube, I’ve linked my Virtualization and OS X Testing session here:

The Take Vacations Using this One Weird Trick – Documentation! session I co-hosted with Vanessa White is linked here:


Using QuickRadar to file bug reports with Apple

$
0
0

I’ve started filing bug reports with Apple using a handy tool named QuickRadar. It helps streamline the process by filing bug reports via a native app on my Mac, rather than having to go through this process:

  1. Open a web browser.
  2. Go through the process of signing into bugreport.apple.com
  3. File a bug report using Apple’s bug reporting web interface

QuickRadar also makes it easy to cross-post the submission of a bug report to OpenRadar. Since bugreport.apple.com is not publicly searchable and only allows developers to see their own bugs, OpenRadar is a way for developers to share their own bug reports and keep both themselves and their colleagues up-to-date on the status of various bugs filed with Apple. For more details, see below the jump.

To get started with QuickRadar:

1. Download a copy of the QuickRadar drag-and-drop application and copy it somewhere convenient.

Screen Shot 2015 08 26 at 1 34 24 PM


2. Launch QuickRadar.You should see a new icon appear in your menubar.

Screen Shot 2015 08 26 at 1 36 11 PM


3. Click on the menubar icon and select Preferences…

Screen Shot 2015 08 26 at 1 38 04 PM


4. In the Preferences window, select Apple Radar

Screen Shot 2015 08 26 at 1 38 34 PM


5. In the Apple Radar preferences, enter the Apple ID username and password that you normally use to sign into bugreport.apple.com.

Screen Shot 2015 08 26 at 1 39 03 PM


6. Close out of Preferences.

7. Select New Radar…

Screen Shot 2015 08 26 at 1 39 27 PM


8. A New Radar window will open.

9. Enter your bug report. Once complete, click the Submit button.

Screen Shot 2015 08 26 at 1 39 59 PM

10. QuickRadar will file the bug report with bugreport.apple.com.

You may also want to make application settings adjustments in the Settings section of Preferences, or register an OpenRadar or social media account, but that’s up to you.

Screen Shot 2015 08 26 at 1 38 35 PM

Screen Shot 2015 08 26 at 1 38 37 PM

Screen Shot 2015 08 26 at 1 38 40 PM

Screen Shot 2015 08 26 at 1 38 42 PM


If an OpenRadar account is registered, a new Send to Open Radar checkbox will appear in the New Radar window.

Screen Shot 2015 08 26 at 2 15 55 PM


When checked, your bug report will be submitted to bugreport.apple.com and cross-posted to OpenRadar.

Among QuickRadar‘s more awesome features is how easy it makes the process of filing a duplicate bug report. For folks not familiar with how Apple’s bug reporting works, the idea of deliberately filing a bug report that duplicates someone else’s bug report may seem redundant. It’s reporting the same problem, right? Doesn’t Apple already have that information?

Yes, they do but Apple also uses duplicate bug reports as a way to judge how many folks are impacted by a particular issue and can use that information when assigning resources to fix it. A million people reporting a particular problem via duplicate bug reports gives Apple information about that problem’s scope that they wouldn’t necessarily have if they just had one person reporting the problem. A duplicate bug report may also include new information about the problem which wasn’t captured in the initial bug report.

To help streamline the process of duplicating an already-submitted bug, QuickRadar includes a File a Duplicate… function:


1. Click on the menubar icon and select File a Duplicate…

Screen Shot 2015 08 26 at 1 39 35 PM


2. A File a Duplicate dialog window will appear

Screen Shot 2015 08 26 at 1 40 29 PM


3. Enter the ID number of the bug report that you want to duplicate.

Screen Shot 2015 08 26 at 1 41 11 PM


4. A New Radar window will open with the contents of the original bug report. The body of the bug report will also include information that it is a duplicate bug report and reference the original bug report ID.

Screen Shot 2015 08 26 at 1 41 23 PM


5. If desired, add additional information. Once complete, click the Submit button.

6. QuickRadar will file the duplicate bug report with bugreport.apple.com.


Creating a VMware ESXi-hosted VM using VMware Fusion 8.x

$
0
0

A new feature in VMware Fusion 8 Professional is the ability to create a new VM on an ESXi 6.x server. This new functionality gives Fusion users on OS X another tool for managing VMs on VMware’s ESXi hypervisor and complements the ability to copy VMs between VMware Fusion and VMware ESXi 5.5.x and 6.x.

There are a few things to know about if you want to create an OS X VM to an ESXi server running 6.x, so I’ve put together a procedure for those who want to leverage Fusion 8.x Pro to create new OS X VMs on ESXi. See below the jump for the details.

There are two issues to be aware of when creating VMs on ESXi 6.x using VMware Fusion 8.x:

  • As of August 27th 2015, ESXi 6.x supports up to VMware’s Hardware Version 11
  • In VMware Fusion 8.0, the new VM’s network interface may not be created correctly

Pre-requisites

  • VMware Fusion 8.x Professional
  • A fully-updated ESXi 6.x server running on Apple hardware. As of August 27th 2015, the latest version should be ESXi 6.0.0b (ESXi600-201507001).

1. Open VMware Fusion 8 Professional

2. Under the File menu, select New…

Screen Shot 2015 08 27 at 8 43 53 AM


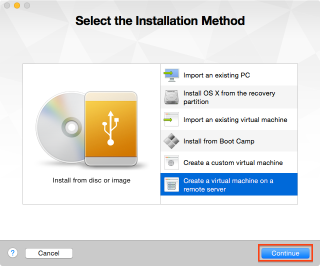
3. The Create a New Virtual Machine window will appear.

Screen Shot 2015 08 27 at 12 49 34 PM


4. Select Create a virtual machine on a remote server and click the Continue button.

Screen Shot 2015 08 27 at 8 44 02 AM


5. The Choose a Server window will appear.

If you’ve connected to this ESXi server previously

Select the server from the list in the Choose a Server window and click the Continue button.

Screen Shot 2015 08 27 at 10 24 10 AM


Enter your credentials when prompted and click on the Connect button

Screen Shot 2015 08 27 at 10 24 27 AM


If you have not connected to this ESXi server previously

Click the Connect to another server… button

Screen Shot 2015 08 27 at 8 44 45 AM


Enter the server name and your credentials when prompted and click on the Connect button

Screen Shot 2015 08 27 at 8 45 24 AM


6. Once you’ve connected to the ESXi server, click the Create a new virtual machine button

Screen Shot 2015 08 27 at 8 46 35 AM


7. Select the ESXi server and datastore from the Choose a Host and Datastore window and click the Continue button.

Screen Shot 2015 08 27 at 8 47 16 AM

Screen Shot 2015 08 27 at 8 47 23 AM


8. Select a hardware version from the Choose a Hardware Version drop-down menu and click the Continue button.

Screen Shot 2015 08 27 at 8 47 36 AM


9. Select the guest operating system for the virtual machine and click the Continue button.

Screen Shot 2015 08 27 at 8 47 42 AM


In this case, I’m selecting OS X 10.10.x

Screen Shot 2015 08 27 at 8 47 46 AM


10. Configure the virtual disk by creating a new virtual disk or use an existing virtual disk. If you create a new virtual disk, use the disk size slider to specify the size of the virtual disk and specify the bus type.

Screen Shot 2015 08 27 at 8 48 43 AM


In this case, I’m selecting to create a new disk and specifying SATA for the bus type.

Screen Shot 2015 08 27 at 8 48 53 AM


11. Once your choices are complete, click the Continue button.

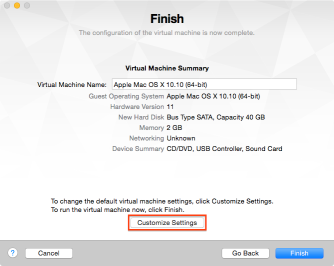
12. The Finish window displays.

At this point, the VM should be ready to go. However, as mentioned earlier, there may be an issue with the VM’s network interface not being created correctly.

You should be able to check for this from the Finish window by checking the Networking entry. If it says Unknown, that means that the VM’s network interface did not get created correctly.

Screen Shot 2015 08 27 at 8 49 00 AM


To fix this, please follow the procedure described below.

1. In the Finish window, click the Customize Settings button

Screen Shot 2015 08 27 at 8 49 01 AM


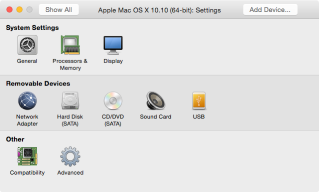
2. In the VM settings, select Network Adapter

Screen Shot 2015 08 27 at 8 49 14 AM


3. In the Network Adapter settings, click the Remove Network Adapter button

Screen Shot 2015 08 27 at 8 49 20 AM


4. Confirm that you want to delete the existing network adapter by clicking the Remove button.

Screen Shot 2015 08 27 at 8 49 29 AM


5. Verify that Network Adapter no longer appears in the VM settings, then click the Add Device… button

Screen Shot 2015 08 27 at 8 49 37 AM


6. In the Add Device window, select Network Adapter

Screen Shot 2015 08 27 at 8 49 43 AM


7. Once Network Adapter has been selected, click the Add… button.

Screen Shot 2015 08 27 at 8 49 48 AM


8. In the VM settings, verify that Network Adapter has been added.

Screen Shot 2015 08 27 at 8 50 01 AM


9. Select Network Adapter in the VM settings.

10. In the Network Adapter settings, click the Generate button to create a new MAC address for the network adapter.

Screen Shot 2015 08 27 at 8 50 06 AM


11. Verify that a MAC address is now being displayed in the MAC Address: entry.

Screen Shot 2015 08 27 at 8 50 13 AM

At this point, you may also want to make other changes to the VM settings like increasing memory or adding processors, but that’s up to you.

Screen Shot 2015 08 27 at 8 50 00 AM


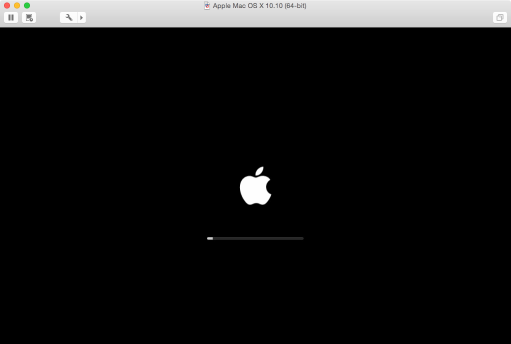
Once all changes have been completed, you should be able to boot the VM.

Screen Shot 2015 08 27 at 8 51 12 AM


NetBooting and System Integrity Protection

$
0
0

Apple took an unusual step this week and released a knowledgebase (KBase) article that refers to an as-yet unreleased operating system:

Prepare for NetBoot, NetInstall, and NetRestore requirements in OS X El Capitan

I can only praise the decision to create it. The content covered affects a number of enterprise Mac environments and gives the Mac admins who support those environments time to prepare for an important change which may affect them.

That said, the KBase article itself is confusingly written and also includes an error. For more details, see below the jump.

In El Capitan, System Integrity Protection (SIP) affects the bless command’s ability to set alternate boot disks, including the ability to designate a NetBoot set as a startup drive.

To help folks who need to use bless to set a NetBoot set as a startup drive, Apple is providing functionality in the csrutil tool referenced in the KBase article to add NetBoot servers to a whitelist.

This whitelist will define by IP address which NetBoot servers are trusted in your environment. Once those IP addresses are part of the whitelist, the bless command can set a Mac to NetBoot from a NetBoot set on a trusted NetBoot server.

To hopefully help clarify the issue, please see the graphic below.

SIP PSA 001

Meanwhile, there also appears to be an error in the KBase article. The section with the error is below:

Screen Shot 2015 09 05 at 11 09 01 AM

The last sentence includes this part:

“…using the bless command-line tool.” That is incorrect, as bless is not able to tell the Mac to trust the NetBoot server.

The correct way to tell the Mac to trust the NetBoot server is to use the new csrutil tool:

“…using the csrutil command-line tool.”

With that change, the section should now read as follows:


Add a trusted NetBoot server

The System Integrity Protection feature of OS X El Capitan requires that you tell your Mac to trust the NetBoot server. You can do that by using the Bless NetBoot Server action in the System Image Utility app, or by using the csrutil command-line tool.


To help get this issue corrected, I’ve filed a bug report on this KBase article. For those interested in duping it, it’s bug ID 22575339.

For those interested in the details, I’ve also posted the bug report to Open Radar:

https://openradar.appspot.com/22575339


System Integrity Protection and the end of XProtect management for browser plug-ins

$
0
0

OS X El Capitan adds a new security feature named System Integrity Protection (SIP). Among other things, SIP prevents parties other than Apple from adding, deleting or modifying directories and files stored in certain directories:

  • /bin
  • /sbin
  • /usr
  • /System

Apple has indicated that the following directories are available for developers to access:

  • /usr/local
  • /Applications
  • /Library
  • ~/Library

All directories in /usr except for /usr/local are protected by SIP.

SIP’s protection of /System affects XProtect’s XProtect.plist and XProtect.meta.plist configuration files as they are stored in the following location inside /System:

/System/Library/CoreServices/CoreTypes.bundle/Contents/Resources/XProtect.plist
/System/Library/CoreServices/CoreTypes.bundle/Contents/Resources/XProtect.meta.plist

As the XProtect configuration files will be locked against editing on OS X El Capitan, this means that they can no longer be managed to allow older versions of the Flash and Java browser plug-ins to run.

If your shop includes a mission-critical system that requires using older Flash or Java browser plug-ins, I recommend working with your vendor and/or in-house developers to find out:

  1. If the use of the Java and/or Flash browser plug-ins can be discontinued.
  2. If their use can’t be discontinued, if the system in question can be updated to support the latest versions of these plug-ins and continue to be compatible as new versions of the Java and/or Flash browser plug-ins are released.

Update – 9-14-2015: Josh Dyson has pointed out that there is a way to allow older plug-ins to access specific sites.

By adding the needed sites to a whitelist in Safari and setting those specific sites to Allow Always, those sites’ functions will be accessible with the older browser plug-in even if XProtect would otherwise block the use of the plug-in. Websites not included in the whitelist would still have the use of the plug-in blocked.

Screen Shot 2015-09-14 at 8.20.10 PM

Apple has provided a KBase article showing how to manage Safari plug-in options, including how to whitelist websites, using a configuration profile. It’s available via the link below:

https://support.apple.com/HT202947


System Integrity Protection and resetting NVRAM

$
0
0

OS X El Capitan’s new System Integrity Protection (SIP) security feature stores its active security configuration in NVRAM. This allows SIP’s configuration to persist across OS installs, but this design choice also means that resetting NVRAM will cause SIP to reset as well. In my testing, this reset will result in the following SIP configuration:

Resetting the NVRAM, otherwise known as a PRAM reset or PRAM zap, has been a standard part of the Mac troubleshooting toolkit for a long time and is performed by pressing and holding down the Option, Command (⌘), P, and R keyboard keys at startup.

PRAM zap

For shops that do not plan to change SIP’s default configuration or set a NetBoot whitelist, NVRAM resets causing SIP’s configuration to also reset should not affect normal operations.

However, for those shops who will need to maintain a NetBoot whitelist or a custom SIP configuration, I would advise education where needed about this change and how it affects SIP configuration in your environment.


PATH environment variables and Casper 9.8

$
0
0

In the wake of the release of Casper 9.8, where the Casper agent’s jamf and jamfAgent binaries have made their planned move from /usr/sbin to /usr/local/jamf/bin, a number of Casper-using folks who were used to running commands that referenced the jamf and jamfAgent binaries from Apple Remote Desktop (ARD) or other tools began to see errors that indicated that the jamf and jamfAgent binaries could not be found.

Screen Shot 2015 09 23 at 8 23 05 PM

Screen Shot 2015 09 23 at 8 11 28 PM

Conversely, opening a Terminal session and running the exact same command works fine.

Screen Shot 2015 09 23 at 8 21 14 PM

Why are different tools acting differently? The root cause is that they each have different PATH environmental variables, usually referred to as $PATH. For more details, see below the jump.

PATH environmental variables define which directories in the OS are searched for commands. When a command name is specified, the OS searches through the directories defined in the PATH environmental variables, examining each directory and looking for an program which matches the command name. Once the OS finds it, that command is executed.

However, if a command is not found as a result of this search, an error results instead of the command being executed.

By default, a Terminal session in OS X will have the following PATH environmental variables:

/usr/local/bin:/usr/bin:/bin:/usr/sbin:/sbin

The jamf and jamfAgent binaries are located in /usr/local/jamf/bin, but JAMF also added symlinks to /usr/local/bin for both of these binaries. Because /usr/local/bin is included in the OS’s search, /usr/local/bin/jamf and /usr/local/bin/jamfAgent can be run in Terminal using just the commands jamf and jamfAgent.

In contrast, Apple Remote Desktop has different PATH environmental variables:

/bin:/sbin:/usr/bin:/usr/sbin:/System/Library/CoreServices/RemoteManagement/ARDAgent.app/Contents/Support

As /usr/local/bin is not referenced in ARD’s $PATH, the OS does not know to search that directory. As a consequence, /usr/local/bin/jamf and /usr/local/bin/jamfAgent are not located and an error results.

A similar situation applies to LaunchD items, like LaunchAgents and LaunchDaemons. LaunchD items have the following PATH environmental variables:

/usr/bin:/bin:/usr/sbin:/sbin

As with ARD,  /usr/local/bin is not referenced in LaunchD items’ $PATH and the OS does not know to search that directory.

A commonality between all three (Terminal, ARD and LaunchD) is that they all include /usr/sbin as part of their $PATH, so the /usr/sbin/jamf and /usr/sbin/jamfAgent binaries are always found when Terminal, ARD and LaunchD items search for those commands.

This condition does not apply to /usr/local/bin, as only Terminal sessions include /usr/local/bin as part of $PATH.

Now that the root cause of the issue has been identified, what can be done about it? A common solution is to refer to the complete directory path to the command, starting from the root level. In the case of the jamf binary, one way to address this is to use /usr/local/bin/jamf in scripts and commands. That way, the OS doesn’t have to search for the command; it’s being told exactly where the command is.

However, a complication in the case of the Casper agent is that the location of the jamf and jamfAgent binaries depends on the operating system version, as JAMF made the decision to move the binaries only if the Mac in question is running 10.7.x or later.

Screen Shot 2015 09 23 at 8 23 06 PM

To help address the issue of the jamf binary being in one of two possible locations, I’ve added a task template for running commands using Casper’s jamf binary to ARD’s Send Unix function:

The script above contains a function called CheckBinary, which populates a variable named $jamf_binary. The script calls the CheckBinary function before running commands which reference $jamf_binary, in place having to hardcode /usr/sbin/jamf or /usr/local/bin/jamf in the script.

Screen Shot 2015 09 23 at 6 07 15 PM

The CheckBinary function can also be added to scripts which are being triggered by LaunchD items, allowing the jamf binary to be located correctly by the OS before running commands using the jamf binary.


Downloading older versions of OS X using Recovery

$
0
0

As of September 28th, 2015, Apple has apparently removed the listings for older versions of OS X and other discontinued software from the Purchased tab of users who had previously purchased or downloaded them.

Screen Shot 2015 09 28 at 7 29 18 PM

With this software unavailable in the Mac App Store, this change means that it’s no longer possible to download the following versions of OS X from the Mac App Store:

  • Mac OS X Lion
  • OS X Mountain Lion
  • OS X Mavericks


Update – 9-29-2015: The listings for older versions of OS X and other discontinued software have re-appeared in the Purchased tab as of this morning, so this software is now available for download again.

Screen Shot 2015-09-29 at 6.59.12 AM


Fortunately, it’s still possible to download installers for these versions of OS X, provided you have access to a Mac or virtual machine running the version of OS X that you need to download. For more details, see below the jump.

When reinstalling your OS using Recovery HD, Apple will send you the correct installer for the OS which your hardware shipped with. It does this by looking at the type of Mac you have and the serial number. Once it has those, your Mac will have the correct installer pushed to it. Once your Mac has the installer fully downloaded, it will then reboot and install OS X.

This behavior will also apply to reinstalling in a VM, but Apple will instead provide the generic OS X installer previously available in the Mac App Store instead of a hardware-specific OS X installer.

You can use this behavior to capture the InstallESD disk image that Apple uses for the OS X installer. Here’s what you need to do:

1. Boot your Mac or VM from your Recovery HD partition by holding down Command-R at startup

2. Connect an erased external disk with at least 10 GBs of free space

3. Select the Reinstall Mac OS X or Reinstall OS X option and select your external disk

Screen Shot 2015 09 28 at 4 09 38 PM


Screen Shot 2015 09 28 at 4 10 15 PM

4. Provide your Apple ID if prompted. This Apple ID must have previously been used to download the desired version of OS X from the Mac App Store.


Screen Shot 2015 09 28 at 4 10 35 PM

5. The OS X installer files will download to the external disk.

Screen Shot 2015 09 28 at 4 14 05 PM

6. Once the installer finishes downloading and prompts you to restart, shut down instead.

7. Disconnect the external disk

8. Boot from your Mac’s regular boot drive.

9. Reconnect the external disk

When you take a look at the external disk, you will find a directory called Mac OS X Install Data or OS X Install Data. Inside that folder is the InstallESD.dmg disk image file for that version of OS X.

Screen Shot 2015 09 28 at 8 48 52 PM

I’ve verified that this method works for the following versions of OS X:

Mac OS X Lion
OS X Mountain Lion
OS X Mavericks

This method also works with Apple’s Internet Recovery. In the event that you don’t have a Recovery HD partition, but your Mac supports Internet Recovery, you can boot to Internet Recovery using Command-R.

If you have a Recovery HD partition, but want to boot from Internet Recovery anyway, you can boot to Internet Recovery using Command-Option-R.


Outlook 2011, OS X El Capitan and the Pinwheel of Patience

$
0
0

If you’re planning to upgrade to OS X El Capitan and you use Outlook 2011 to get email from Microsoft Exchange, you may want to delay upgrading. On El Capitan, connecting to Exchange email servers causes Outlook 2011 to freeze and display a beachball cursor.

 Outlook Pinwheel of Patience

The issue appears to only affect Outlook 2011 when configured to access Exchange servers. When set up with only IMAP accounts, Outlook 2011 does not appear to display this behavior.

Microsoft is aware of the issue and has posted a knowledgebase article about it:

https://support.microsoft.com/kb/3098396


System Integrity Protection – Adding another layer to Apple’s security model

$
0
0

As part of the release of OS X El Capitan, Apple has added a new layer named System Integrity Protection (SIP) to its security model. To understand how System Integrity Protection fits in, let’s first take a look at Apple’s security model as it existed as of OS X Yosemite.

OS X Defenses


Gatekeeper

Gatekeeper is one of the outer lines of defense. It allows users to restrict which sources they can install applications from, with the general idea being that malware will not be from an allowed source.


Sandboxing

OS X also uses sandboxing extensively. A sandbox typically provides a tightly controlled set of resources for programs to run in. Network access, the ability to inspect the host system, or reading from input devices is usually disallowed or heavily restricted.


POSIX permissions

OS X uses the Unix permissions model as defined by POSIX, which governs which users and groups can access which files and directories. If a particular user account requests access to a particular file or directory and does not have the necessary rights, that account is refused access.


Keychains

The innermost layer of defense are keychains. Keychains are very specialized databases which are designed for the storing of secrets, like passwords, private keys, PIN numbers, and then controlling access to those secrets. To help protect these secrets, keychains are encrypted.


There’s an issue with this model though and it’s been there for decades. It pre-exists OS X and even pre-exists Apple as a company. That issue is found in the POSIX permissions layer.

OS X defenses with POSIX highlighted

Root

Whoami root


Root is the superuser for a Unix system and the Unix permissions model is designed around the assumption that root has access to everything. Apple has not ignored this issue and has put some controls in place to limit the actual root user. These controls include disabling the root user account, discouraging its use, and providing ways to access elevated or root privileges using other means.

However, the root user account is still present and still can do anything on the system.


System Integrity Protection

To limit what the superuser can do and add another layer to OS X’s security model, Apple has developed SIP and deployed it as part of OS X El Capitan. SIP is designed to limit the power of root and to protect the system even from the superuser. For more details, see below the jump.

SIP is an overall security policy with the goal of preventing system files and processes from being modified by third parties. To achieve this, it has the following concepts:

  • File system protection
  • Runtime protection
  • Kernel extension protection

File system protection

SIP prevents parties other than Apple from adding, deleting or modifying directories and files stored in certain directories:

  • /bin
  • /sbin
  • /usr
  • /System

Apple has indicated that the following directories are available for developers to access:

  • /usr/local
  • /Applications
  • /Library
  • ~/Library

All directories in /usr except for /usr/local are protected by SIP.

It is possible to add, remove or change SIP-protected files and directories via an installer package which is signed by Apple’s own certificate authority. This allows Apple to make changes to SIP-protected parts of the OS without needing to change the existing SIP protections.

Sip disabling apple installer certificate

The certificate authority in question is reserved by Apple for their own use; Developer ID-signed installer packages are not able to alter SIP-protected files or directories.

To define which directories are protected, Apple has currently defined two configuration files on the filesystem. The primary one is found at the location below:

/System/Library/Sandbox/rootless.conf

The rootless.conf file lists all the applications and the top-level of directories which SIP is protecting.

Full rootless conf

Applications

SIP is protecting the core apps which OS X installs into /Applications and /Applications/Utilities.

Rootless applications

Rootless applications utilties

This means it will no longer be possible to delete the applications which OS X installs, even from the command line when using root privileges.


Directories

SIP is also protecting a number of directories and symlinks outside of /Applications and the top level of those directories are also listed in the rootless.conf file. In addition to protections, Apple has also defined some exceptions to SIP’s protection in the rootless.conf file, and those exceptions are marked with asterixes. These exemptions from SIP’s protection mean that it is possible to add, remove or change files and directories within those locations.

Rootless exceptions

Among those exceptions are the following:

/System/Library/User Template – where OS X stores the template directories it uses when creating home folders for new accounts.
/usr/libexec/cups – where OS X stores printer configuration information

When I’ve spoken with Apple engineers about how this configuration file was updated and if third parties could add their own exceptions to it, it was made clear that Apple considers this file theirs and that any third parties’ changes to it would be overwritten by Apple.

To see which files have been protected by SIP, use the ls command with the capital O flag in Terminal:

ls -O

SIP-protected files will be labeled as restricted.

SIP protected root level directories

One important think to know is that even if a symlink is protected by SIP, that does not necessarily mean that the directory they’re linking to is being protected by SIP. At the root level of an OS X El Capitan boot drive, there are several SIP-protected symlinks pointing to directories stored inside the root-level directory named private.

However, when the contents of the directory named private are examined, the directories which those symlinks point to are not protected by SIP and both they and their contents can be moved, edited or changed by processes using root privileges.

Non SIP protected directories inside the private directory


In addition to the list of SIP exceptions which Apple has set in rootless.conf, there is a second list of SIP exceptions. This list includes a number of directories and application names for third-party products. Similar to rootless.conf, this exclusion list is Apple’s and any third parties’ changes to it will be overwritten by Apple.

/System/Library/Sandbox/Compatibility.bundle/Contents/Resources/paths

Runtime protection

SIP’s protections are not limited to protecting the system from filesystem changes. There are also system calls which are now restricted in their functionality.

  • task_for_pid() / processor_set_tasks() fail with EPERM
  • Mach special ports are reset on exec(2)
  • dyld environment variables are ignored
  • DTrace probes unavailable

However, SIP does not block inspection by the developer of their own applications while they’re being developed. Xcode’s tools will continue to allow apps to be inspected and debugged during the development process.

For more details on this, I recommend taking a look at Apple’s developer documentation for SIP.

Kernel extension protection

SIP blocks installation of unsigned kernel extensions. In order to install a kernel extension on OS X El Capitan with SIP enabled, a kernel extension must:

  1. Be signed with a Developer ID for Signing Kexts certificate
  2. Install into /Library/Extensions

If installing an unsigned kernel extension, SIP will need to be disabled first.

Managing SIP

To help ensure that third parties will not be able to disable these protections, SIP’s configuration is stored in NVRAM rather than in the file system itself and is only configurable if the Mac is booted into one of two environments:

Note: The OS X Installer and OS X Recovery environments are in fact the same environment from OS X’s perspective, with the main difference being that the OS X Installer environment contains a copy of the installation files for OS X and the Recovery environment does not.

Because SIP’s configuration is stored in NVRAM, SIP’s protection settings will apply to the entire machine and will persist even if the OS is reinstalled.

SIP can be managed to the extent of turning it on, turning it off, adding and removing IP addresses into a NetBoot whitelist and reporting on whether SIP is enabled or disabled. All changes to SIP’s configuration also require a reboot before they take effect.

The tool used to manage SIP is /usr/bin/csrutil. csrutil is able to work with SIP because it has a unique application entitlement assigned to it by Apple. This entitlement is viewable using the codesign command shown below:

codesign -d --entitlements - /usr/bin/csrutil

Csrutil application entitlement highlighted


When you run csrutil without any associated commands, it will pull up the help page.

Csrutil help


When booted from Recovery, the command used to enable SIP is csrutil enable:

csrutil enable

csrutil enable run inside Recovery

When booted from Recovery, the command used to turn SIP off is csrutil disable:

csrutil disable

csrutil disable run inside Recovery

When booted from Recovery, the command used to reset SIP’s configuration is csrutil clear:

csrutil clear

csrutil clear run inside Recovery

When csrutil clear is run, SIP goes back to its factory-default settings. That means SIP is enabled if it was disabled previously and any custom configuration is cleared out.


SIP and NetBoot

One of the custom configuration options available in SIP is the ability to set a whitelist for approved NetBoot servers. This whitelist is needed because the bless command in El Capitan is restricted by SIP from writing to NVRAM. This affects bless‘s ability to set Macs to boot from NetBoot sets because it needs to write that information to NVRAM.

This whitelist defines by IP address which NetBoot servers are trusted in your environment. Once those IP addresses are part of the whitelist, the bless command can set a Mac to NetBoot from a NetBoot set on a trusted NetBoot server. For more information about whether or not you need to whitelist your NetBoot server(s), please see the link below:

https://derflounder.wordpress.com/2015/09/05/netbooting-and-system-integrity-protection/

To help folks who need to use bless to set a NetBoot set as a startup drive, the csrutil tool includes functionality to add NetBoot servers to the whitelist. While booted from Recovery, use csrutil netboot add followed by an IP address to set the IP as being that of a NetBoot server approved for use by the bless command:

csrutil netboot add ip.address.here

Csrutil netboot add run inside recovery


While booted from Recovery, you can also remove NetBoot servers from the whitelist. To do this, use csrutil netboot remove followed by the IP address that you want to remove from the whitelist.

csrutil netboot remove ip.address.here

Csrutil netboot remove run inside recovery


To see which NetBoot servers have been added to the whitelist, run csrutil netboot list.

csrutil netboot list

Csrutil netboot list run inside recovery


Running csrutil outside Recovery

If you try to run the csrutil enable and csrutil disable commands while booted from a regular boot drive, you will receive a message that these commands need to be run from Recovery. The current SIP configuration will remain unchanged.

Csrutil enable run outside recovery

Csrutil disable run outside recovery


Likewise, if you try to run the csrutil netboot add and csrutil netboot remove commands while booted from a regular boot drive, you will receive the message that csrutil was unable to save the configuration and the status of the NetBoot whitelist will remain unchanged.

Csrutil netboot add run outside recovery

Csrutil netboot remove run outside recovery


What can be run while booted from a regular boot drive is csrutil’s reporting functions. For example, to learn if SIP is enabled or disabled, run csrutil status.

csrutil status

Csrutil status

This command can be run without root privileges and will tell you if SIP is on or off.

If SIP is off, you may receive a confusing message which indicates that SIP is enabled, followed by a list of individual SIP functions which are disabled. If all functions listed are showing as being disabled, SIP is actually completely disabled; it’s just confusingly worded.

Csrutil status disabled run outside recovery


I actually have a bug report on this message. For those who wish to dupe it, it is bug ID 22361698 and is cross-posted to Open Radar here:

https://openradar.appspot.com/radar?id=4932475130216448


Likewise, you can run csrutil netboot list and it will report on which IPs have been set as allowed NetBoot sources when using the bless command.

Csrutil netboot list run outside recovery


Other custom SIP configuration options

It is also possible to enable SIP protections and selectively disable aspects of it, by adding one or more flags to the csrutil enable command. All require being booted from Recovery in order to set them:

Enable SIP and allow installation of unsigned kernel extensions

csrutil enable --without kext

Csrutil enable kext disabled run inside recovery


When this option is enabled, running csrutil status should produce output similar to this.

Csrutil status enabled kext disabled run outside recovery


Enable SIP and disable filesystem protections

csrutil enable --without fs

Csrutil enable fs disabled run inside recovery


When this option is enabled, running csrutil status should produce output similar to this.

Csrutil status enabled fs disabled run outside recovery

Enable SIP and disable debugging restrictions

csrutil enable --without debug

Csrutil enable debug disabled run inside recovery

When this option is enabled, running csrutil status should produce output similar to this.

Csrutil status enabled debug disabled run outside recovery

Enable SIP and disable DTrace restrictions

csrutil enable --without dtrace

Csrutil enable dtrace disabled run inside recovery

When this option is enabled, running csrutil status should produce output similar to this.

Csrutil status enabled dtrace disabled run outside recovery

Enable SIP and disable restrictions on writing to NVRAM

csrutil enable --without nvram

Csrutil enable nvram disabled run inside recovery

When this option is enabled, running csrutil status should produce output similar to this.

Csrutil status enabled nvram disabled run outside recovery

Conclusion

SIP is a big change, but I think it should also be considered a work in progress. I’m expecting to see additional changes to SIP’s functionality in both El Capitan and future releases of OS X, as Apple sees how SIP works in the real world.


Enabling an IPv6-only network using Internet Sharing on El Capitan

$
0
0

One of the hidden features of OS X El Capitan is the ability to enable Internet Sharing to provide only IPv6 addresses. This feature was added to El Capitan to help developers ensure their apps are ready to work with IPv6. It uses NAT64, which facilitates communication between IPv6 and IPv4 hosts by using a form of NAT.

For those interested in having the ability to set up an IPv6-only network, see below the jump for the procedure.

Pre-requisite:

A Mac running OS X 10.11.x

1. Open System Preferences

2. Option-click on the Sharing preference pane

Screen Shot 2015 10 05 at 7 37 22 AM


3. A Create NAT64 Network checkbox will appear (this may also be labeled Create IPv6 Only Network.)

Screen Shot 2015 10 05 at 7 36 10 AM


4. Check Create NAT64 Network.

Screen Shot 2015 10 05 at 7 36 29 AM

5. Select the interface to share out over

Screen Shot 2015 10 05 at 7 36 49 AM

6. Check the Internet Sharing checkbox

Screen Shot 2015 10 05 at 7 36 50 AM


7. When prompted, click the Start button

Screen Shot 2015 10 05 at 7 36 58 AM

8. An IPv6-only network should now be available.

Screen Shot 2015 10 05 at 7 37 05 AM


Configuring System Integrity Protection without booting to Recovery HD

$
0
0

One interesting part of Apple’s developer documentation for System Integrity Protection (SIP) is the note shown below, indicating that it’s possible to configure SIP for environments that can’t access Recovery.

Apple developer documentation for configuring SIP outside recovery

When I followed up with Apple about this, I was told that this meant I could configure it using NetBoot, using a NetBoot set that included the needed Recovery environment.

The example used was leveraging a new option in System Image Utility to create a package-only installation NetBoot set.

System image utility package only installation

This new type of NetBoot set is is designed to install only scripts, configuration profiles and packages as opposed to installing an OS. For more details, see below the jump.

To test this, I wrote a script that uses csrutil netboot add to add two IP addresses to the NetBoot whitelist.


Csrutil netboot add script


Once I had my script written, I built a package-only NetBoot set using System Image Utility and added the script to it.

Adding script to packages only netboot set

Once completed, I booted a VM running OS X El Capitan from the NetBoot set to verify that the process works.

To demonstrate how the process looks, I’ve made a video showing the following process:

  1. Running csrutil status and csrutil netboot list to show that the Mac has SIP enabled, but no entries in the NetBoot whitelist.
  2. NetBooting the VM from the packages-only NetBoot set
  3. The NetBoot set running the script and rebooting
  4. Running csrutil status to show that the Mac has SIP enabled and now also has the two IP addresses added to the NetBoot whitelist.


Note: The video has been edited to artificially reduce the amount of time it took to NetBoot and restart.


Viewing all 764 articles
Browse latest View live